> ## Documentation Index
> Fetch the complete documentation index at: https://help.coachiq.io/llms.txt
> Use this file to discover all available pages before exploring further.
# App Builder Overview & Navigation
> Master the App Builder interface to create and manage your athlete portal. Learn how to navigate sections, configure pages, and publish changes.
**Where to find this**: Dashboard → App (in the main navigation)
## What you'll accomplish
The App Builder is where you bring your athlete portal to life—no code required. In this guide, you’ll learn how to navigate its layout, customize sections, and publish updates so your athletes always see your latest content and schedules.earn how to navigate and use the App Builder interface to create a professional, customized experience for your athletes across web and mobile platforms.
## Understanding the App Builder layout
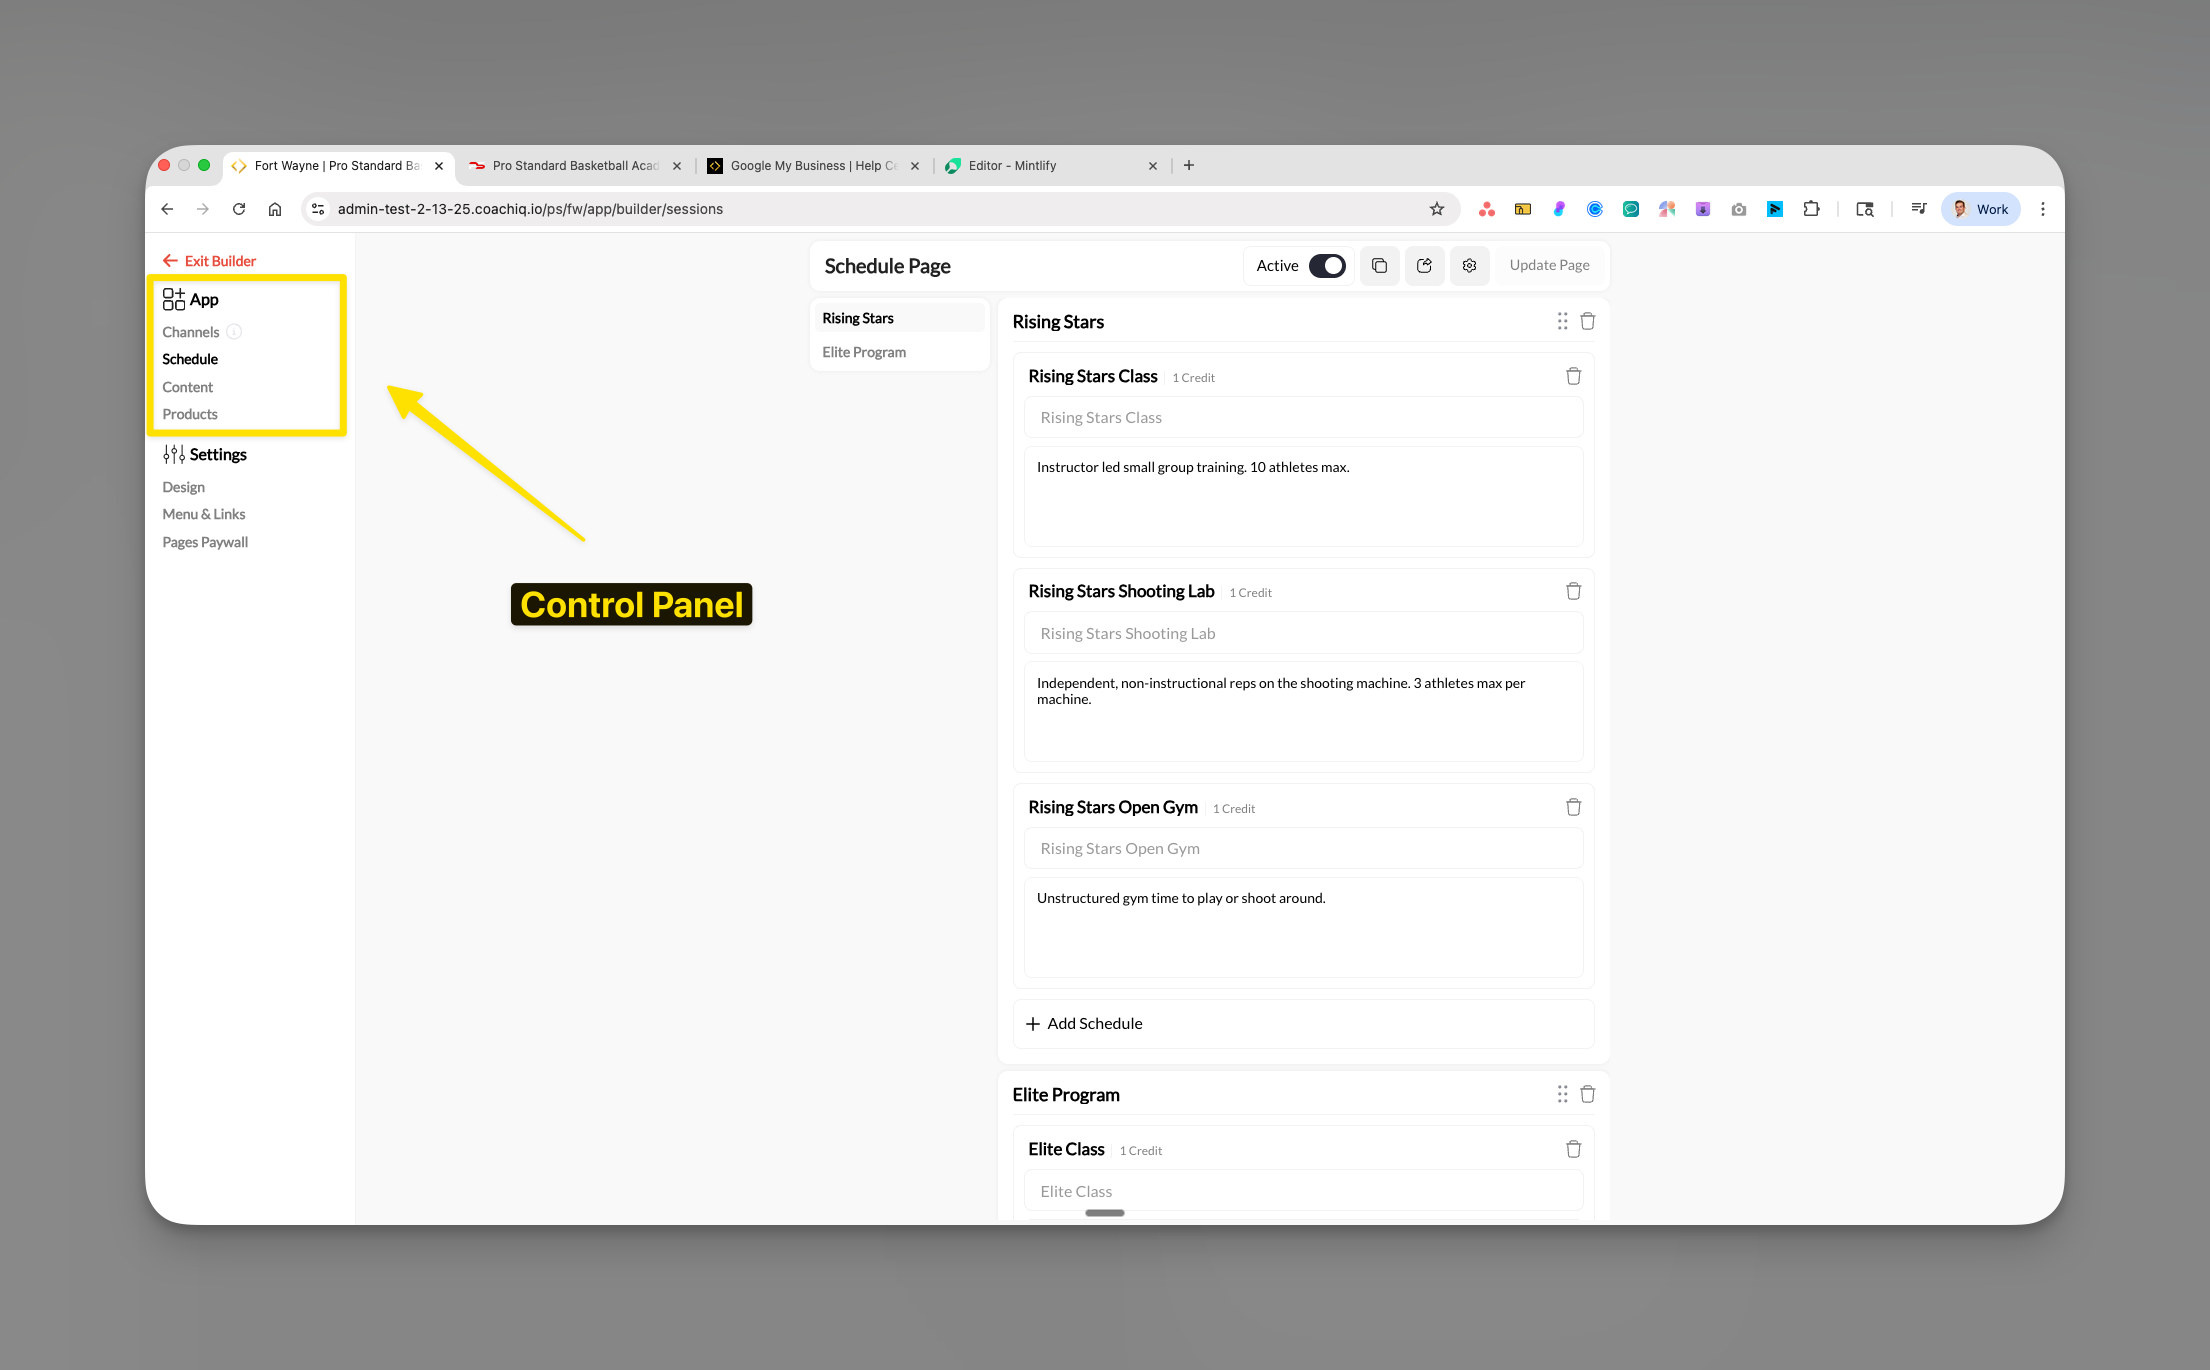
The App Builder uses a three-panel interface that gives you complete control over your athlete portal:
 ### Interface components
**Navigation hub** - Switch between pages and settings:
* Channels (communication)
* Schedule (bookings)
* Content (programs)
* Products (purchases)
* Settings (design & configuration)
**Configuration space** - Where you manage sections and items:
* Add/remove sections
* Configure schedulers
* Organize content
* Set descriptions
**Publishing controls** - Make changes live:
* Active toggle (on/off)
* Copy page button
* Preview option
* Update Page button
* Page Settings access
**Hierarchical structure** - Organize your content:
* Sections contain categories
* Categories contain items
* Items link to actual content
* Everything is customizable
## Navigating between pages
The App Builder organizes your athlete portal into distinct pages, each serving a specific purpose:
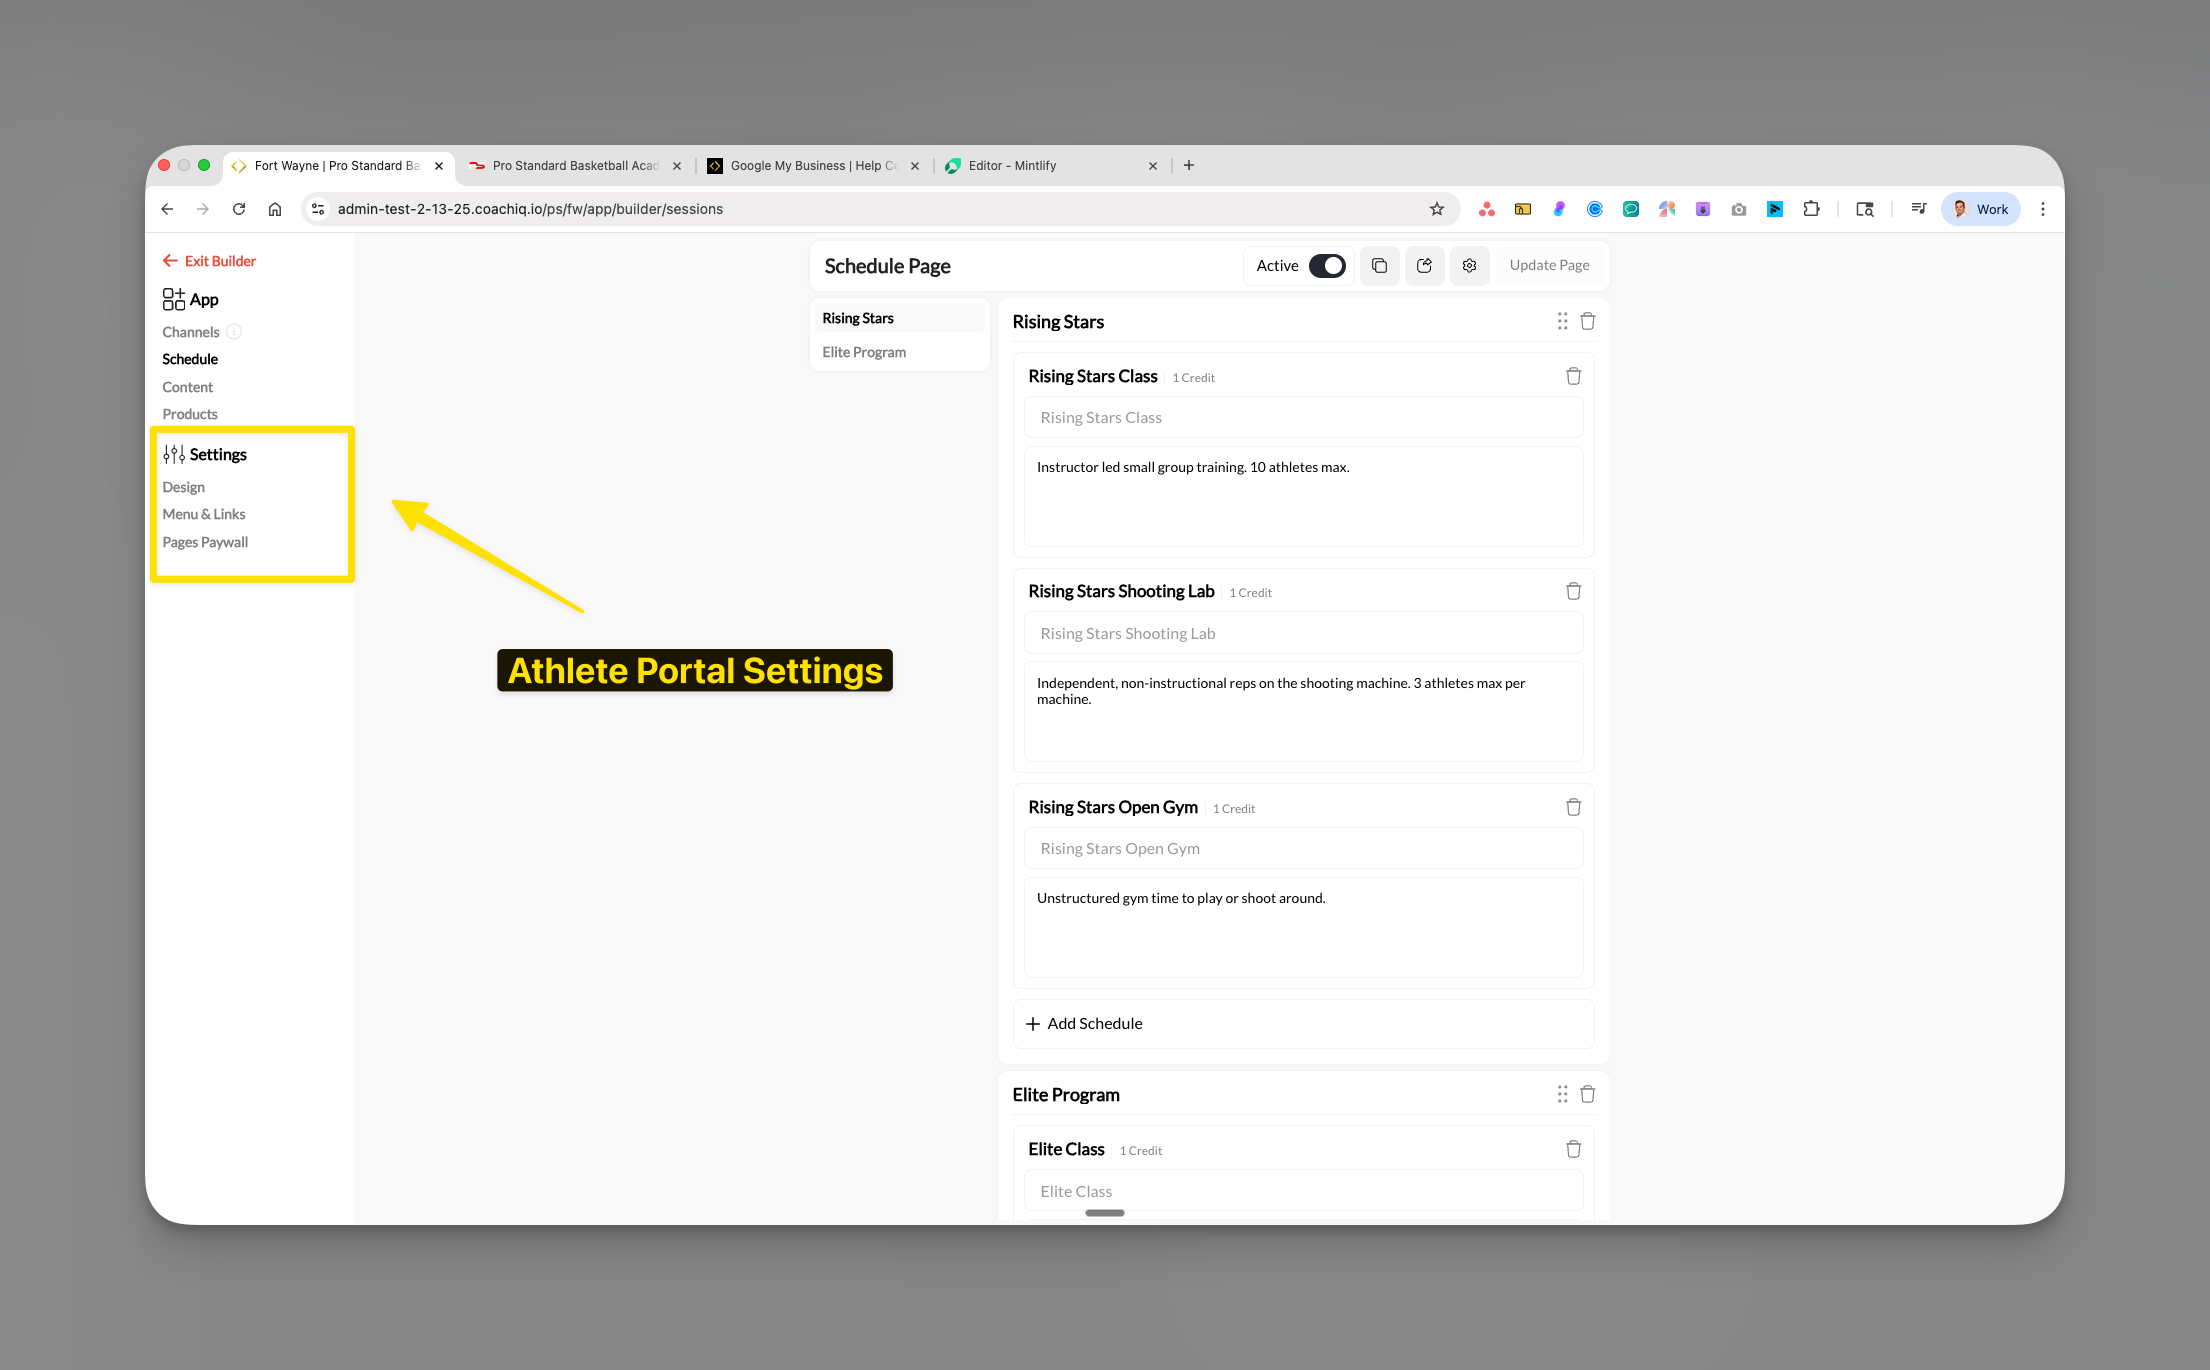
Use the left sidebar to navigate between the four core pages:
* **Channels**: Messaging and announcements
* **Schedule**: Session bookings and calendar
* **Content**: Programs and educational materials
* **Products**: Memberships and purchases
Click the **Settings** section in the sidebar to configure:
* **Design**: Themes and colors
* **Menu & Links**: Navigation visibility
* **Pages Paywall**: Access restrictions
### Interface components
**Navigation hub** - Switch between pages and settings:
* Channels (communication)
* Schedule (bookings)
* Content (programs)
* Products (purchases)
* Settings (design & configuration)
**Configuration space** - Where you manage sections and items:
* Add/remove sections
* Configure schedulers
* Organize content
* Set descriptions
**Publishing controls** - Make changes live:
* Active toggle (on/off)
* Copy page button
* Preview option
* Update Page button
* Page Settings access
**Hierarchical structure** - Organize your content:
* Sections contain categories
* Categories contain items
* Items link to actual content
* Everything is customizable
## Navigating between pages
The App Builder organizes your athlete portal into distinct pages, each serving a specific purpose:
Use the left sidebar to navigate between the four core pages:
* **Channels**: Messaging and announcements
* **Schedule**: Session bookings and calendar
* **Content**: Programs and educational materials
* **Products**: Memberships and purchases
Click the **Settings** section in the sidebar to configure:
* **Design**: Themes and colors
* **Menu & Links**: Navigation visibility
* **Pages Paywall**: Access restrictions
 ## Working with sections and items
Each page in your athlete portal is built using a section-based architecture:
### Adding new sections
Click on Schedule, Content, or Products in the left sidebar.
Find the **Add Section** button in the content area to create a new category.
## Working with sections and items
Each page in your athlete portal is built using a section-based architecture:
### Adding new sections
Click on Schedule, Content, or Products in the left sidebar.
Find the **Add Section** button in the content area to create a new category.
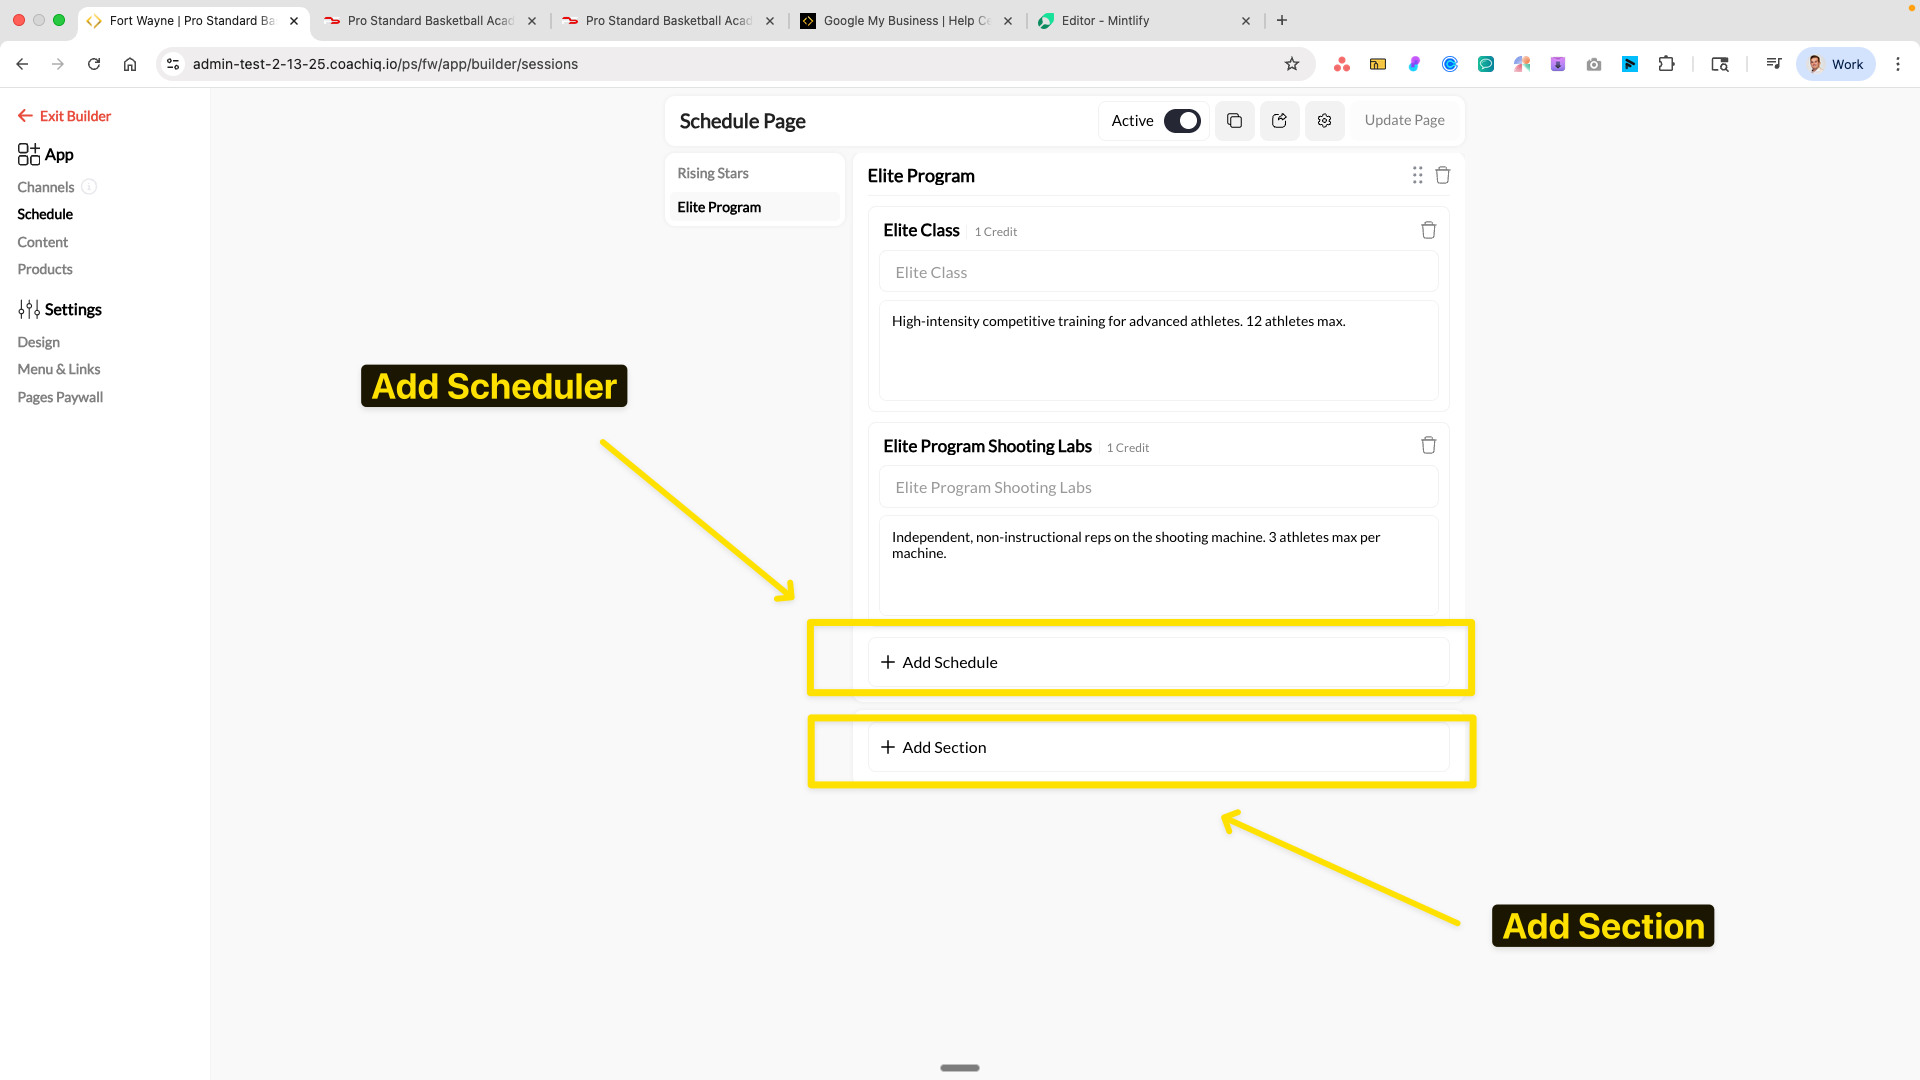 * Give it a descriptive name (e.g., "Rising Stars", "Elite Program")
* Add a description for clarity
* Set credit requirements if applicable
### Adding items to sections
Within each section, you can add specific items:
* **Schedule page**: Add schedulers (booking sessions)
* **Content page**: Add programs (courses/training)
* **Products page**: Add products (memberships/packages)
**Organization tip**: Name your sections based on how athletes will understand them - by location ("Downtown Gym"), by level ("Beginner Classes"), or by type ("Private Training").
## Understanding the preview system
The App Builder shows you exactly what athletes will see:
* Give it a descriptive name (e.g., "Rising Stars", "Elite Program")
* Add a description for clarity
* Set credit requirements if applicable
### Adding items to sections
Within each section, you can add specific items:
* **Schedule page**: Add schedulers (booking sessions)
* **Content page**: Add programs (courses/training)
* **Products page**: Add products (memberships/packages)
**Organization tip**: Name your sections based on how athletes will understand them - by location ("Downtown Gym"), by level ("Beginner Classes"), or by type ("Private Training").
## Understanding the preview system
The App Builder shows you exactly what athletes will see:
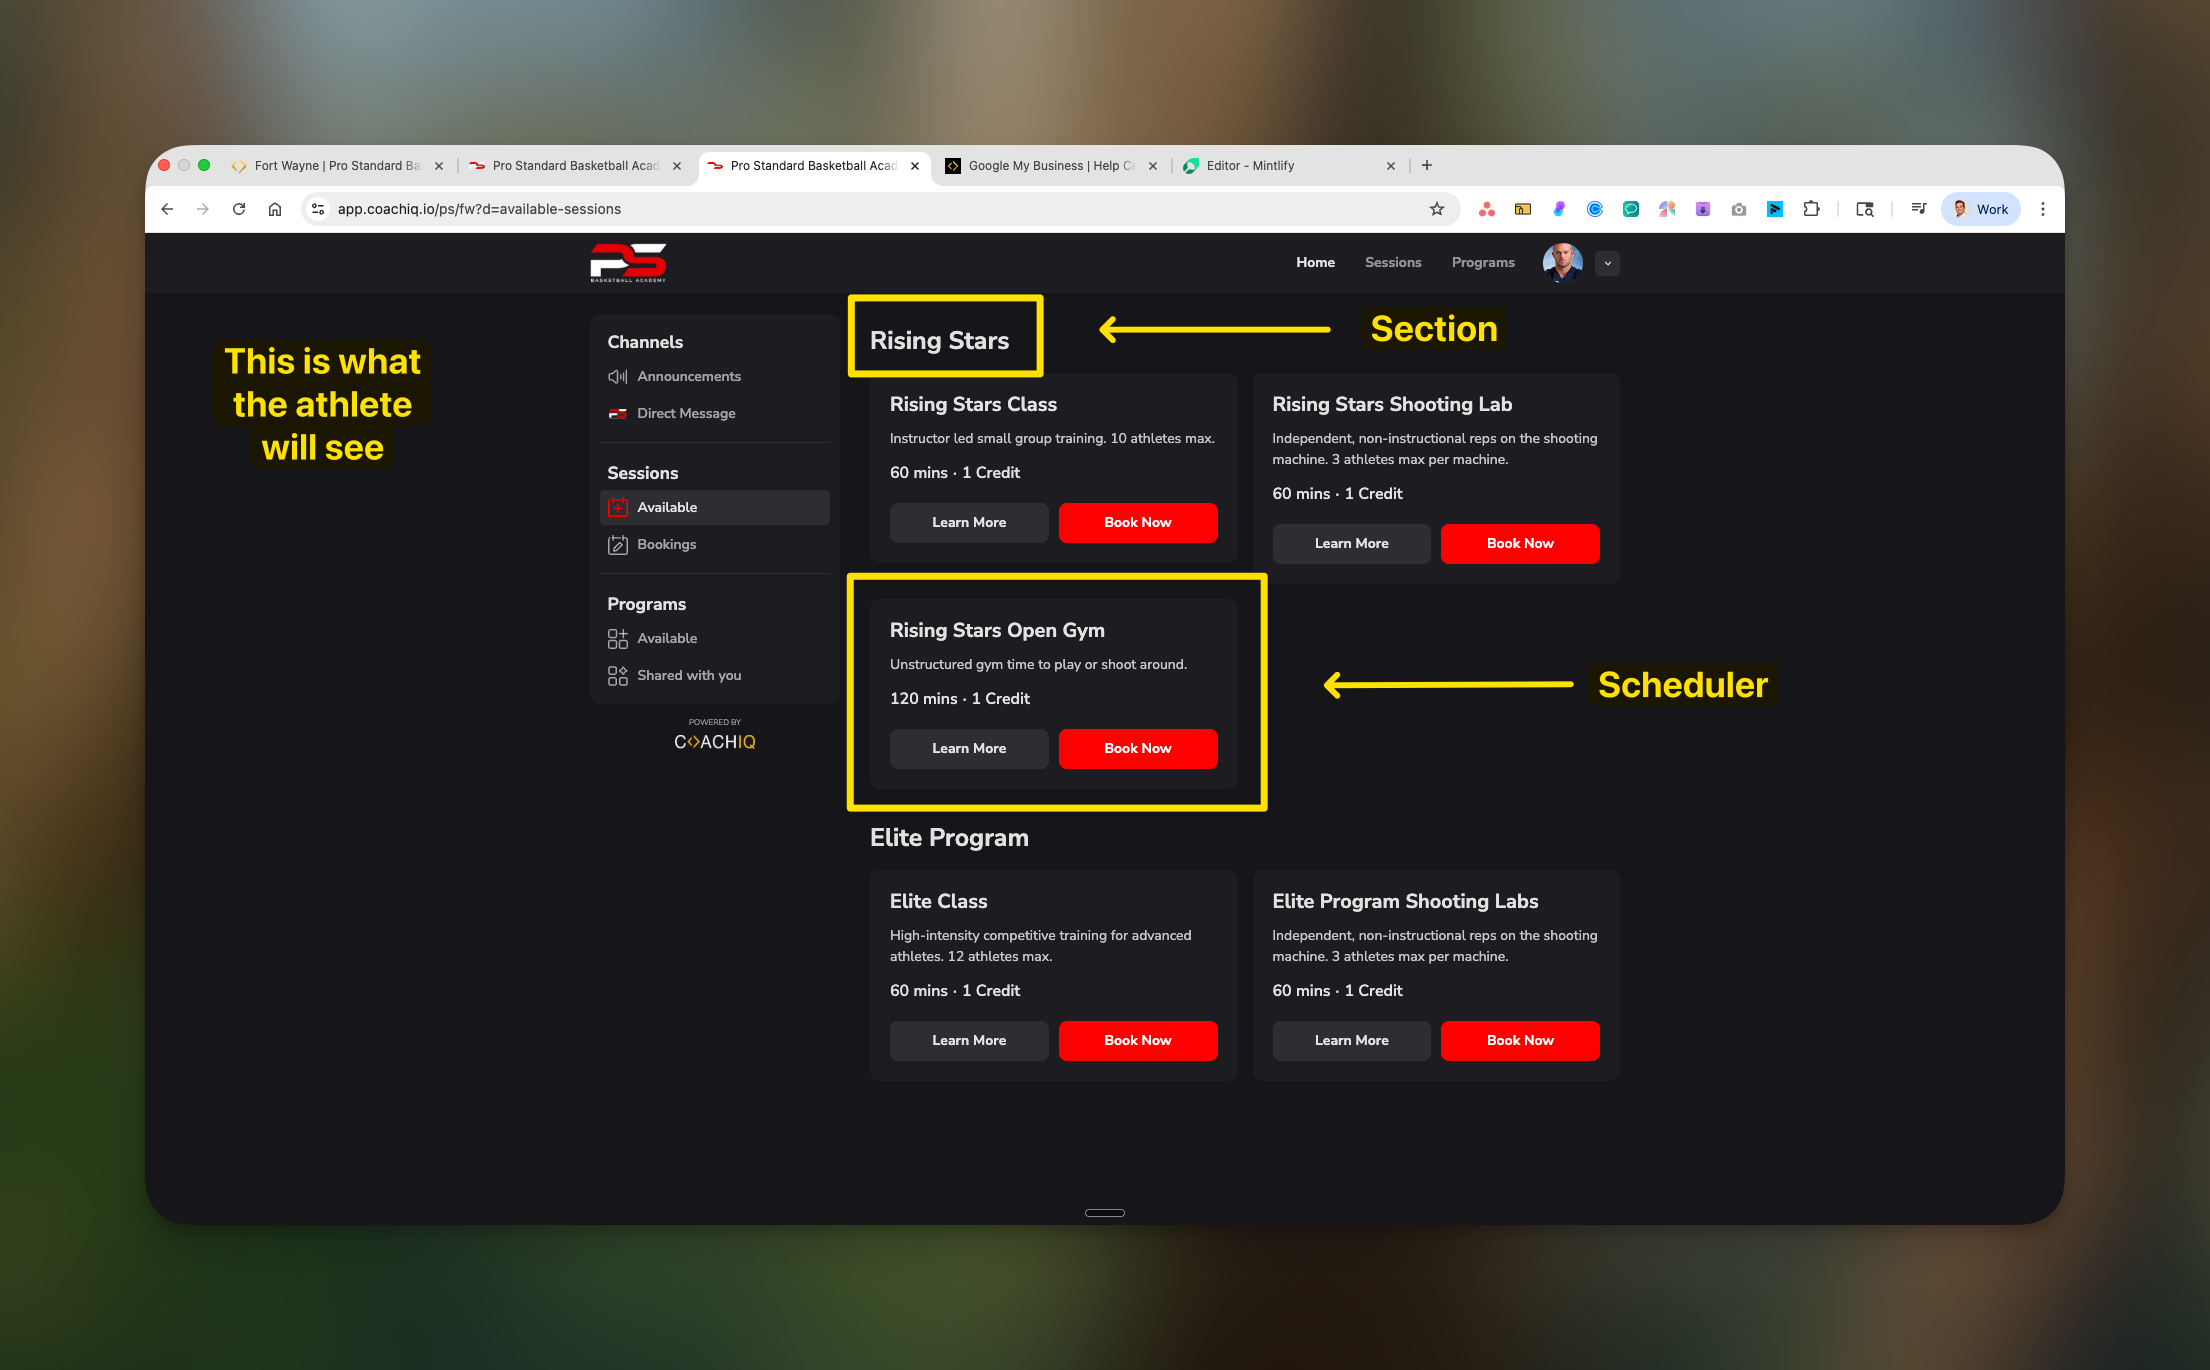 The athlete view (shown above) displays your sections as cards with:
* Section name and description
* Credit requirements
* "Book Now" or "Learn More" buttons
* Professional, branded appearance
## Page controls and settings
### Activating pages
Each page must be activated before athletes can see it:
Use the **Active** toggle in the top bar to enable/disable the entire page.
The athlete view (shown above) displays your sections as cards with:
* Section name and description
* Credit requirements
* "Book Now" or "Learn More" buttons
* Professional, branded appearance
## Page controls and settings
### Activating pages
Each page must be activated before athletes can see it:
Use the **Active** toggle in the top bar to enable/disable the entire page.
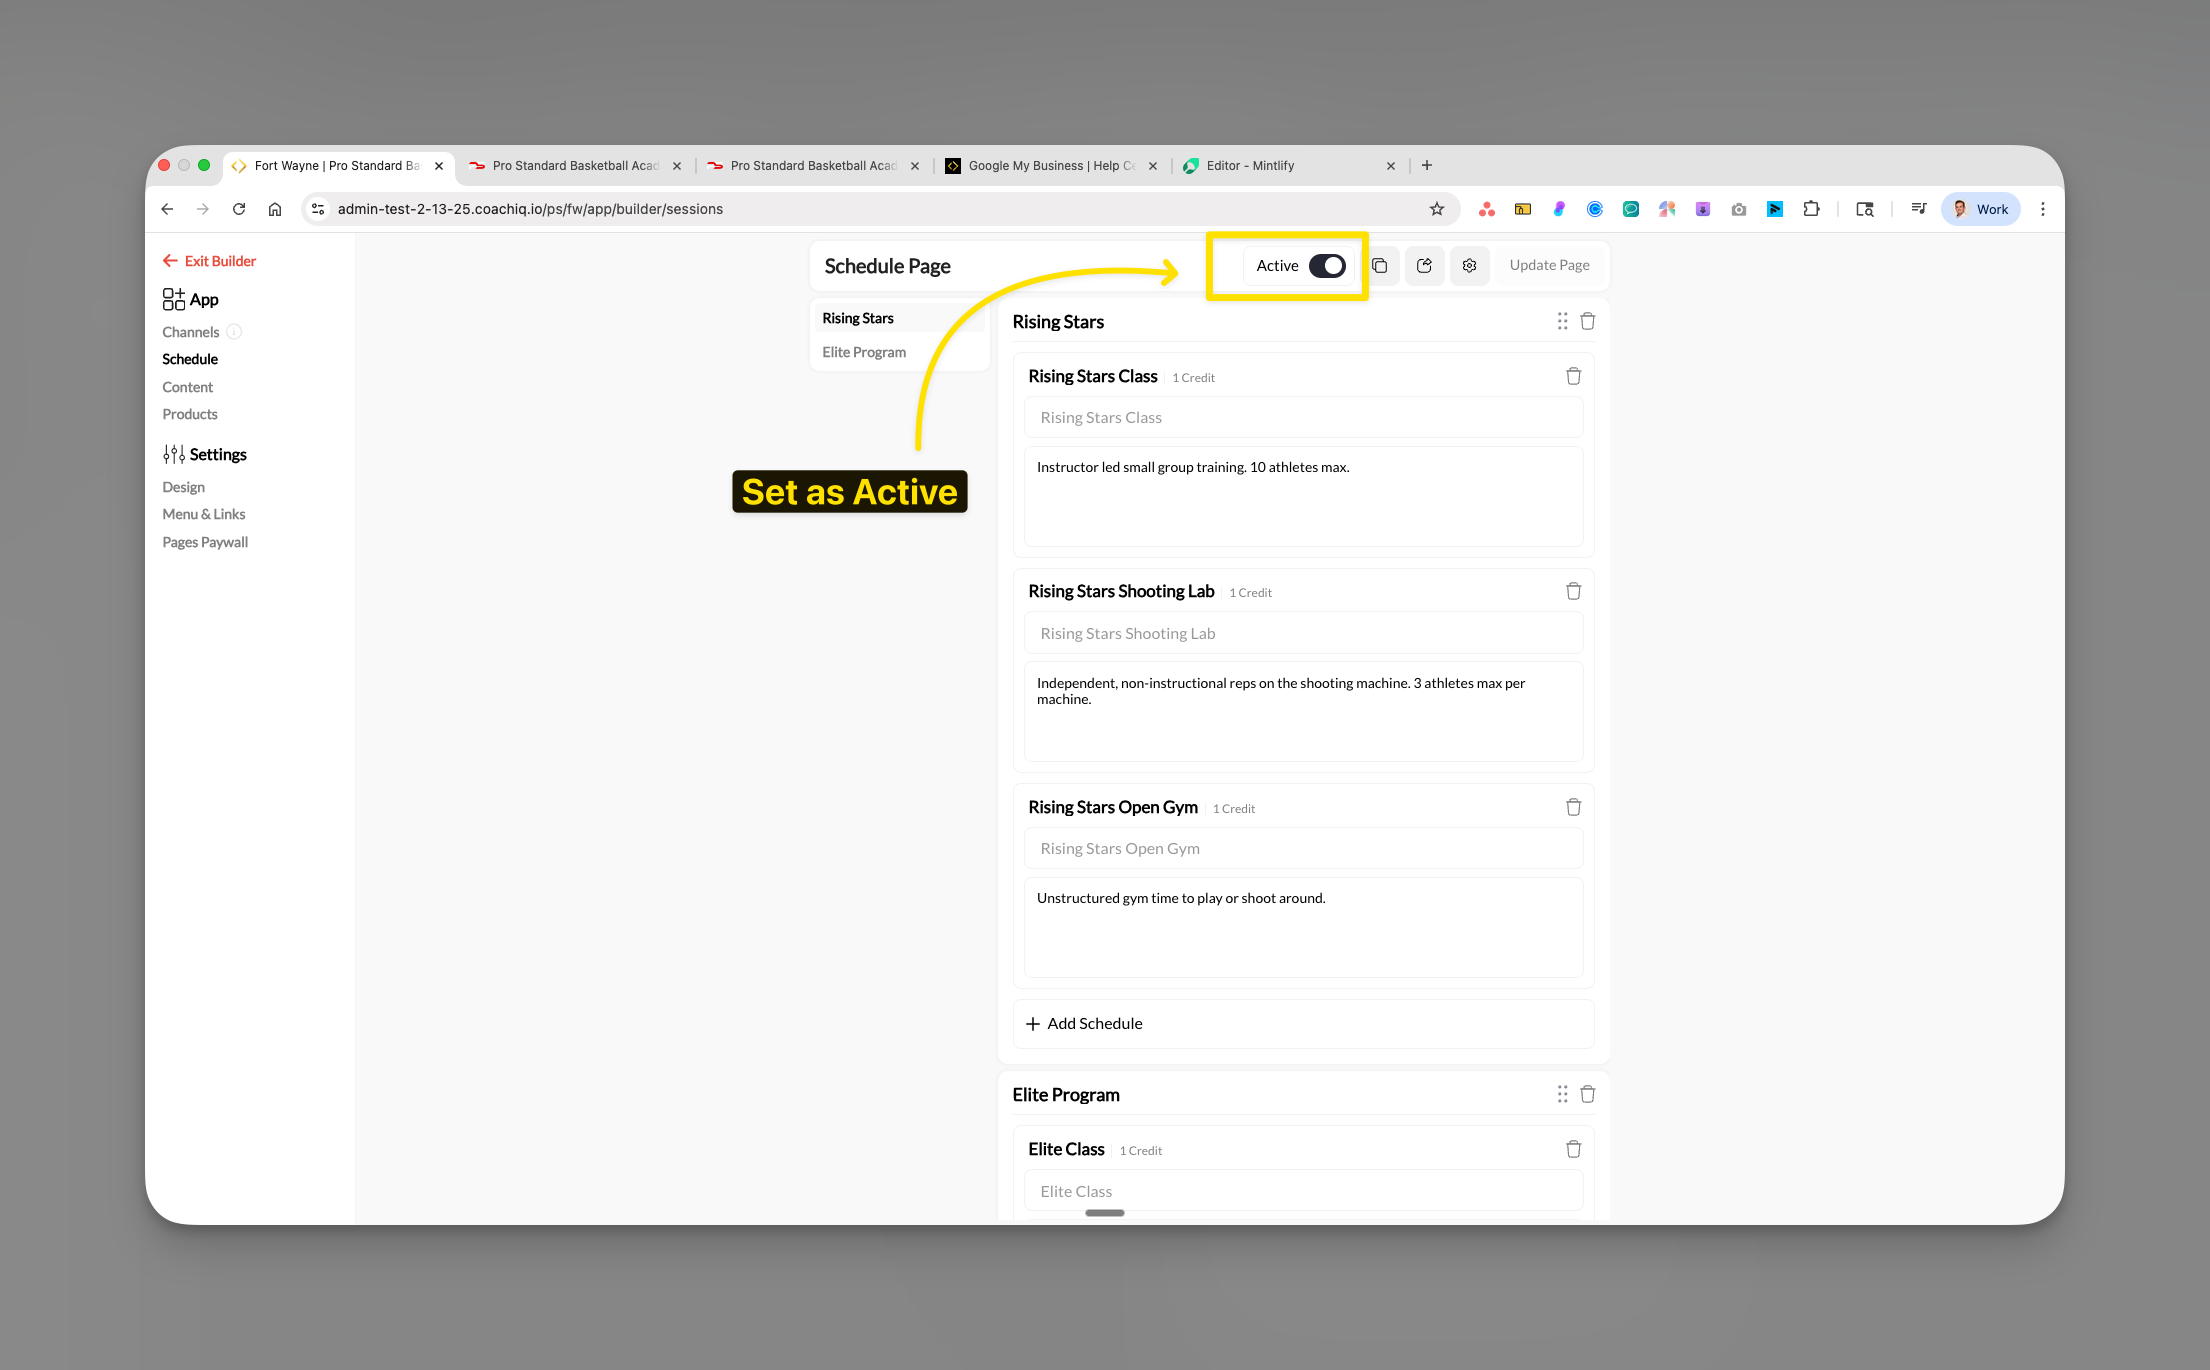 Even with a page active, you control its visibility through Settings → Menu & Links.
### Page-specific settings
Click the settings icons in the top bar to access:
Even with a page active, you control its visibility through Settings → Menu & Links.
### Page-specific settings
Click the settings icons in the top bar to access:
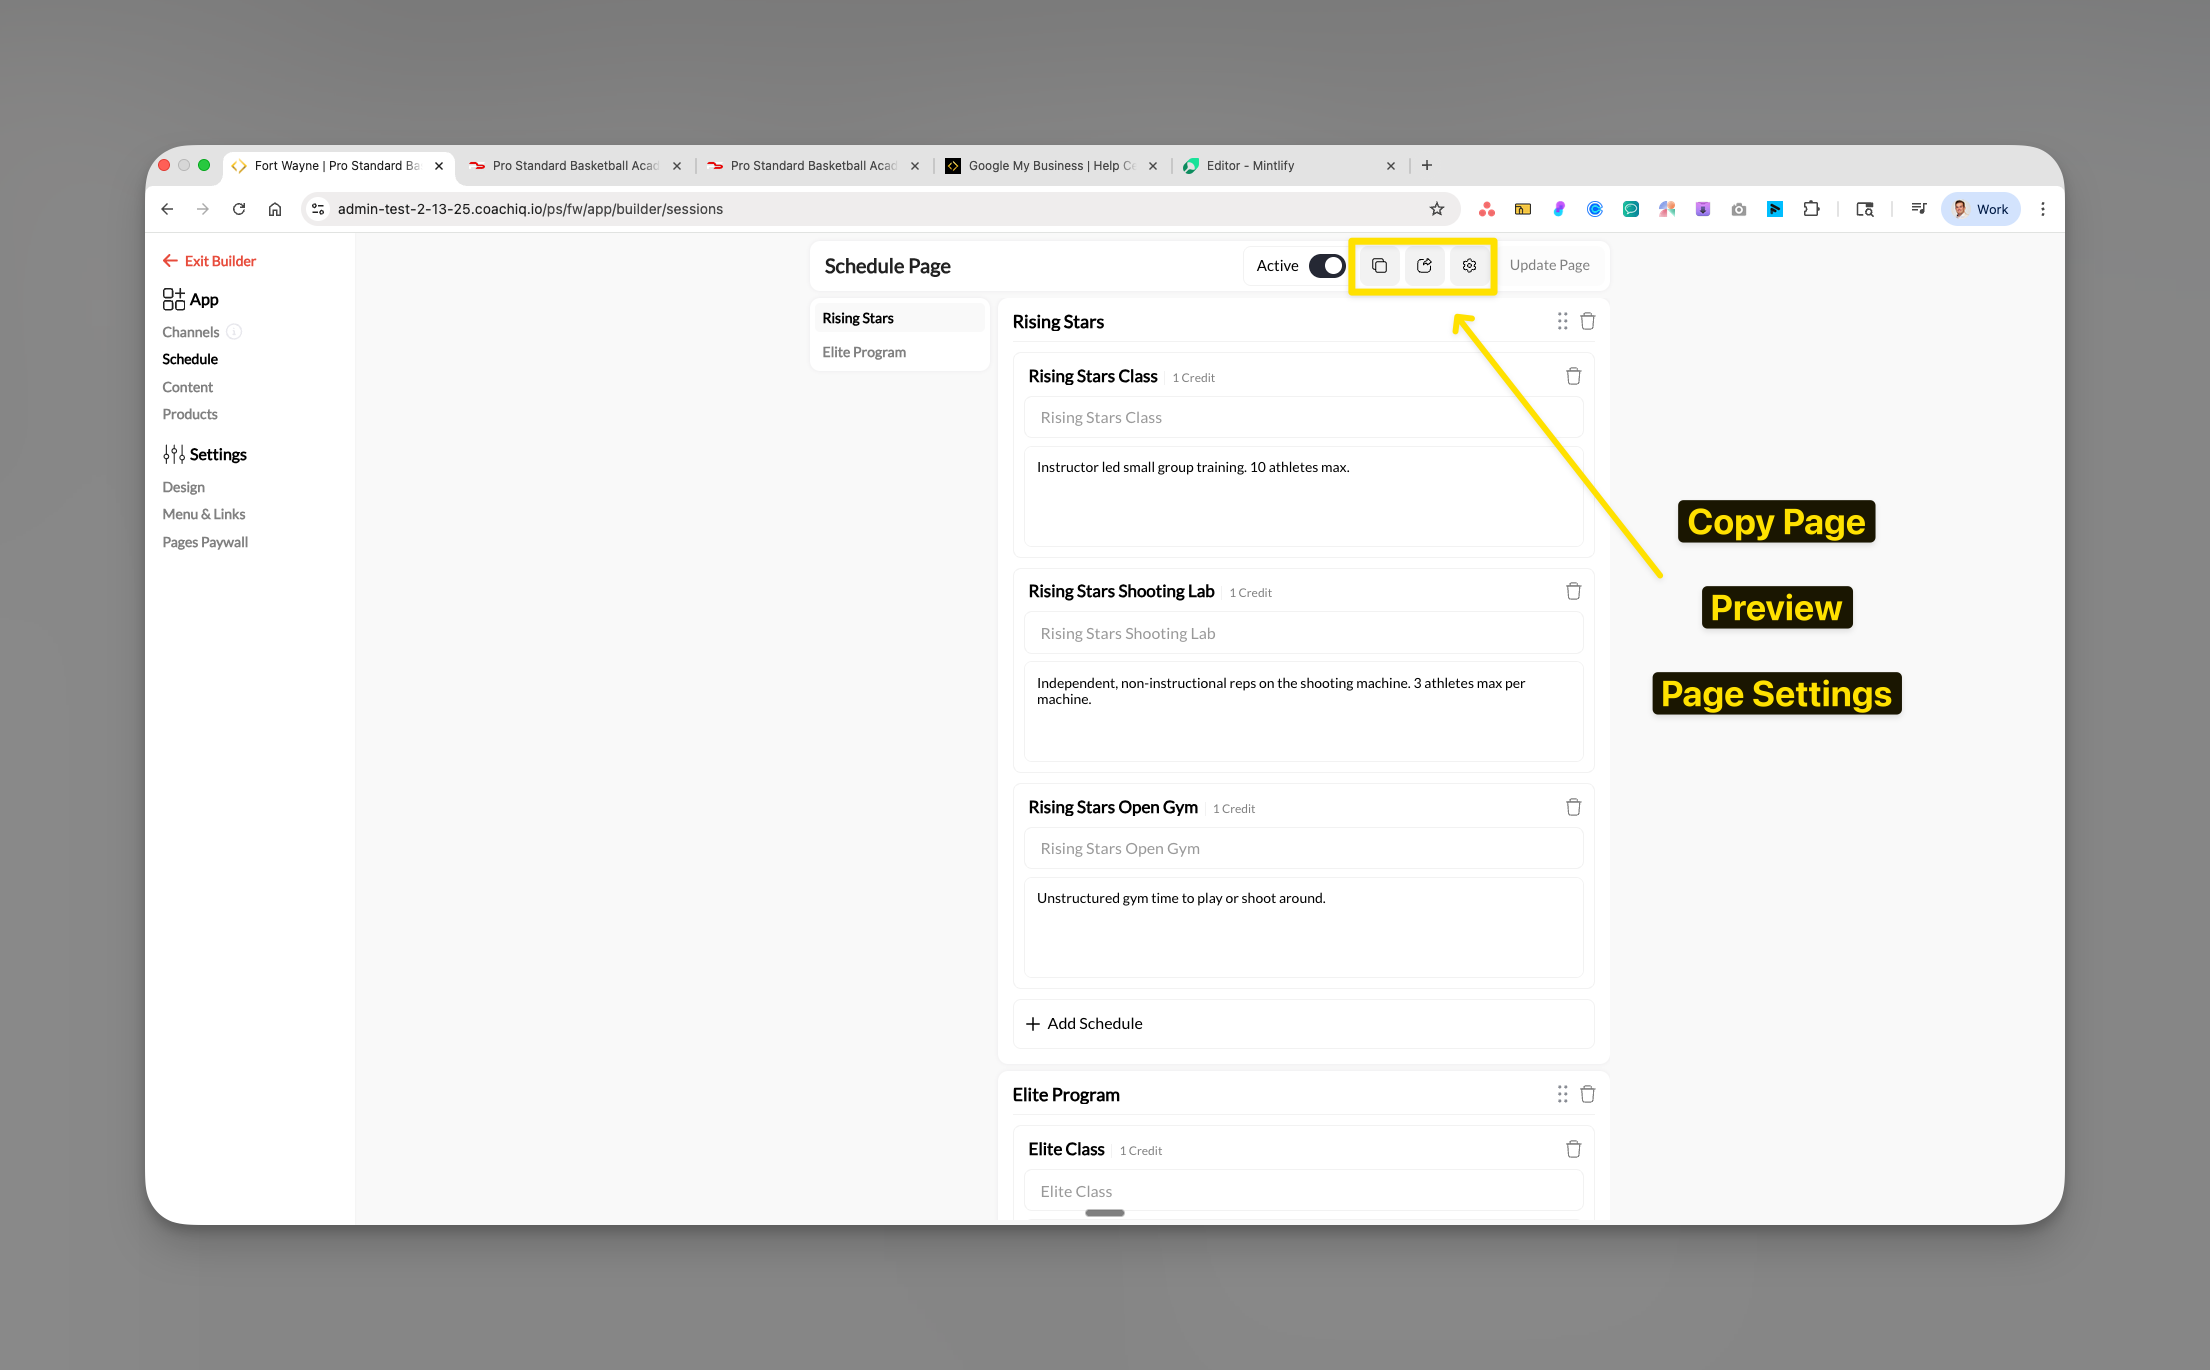 * **Copy Page**: Duplicate the entire page configuration
* **Preview**: See how the page looks to athletes
* **Page Settings**: Advanced configuration options
## Publishing your changes
**Important**: Changes are NOT live until you click "Update Page". Athletes continue seeing the previous version until you publish.
Add sections, configure items, adjust settings as needed.
Use the preview function to see how it will look to athletes.
The yellow **Update Page** button publishes all changes immediately.
* **Copy Page**: Duplicate the entire page configuration
* **Preview**: See how the page looks to athletes
* **Page Settings**: Advanced configuration options
## Publishing your changes
**Important**: Changes are NOT live until you click "Update Page". Athletes continue seeing the previous version until you publish.
Add sections, configure items, adjust settings as needed.
Use the preview function to see how it will look to athletes.
The yellow **Update Page** button publishes all changes immediately.
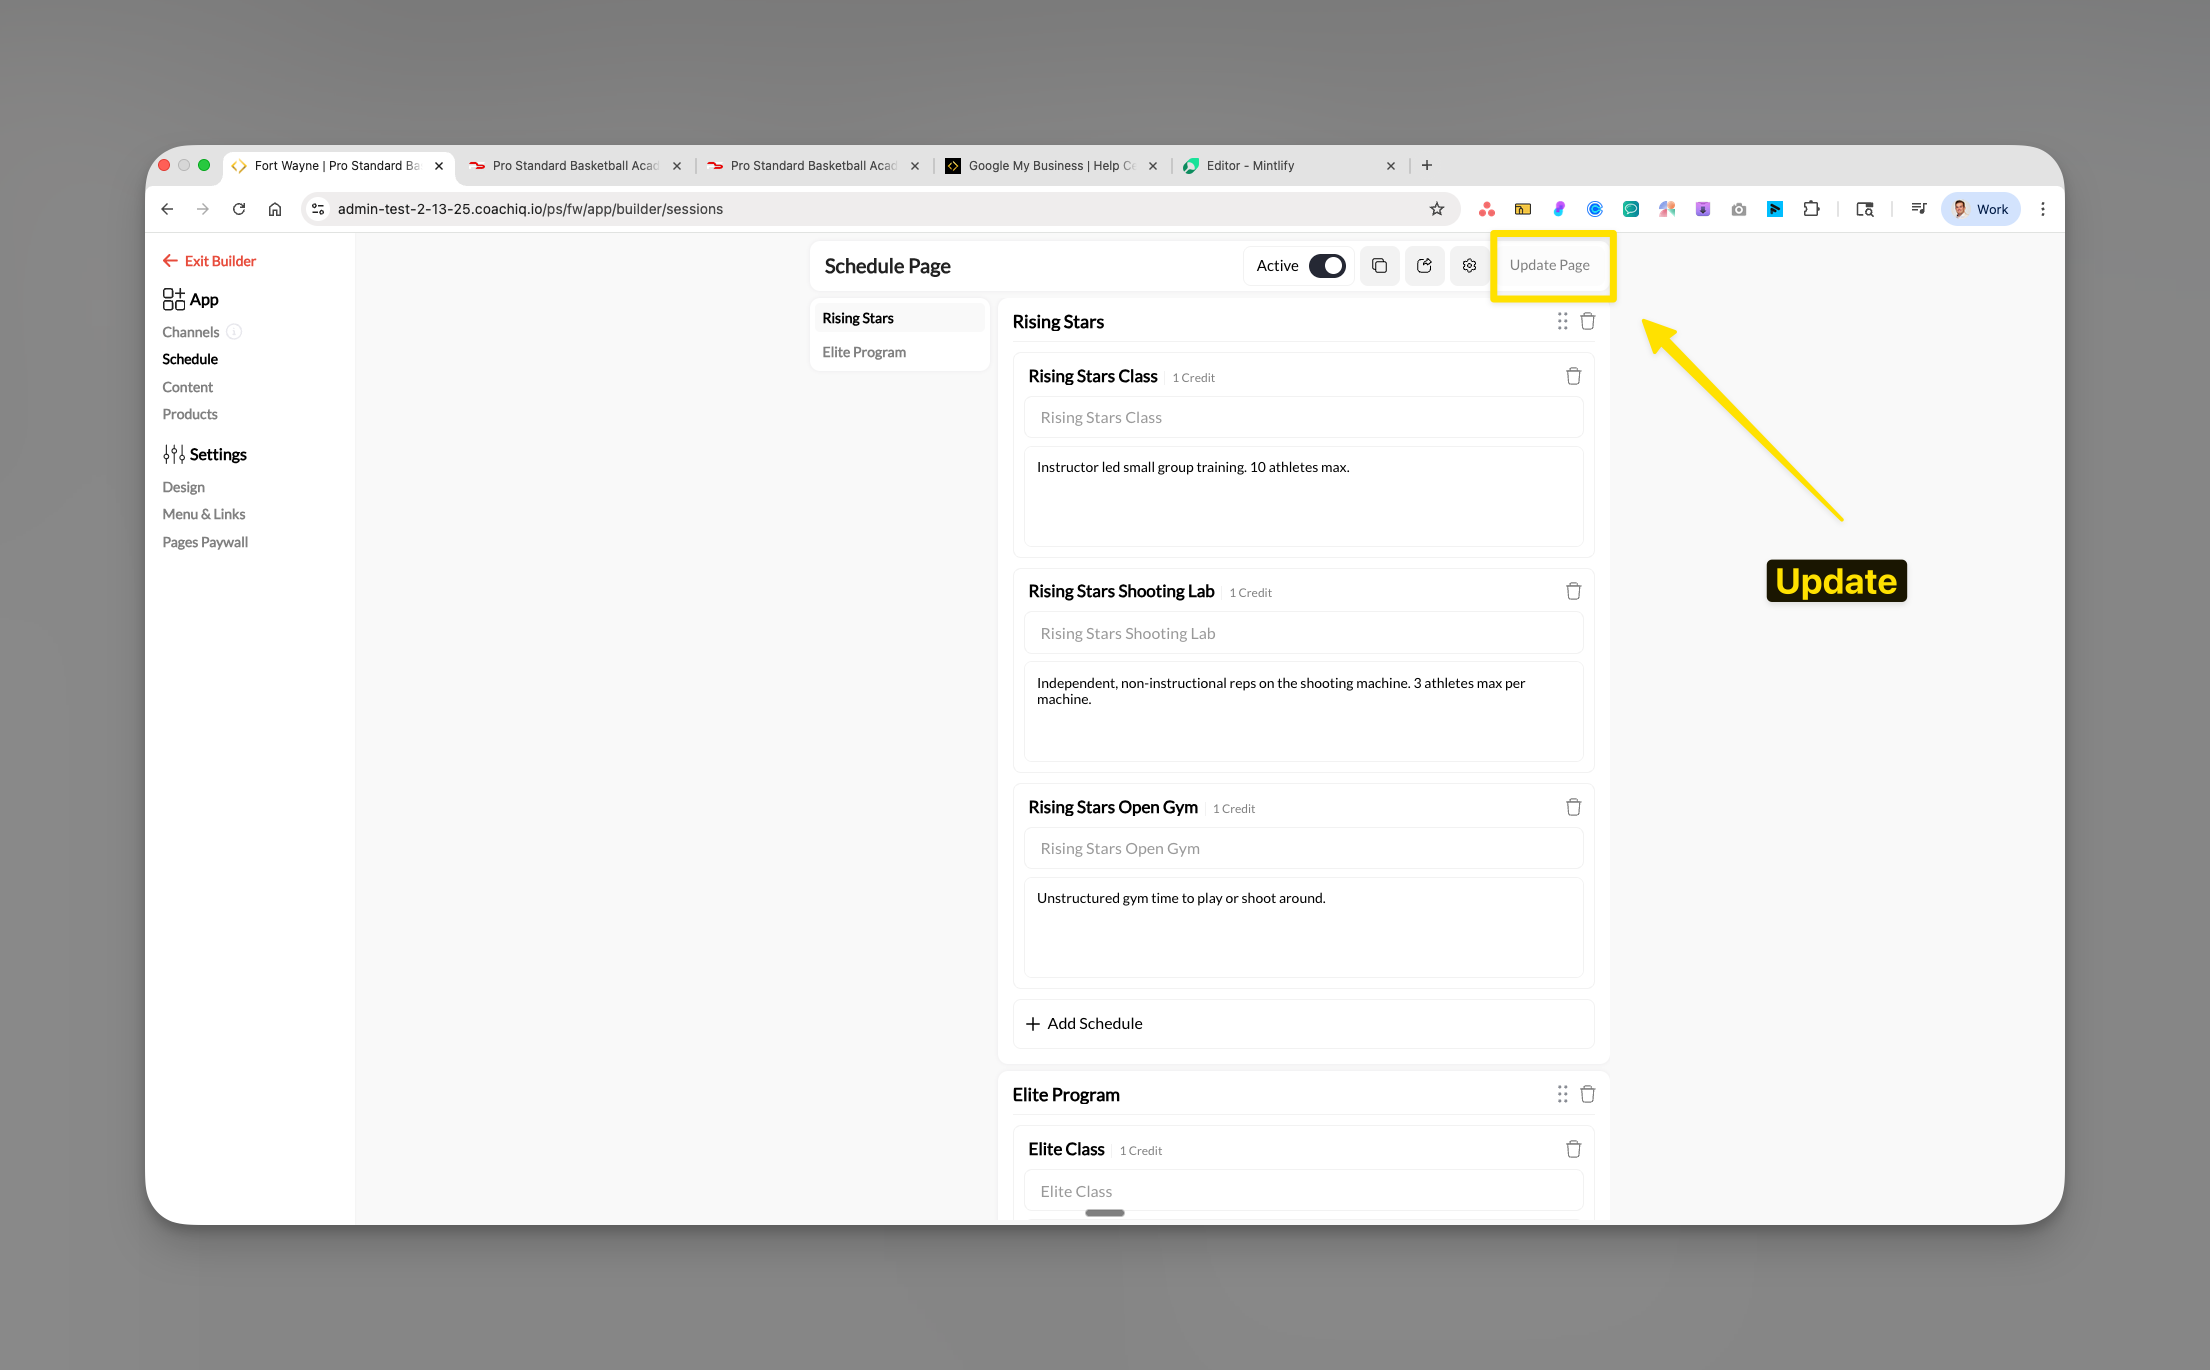 The button will briefly show "Updating..." then return to normal when complete.
**Success!** Your changes are now live for all athletes across web and mobile apps.
## Common interface patterns
### The toggle hierarchy
The App Builder uses three levels of toggles:
1. **Page level**: Active toggle (entire page on/off)
2. **Menu level**: Settings → Menu & Links (navigation visibility)
3. **Section level**: Individual section toggles (show/hide sections)
### Visual indicators
* **Gray text**: Descriptions and helper text
* **Credit badges**: Show credit requirements clearly
* **Trash icons**: Remove sections or items
* **Drag handles**: Reorder sections (where available)
## Pro tips for navigation
**Organization tip**: Start with one page at a time. Complete and test each page fully before moving to the next.
**Testing tip**: Always preview your changes before publishing, especially when managing multiple sections.
## Common questions
You need to click "Update Page" to publish changes. Also verify:
* The page Active toggle is ON
* The page is enabled in Menu & Links settings
* Athletes have refreshed their app
There's no undo function, but you can:
* Manually revert changes
* Use the Copy Page feature to backup configurations
* Contact support for assistance with major issues
Check three things:
1. Page Active toggle (must be ON)
2. Menu & Links visibility settings
3. Individual section settings and paywall configuration
* **Sections**: Categories that group similar items (like "Elite Training")
* **Schedulers**: Actual bookable sessions within sections (like "Tuesday 6pm Elite Class")
## Next steps
Now that you understand the App Builder interface:
Set up messaging and announcements
Upload programs and educational materials
Configure bookable sessions
Brand your athlete experience
The button will briefly show "Updating..." then return to normal when complete.
**Success!** Your changes are now live for all athletes across web and mobile apps.
## Common interface patterns
### The toggle hierarchy
The App Builder uses three levels of toggles:
1. **Page level**: Active toggle (entire page on/off)
2. **Menu level**: Settings → Menu & Links (navigation visibility)
3. **Section level**: Individual section toggles (show/hide sections)
### Visual indicators
* **Gray text**: Descriptions and helper text
* **Credit badges**: Show credit requirements clearly
* **Trash icons**: Remove sections or items
* **Drag handles**: Reorder sections (where available)
## Pro tips for navigation
**Organization tip**: Start with one page at a time. Complete and test each page fully before moving to the next.
**Testing tip**: Always preview your changes before publishing, especially when managing multiple sections.
## Common questions
You need to click "Update Page" to publish changes. Also verify:
* The page Active toggle is ON
* The page is enabled in Menu & Links settings
* Athletes have refreshed their app
There's no undo function, but you can:
* Manually revert changes
* Use the Copy Page feature to backup configurations
* Contact support for assistance with major issues
Check three things:
1. Page Active toggle (must be ON)
2. Menu & Links visibility settings
3. Individual section settings and paywall configuration
* **Sections**: Categories that group similar items (like "Elite Training")
* **Schedulers**: Actual bookable sessions within sections (like "Tuesday 6pm Elite Class")
## Next steps
Now that you understand the App Builder interface:
Set up messaging and announcements
Upload programs and educational materials
Configure bookable sessions
Brand your athlete experience