> ## Documentation Index
> Fetch the complete documentation index at: https://help.coachiq.io/llms.txt
> Use this file to discover all available pages before exploring further.
# Waivers: Create, Require & Track Compliance
> Create liability waivers, require agreement at checkout or on forms, and track which clients have accepted
**Where to find this**: Tools → Waivers
CoachIQ's waiver system lets you create waivers, attach them to products and forms, and track exactly who has accepted — all from one place.
## The waivers dashboard
Navigate to **Tools → Waivers** to see all your waivers at a glance.
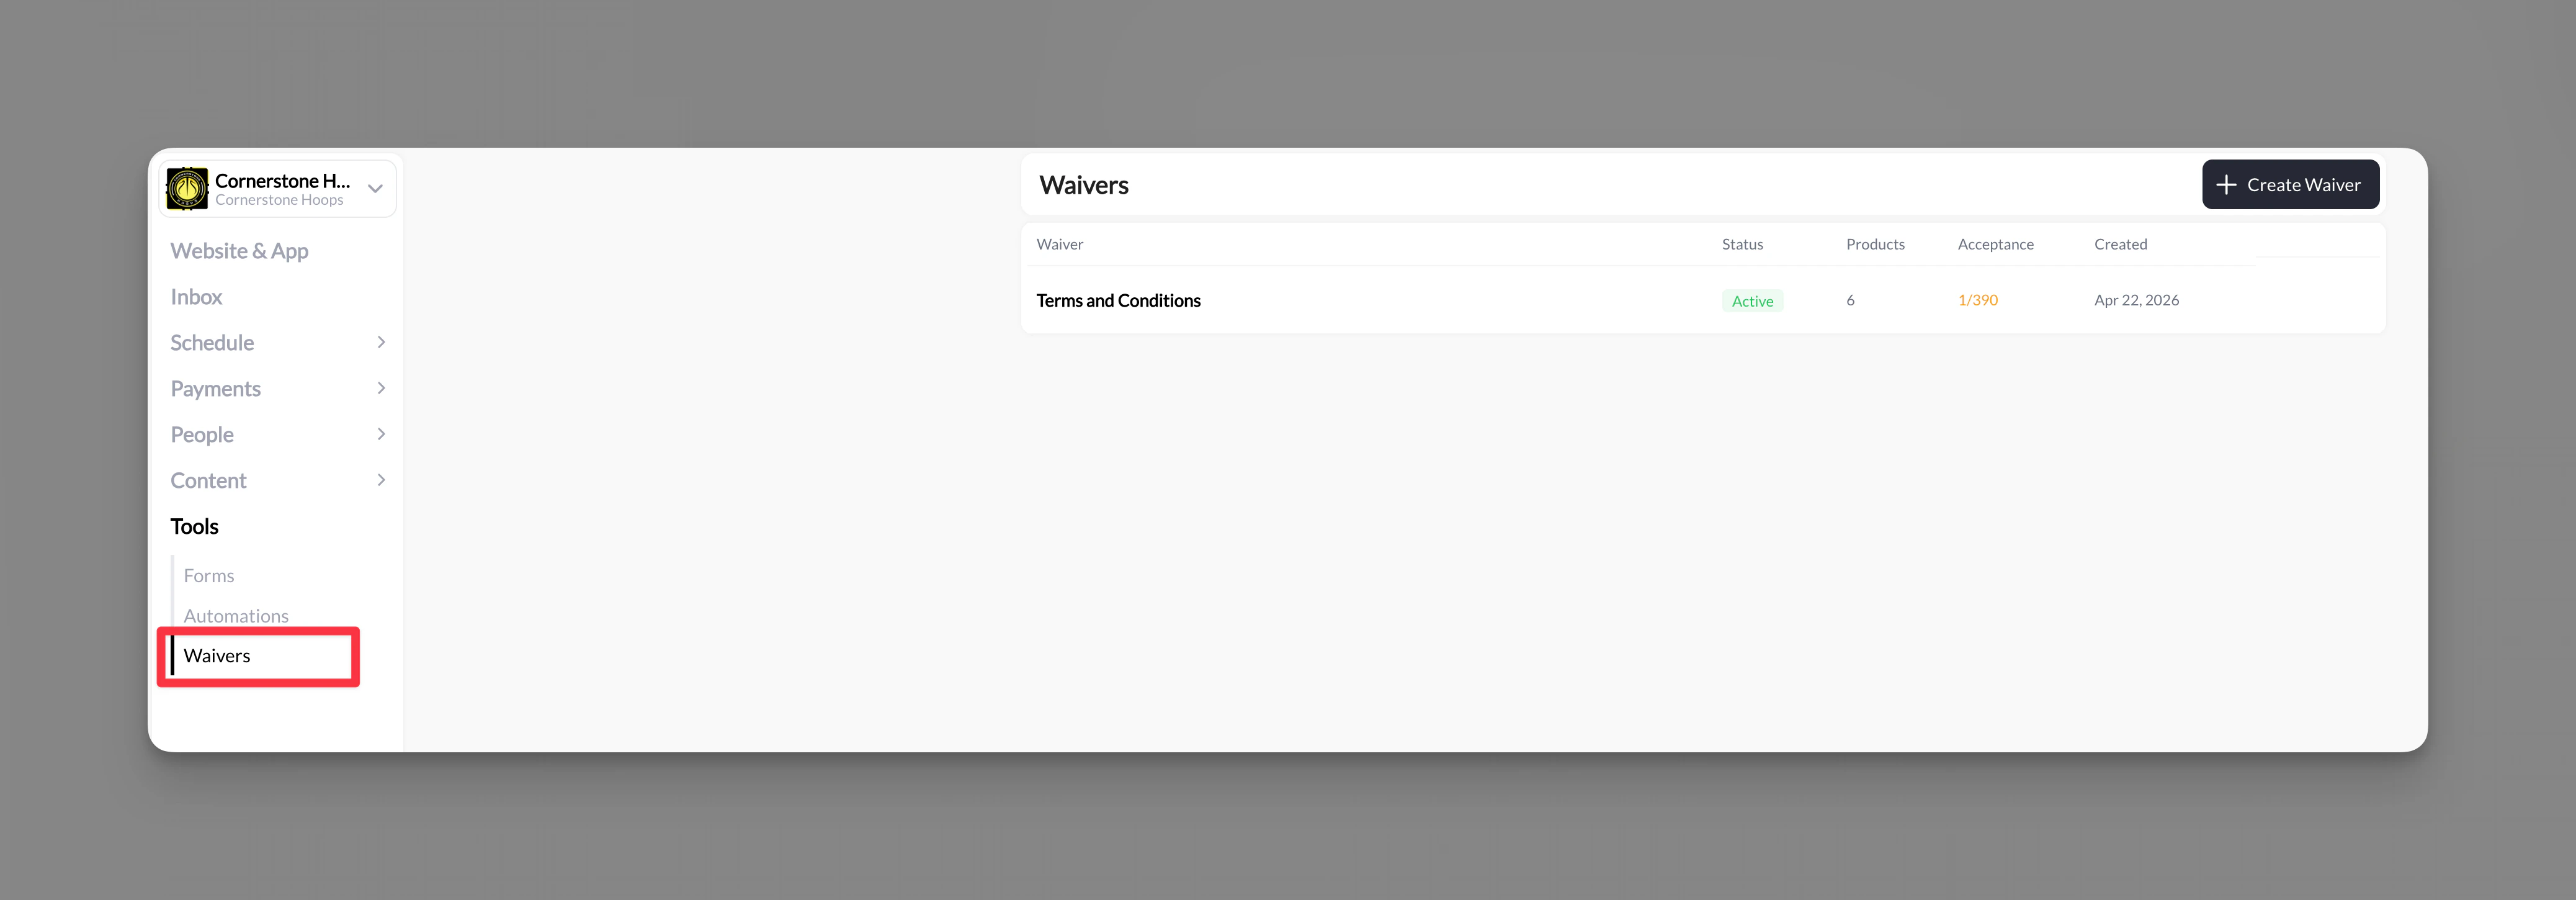 The dashboard shows:
| Column | What it shows |
| -------------- | ---------------------------------------- |
| **Waiver** | The waiver name |
| **Status** | Active or Archived |
| **Products** | Number of products requiring this waiver |
| **Acceptance** | How many clients have accepted vs. total |
| **Created** | Date the waiver was created |
***
## Create a waiver
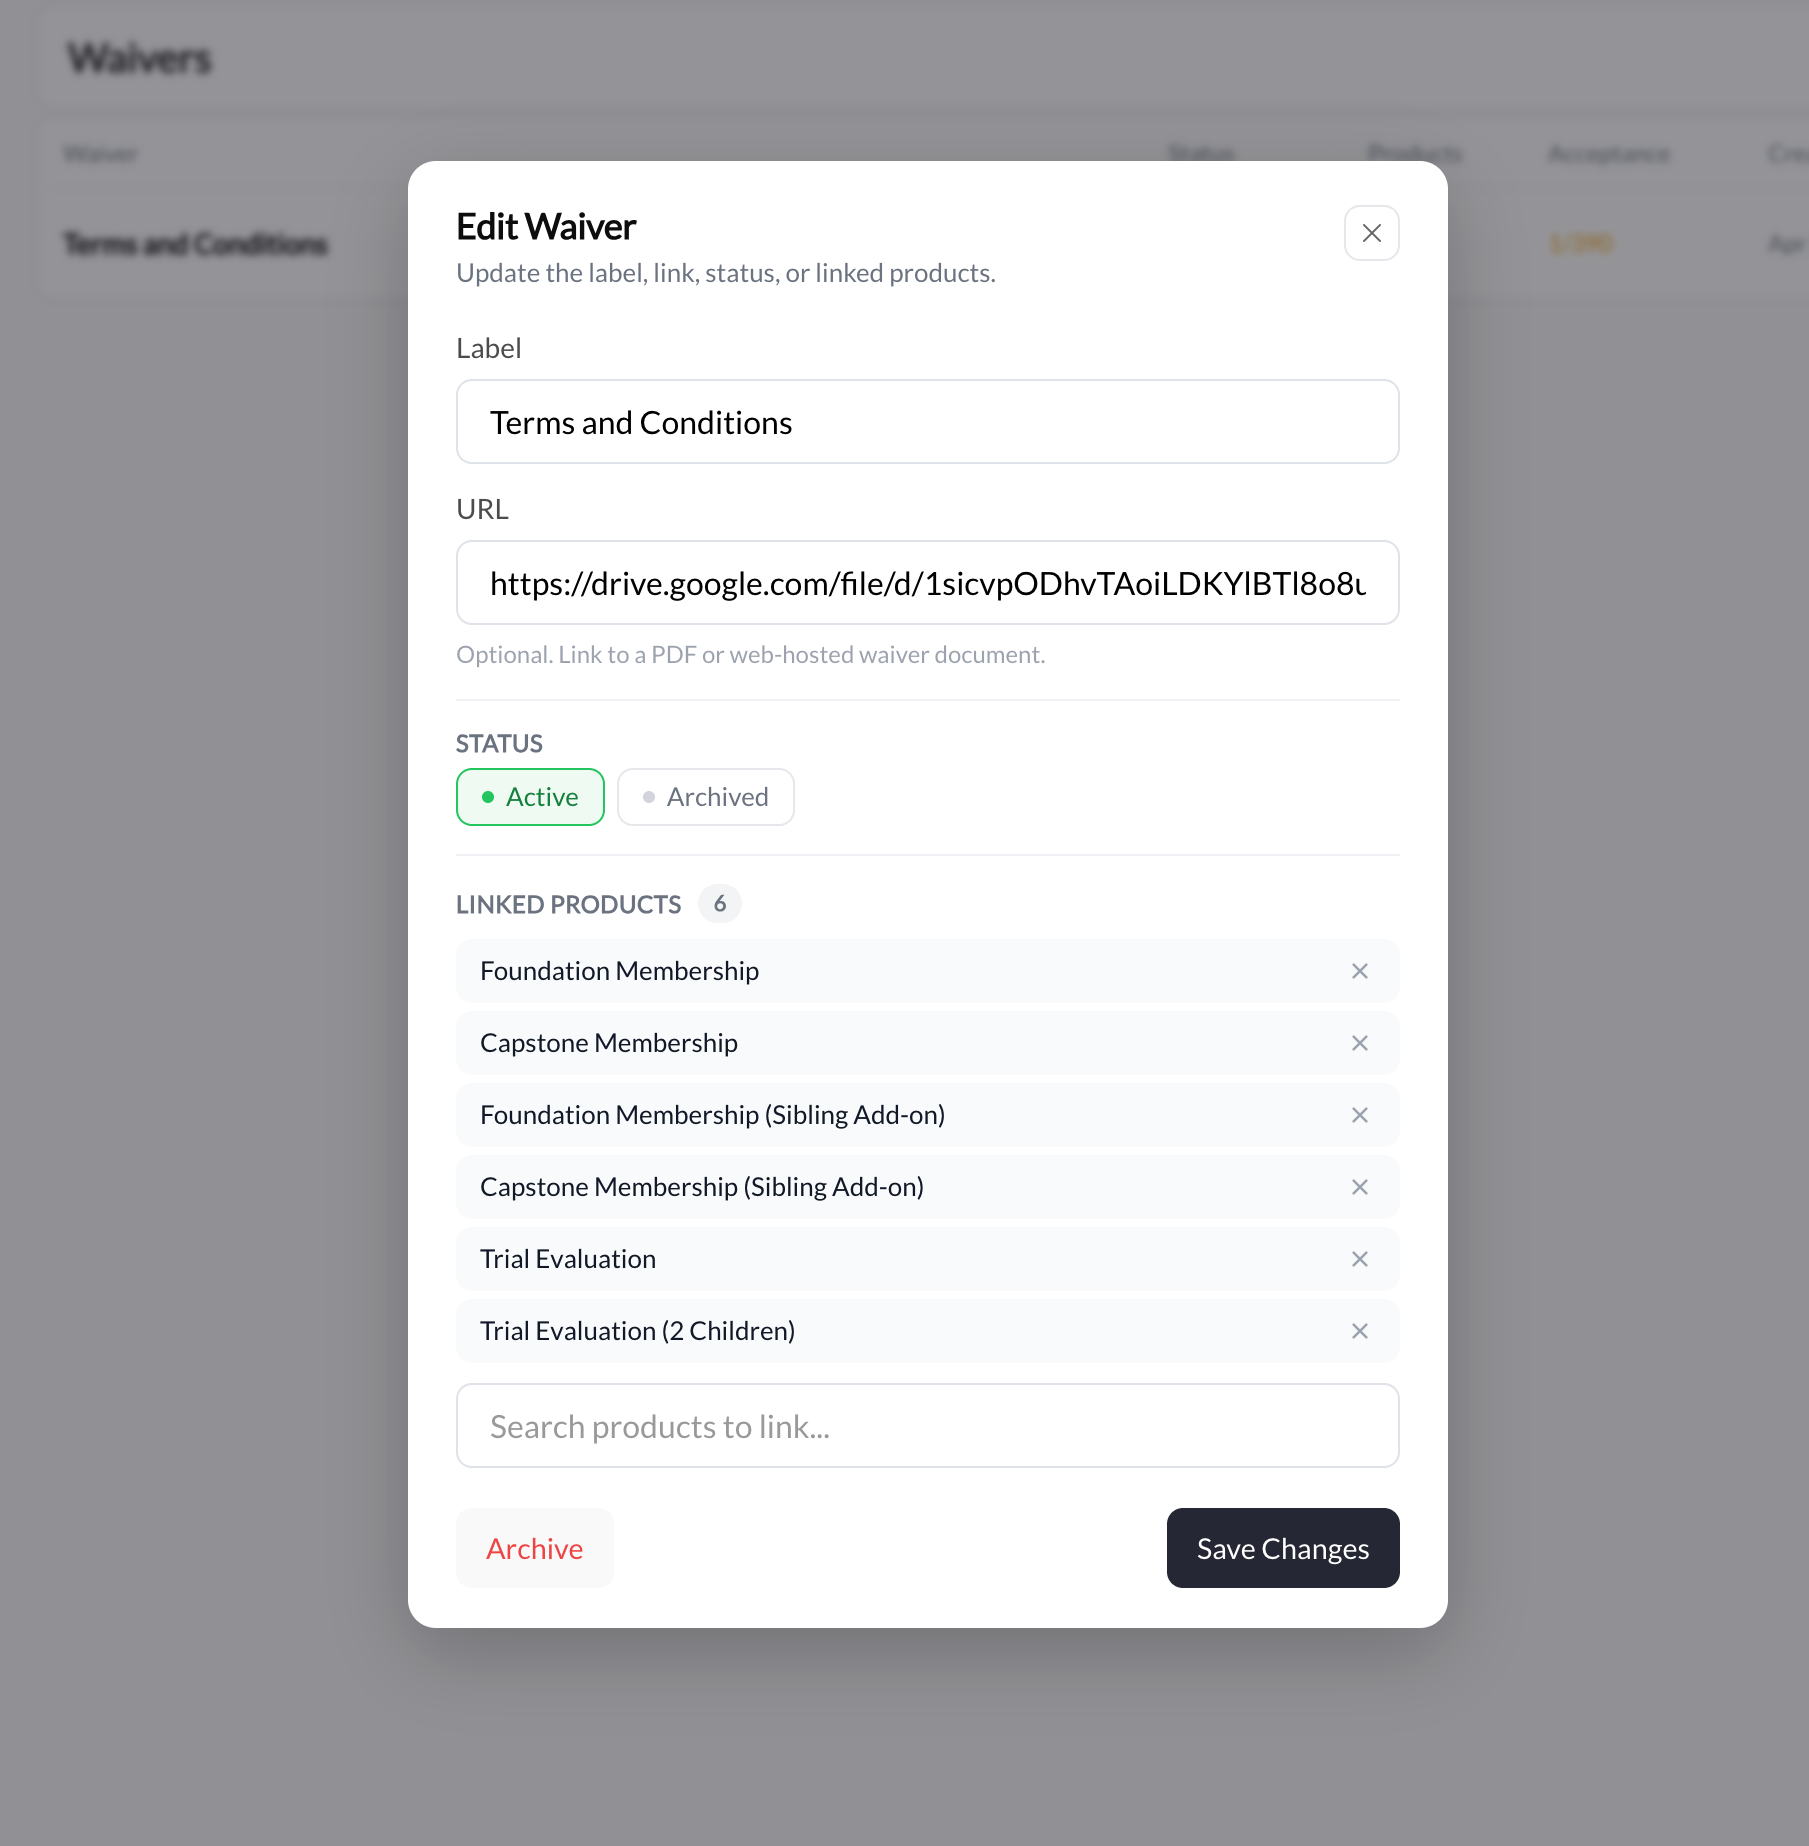
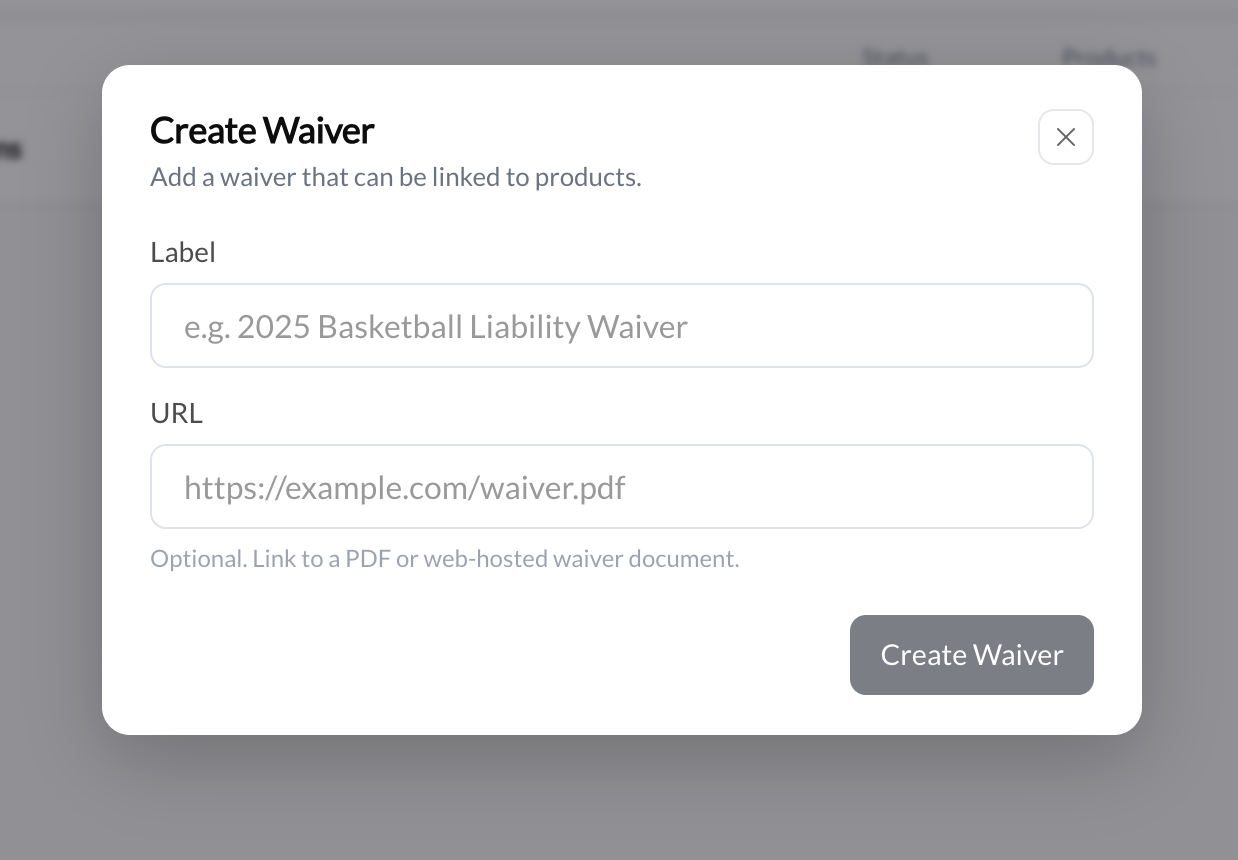
Click **+ Create Waiver** in the top-right corner.
* **Label** — Give your waiver a clear name (e.g., "Liability Waiver", "Cancellation Policy")
* **URL** — Link to the full waiver document. This can be a page on your CoachIQ website, a Google Drive link, a PDF, or any public URL.
The dashboard shows:
| Column | What it shows |
| -------------- | ---------------------------------------- |
| **Waiver** | The waiver name |
| **Status** | Active or Archived |
| **Products** | Number of products requiring this waiver |
| **Acceptance** | How many clients have accepted vs. total |
| **Created** | Date the waiver was created |
***
## Create a waiver
Click **+ Create Waiver** in the top-right corner.
* **Label** — Give your waiver a clear name (e.g., "Liability Waiver", "Cancellation Policy")
* **URL** — Link to the full waiver document. This can be a page on your CoachIQ website, a Google Drive link, a PDF, or any public URL.
 Host your waiver on your CoachIQ website using [legal page templates](/website/pages-navigation/legal-pages) — it keeps everything in one place and looks professional.
Click **Save Changes**. Your waiver is now active and ready to attach to products or forms.
***
## Require a waiver at checkout
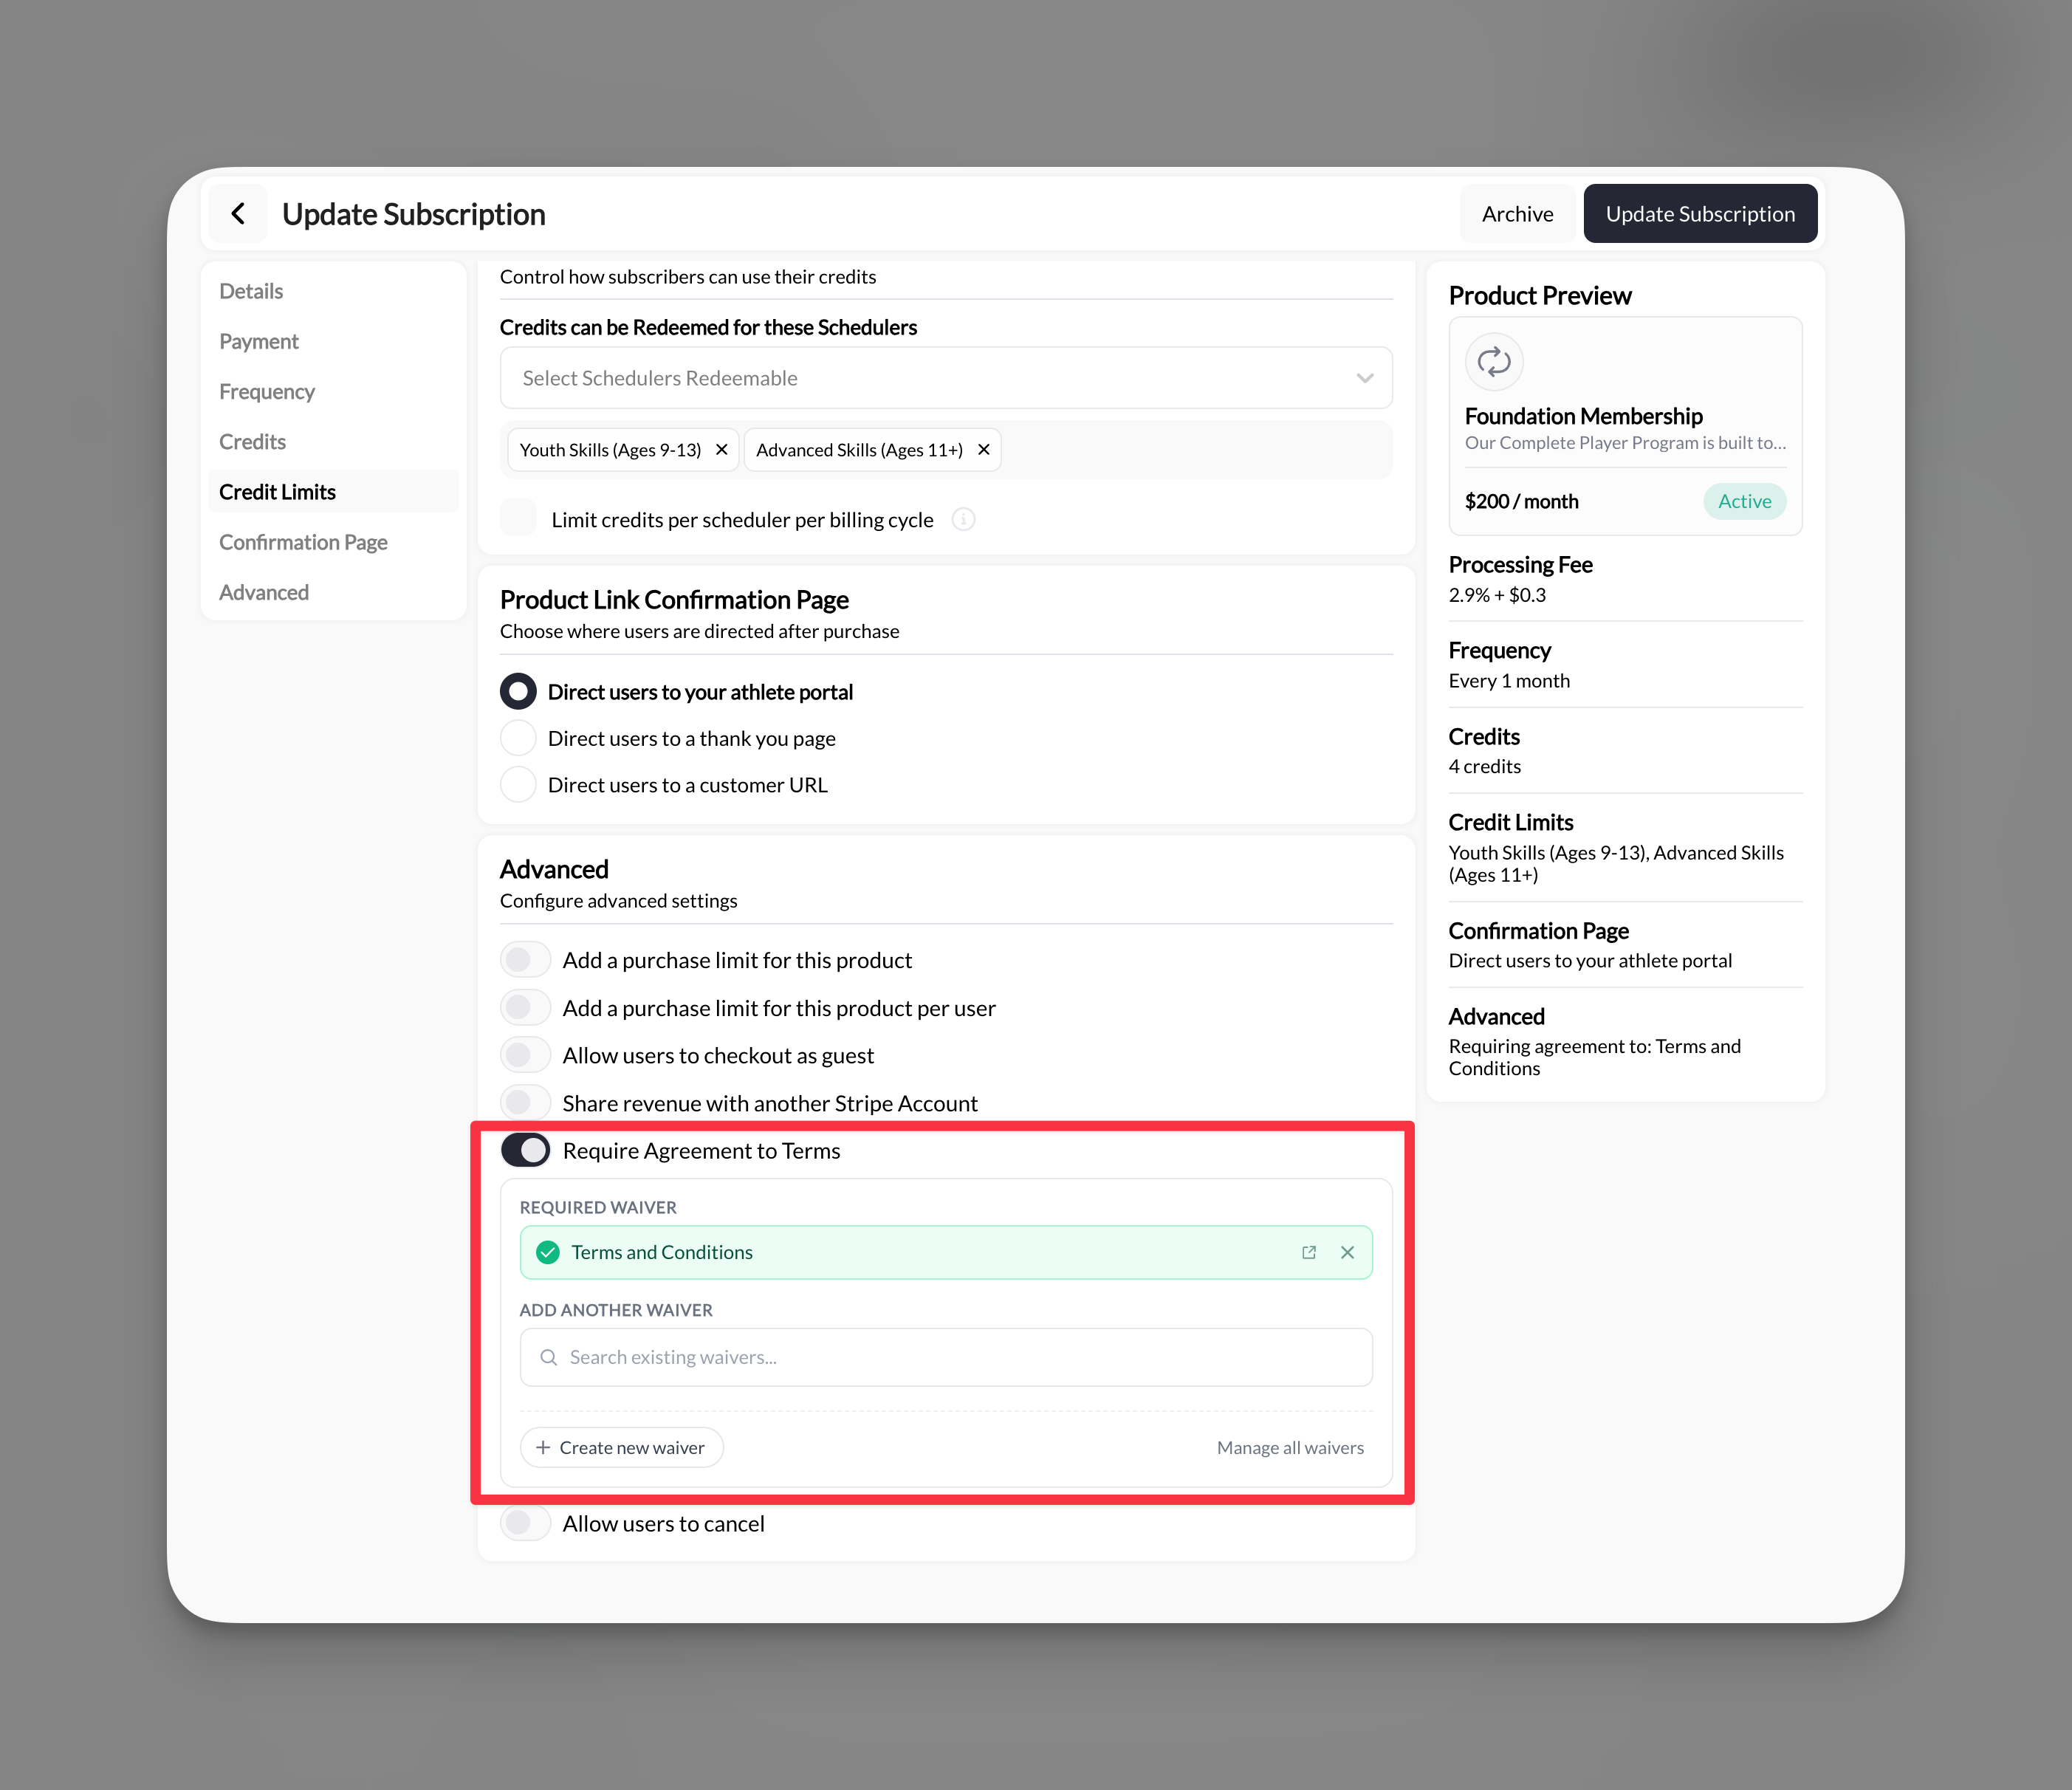
Attach a waiver to any product so clients must agree before purchasing.
Go to **Payments → Products** and select the product you want to add a waiver to.
Click **Advanced** in the left sidebar of the product editor.
Enable the toggle, then select your waiver from the dropdown. You can also search for existing waivers or create a new one directly from here.
Host your waiver on your CoachIQ website using [legal page templates](/website/pages-navigation/legal-pages) — it keeps everything in one place and looks professional.
Click **Save Changes**. Your waiver is now active and ready to attach to products or forms.
***
## Require a waiver at checkout
Attach a waiver to any product so clients must agree before purchasing.
Go to **Payments → Products** and select the product you want to add a waiver to.
Click **Advanced** in the left sidebar of the product editor.
Enable the toggle, then select your waiver from the dropdown. You can also search for existing waivers or create a new one directly from here.
 Click **Update Subscription** (or **Create**) to save.
**Done!** Clients will now see a checkbox at checkout: "I agree to the \[Waiver Name]." They must check it before they can purchase.
Click **Update Subscription** (or **Create**) to save.
**Done!** Clients will now see a checkbox at checkout: "I agree to the \[Waiver Name]." They must check it before they can purchase.
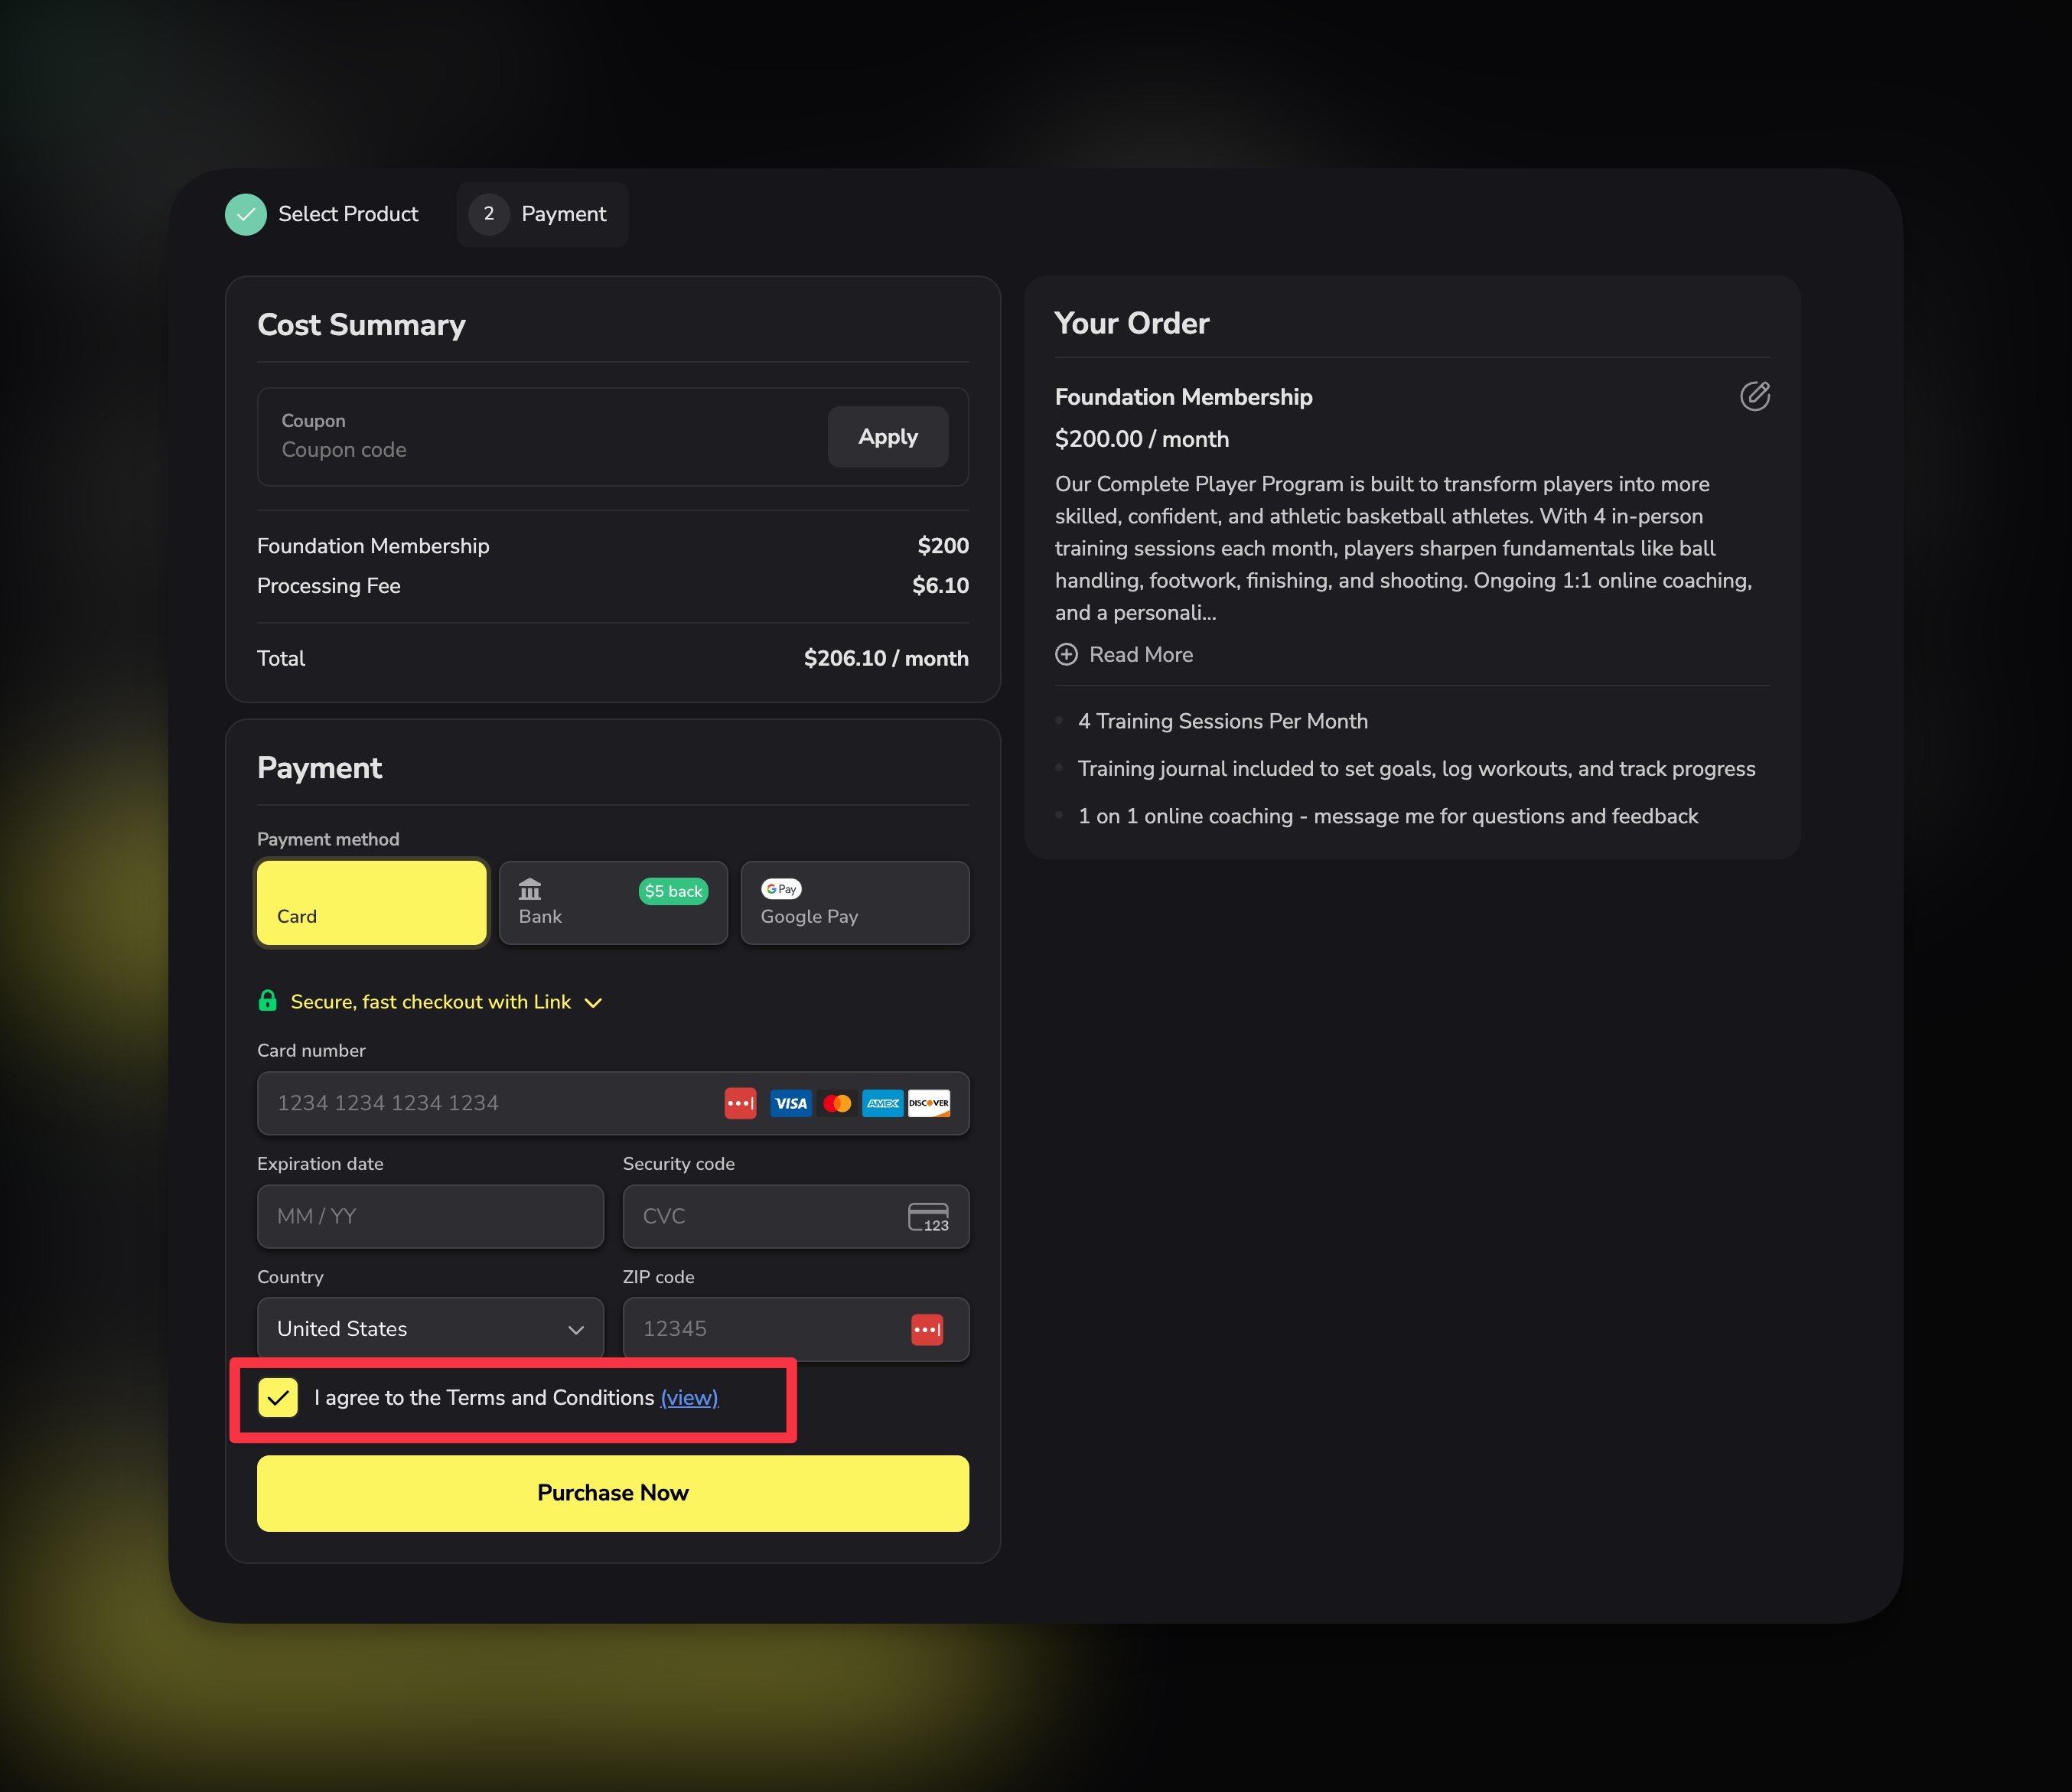 When a client clicks the waiver name at checkout, it opens the URL you set — so they can read the full document before agreeing.
***
## Add a waiver to a form
You can also require waiver acceptance on any form — useful for registration forms, intake forms, or onboarding flows.
Go to **Tools → Forms** and select the form you want to edit.
In the form builder, click the **General** section in the left panel and select **Waiver** from the component list.
When a client clicks the waiver name at checkout, it opens the URL you set — so they can read the full document before agreeing.
***
## Add a waiver to a form
You can also require waiver acceptance on any form — useful for registration forms, intake forms, or onboarding flows.
Go to **Tools → Forms** and select the form you want to edit.
In the form builder, click the **General** section in the left panel and select **Waiver** from the component list.
 Choose the waiver you want to require. The form will display a checkbox with a link to the waiver document.
Click **Update Form** to save.
**Done!** Anyone submitting this form must accept the waiver before completing it.
***
## Track waiver compliance
The compliance report shows exactly who has accepted each waiver and who hasn't — so you always know where you stand.
Go to **Tools → Waivers** and click on the acceptance count (e.g., "1/200") for any waiver.
The compliance report shows:
* **All** — Every client in your system
* **Accepted** — Clients who have agreed to the waiver (with the date)
* **Missing** — Clients who have not yet accepted
Choose the waiver you want to require. The form will display a checkbox with a link to the waiver document.
Click **Update Form** to save.
**Done!** Anyone submitting this form must accept the waiver before completing it.
***
## Track waiver compliance
The compliance report shows exactly who has accepted each waiver and who hasn't — so you always know where you stand.
Go to **Tools → Waivers** and click on the acceptance count (e.g., "1/200") for any waiver.
The compliance report shows:
* **All** — Every client in your system
* **Accepted** — Clients who have agreed to the waiver (with the date)
* **Missing** — Clients who have not yet accepted
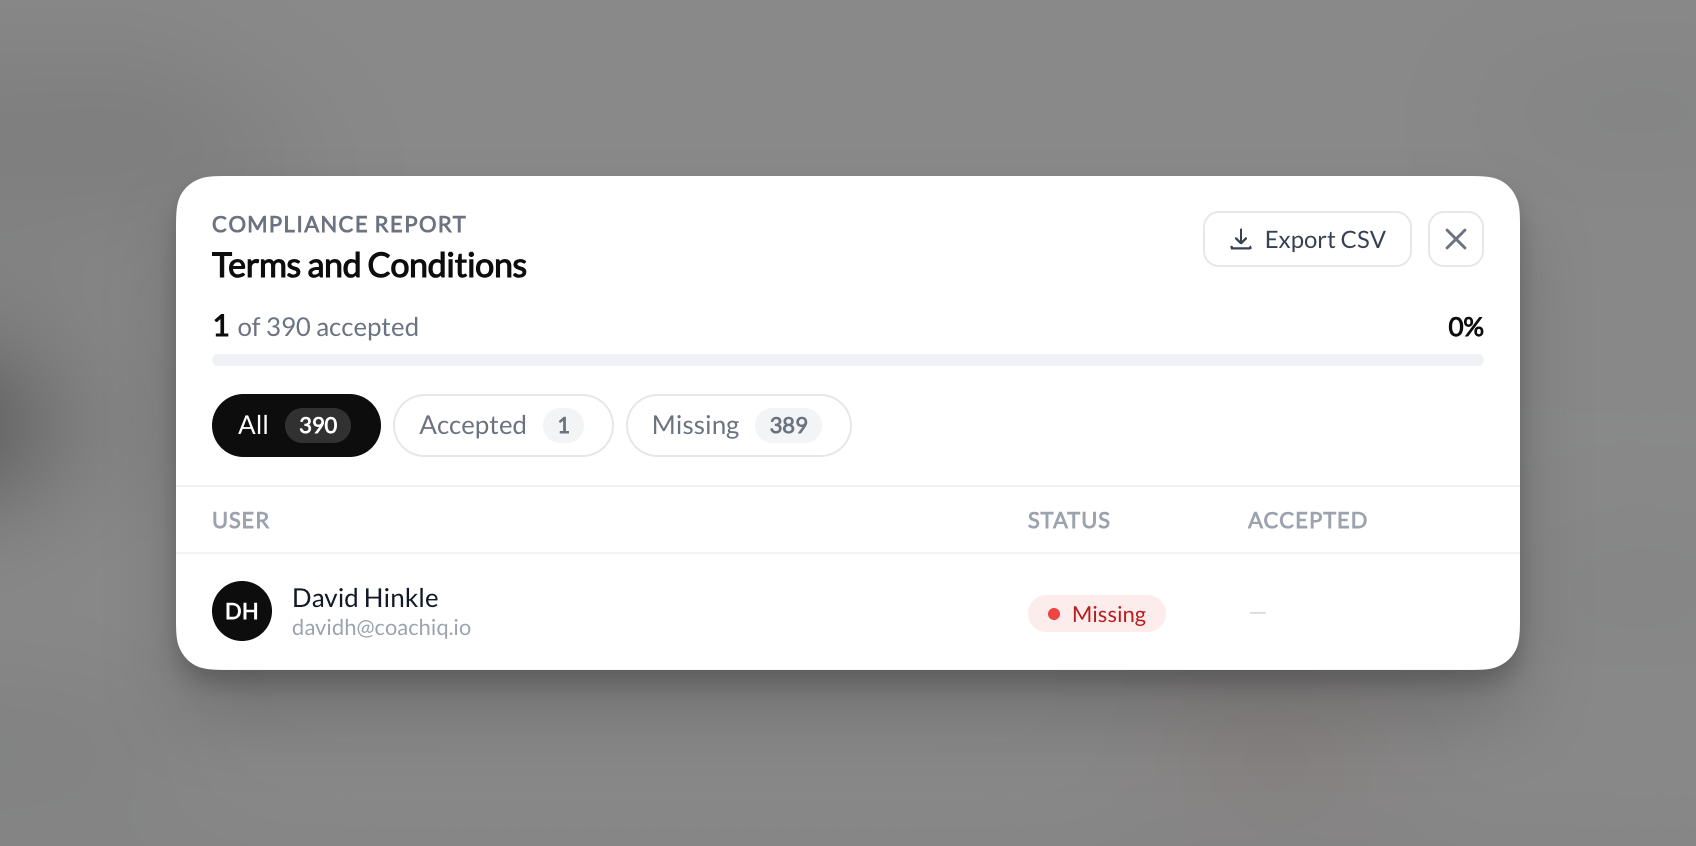 Click **Export CSV** to download the full compliance list. Use this for your records, insurance requirements, or audits.
Filter by **Missing** to quickly identify clients who still need to accept. You can then send them a message through the Inbox with a link to the product or form that includes the waiver.
***
## Edit or archive a waiver
Click on any waiver in the dashboard to edit it. You can update:
* **Label** — Rename the waiver
* **URL** — Point to an updated document
* **Status** — Set to Active or Archived
* **Linked Products** — See and manage which products require this waiver
Click **Archive** to deactivate a waiver without deleting it. Archived waivers are removed from checkout and forms but their acceptance records are preserved.
***
## Common questions
Yes. Each product can require its own waiver. For example, use a liability waiver for training sessions and a cancellation policy for memberships.
The system records who accepted, when they accepted, and how (via purchase or via form). This shows up in the compliance report and on the client's activity feed.
No. When a waiver is required, the checkbox is mandatory. Clients cannot complete the purchase or submit the form without checking it.
Any publicly accessible link works — a page on your CoachIQ website, a Google Doc, a PDF hosted on Google Drive, or an external website. Just make sure the link works for anyone who clicks it.
Yes. The waiver checkbox appears for both logged-in clients and guest checkout.
Yes. Check the client's activity feed in **People → Client Profile** to see when they accepted and through which product or form.
***
## Related articles
Create terms, privacy policy, and disclaimers on your website
All product settings including Advanced options
Build forms with waiver components and more
Everything you can do with CoachIQ forms
Click **Export CSV** to download the full compliance list. Use this for your records, insurance requirements, or audits.
Filter by **Missing** to quickly identify clients who still need to accept. You can then send them a message through the Inbox with a link to the product or form that includes the waiver.
***
## Edit or archive a waiver
Click on any waiver in the dashboard to edit it. You can update:
* **Label** — Rename the waiver
* **URL** — Point to an updated document
* **Status** — Set to Active or Archived
* **Linked Products** — See and manage which products require this waiver
Click **Archive** to deactivate a waiver without deleting it. Archived waivers are removed from checkout and forms but their acceptance records are preserved.
***
## Common questions
Yes. Each product can require its own waiver. For example, use a liability waiver for training sessions and a cancellation policy for memberships.
The system records who accepted, when they accepted, and how (via purchase or via form). This shows up in the compliance report and on the client's activity feed.
No. When a waiver is required, the checkbox is mandatory. Clients cannot complete the purchase or submit the form without checking it.
Any publicly accessible link works — a page on your CoachIQ website, a Google Doc, a PDF hosted on Google Drive, or an external website. Just make sure the link works for anyone who clicks it.
Yes. The waiver checkbox appears for both logged-in clients and guest checkout.
Yes. Check the client's activity feed in **People → Client Profile** to see when they accepted and through which product or form.
***
## Related articles
Create terms, privacy policy, and disclaimers on your website
All product settings including Advanced options
Build forms with waiver components and more
Everything you can do with CoachIQ forms