> ## Documentation Index
> Fetch the complete documentation index at: https://help.coachiq.io/llms.txt
> Use this file to discover all available pages before exploring further.
# Products Overview
> Understand the three product types in CoachIQ and how to use them to monetize your coaching business
**Where to find this**: Payments → Products
## What products are
Products are anything you sell through CoachIQ:
* Session bookings
* Monthly memberships
* Training programs
* Access codes for partners
* Digital content
* Workshops and camps
Each product defines what clients buy, how much they pay, and what they receive.
## Three product types
**Single purchase**
Sessions, workshops, evaluations, camps
Client pays once → Receives access immediately
**Recurring billing**
Monthly memberships, training packages
Client pays monthly → Receives credits or access automatically
**Code redemption**
Partner codes, promo codes, team discounts
Client enters code → Discount applied or free access granted
## Product type comparison
| Feature | One-Time | Subscription | Access Code |
| ----------------- | -------------------------- | ----------------------------- | ------------------------------------ |
| **Payment** | Single charge | Recurring billing | Single charge (can be \$0) |
| **Use case** | Sessions, camps, workshops | Memberships, monthly training | Partnerships, promos, team discounts |
| **Credits** | Optional | Optional (renews each period) | Optional |
| **Trial period** | No | Yes | No |
| **Code required** | No | No | Yes |
| **Renewal** | Never | Automatic | Never |
## The Products page
Navigate to **Payments → Products** to see all your products.
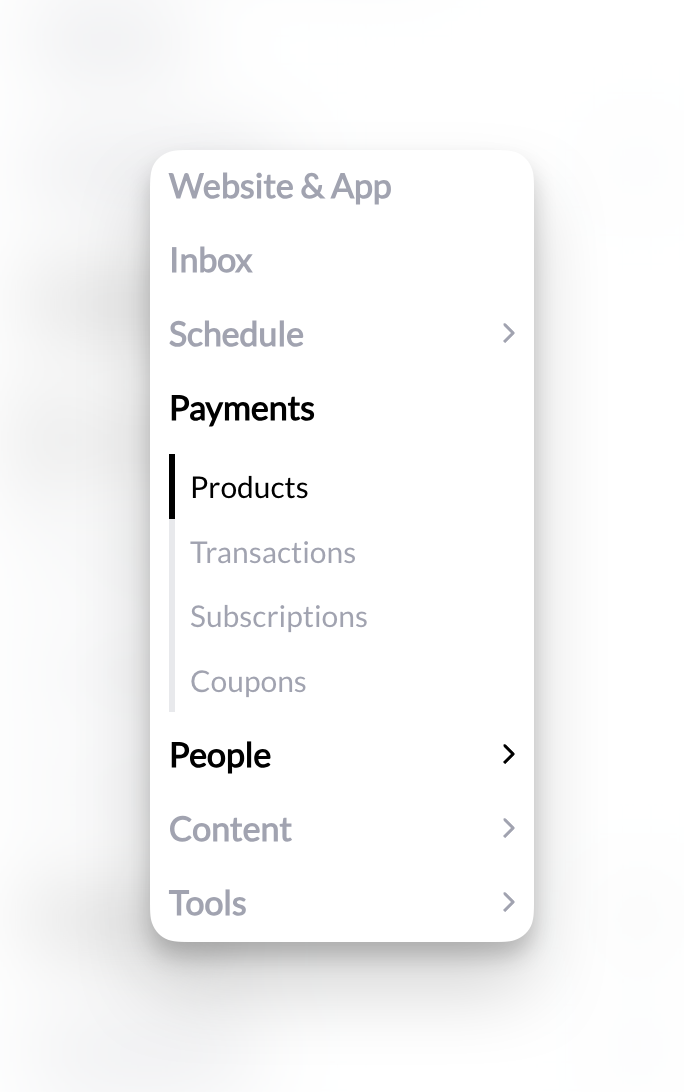 **What you see:**
* Product name
* Type (One-Time, Subscription, Access Code)
* Price
* Date created
* Status indicator
**What you can do:**
* Search by product name
* Filter by type
* Sort by date or price
* Edit existing products
* Archive old products
* Create new products
Click any product name to open the Product Builder and see full details or make changes.
## When to use each type
**Best for single purchases**
Examples:
* Individual training sessions
* Skills assessments or evaluations
* One-time workshops
* Summer camps
* Merchandise or equipment
* Program access (one-time fee)
Client pays once and receives immediate access to what they purchased.
**Best for recurring revenue**
Examples:
* Monthly unlimited training
* Weekly session packages (4 credits/month)
* Facility membership
* Program access (monthly fee)
* Ongoing coaching packages
Client's card charges automatically each month. They receive credits or maintain access as long as subscription is active.
Subscriptions create predictable recurring revenue and reduce manual billing work.
**Best for special access**
Examples:
* Corporate partnership codes
* Sponsor/donor free access
* Team discount codes
* Referral program offers
* Promotional campaigns
Client enters a code during checkout. Discount applies or access is granted for free.
Access codes can have redemption limits. Track usage to ensure codes aren't overused.
## How products connect to your business
Products attach to three places in CoachIQ:
**Session Schedulers** → Clients book time slots and pay with products
* Schedule → Schedulers → \[Select Scheduler] → Payment Settings
**Programs** → Clients purchase access to locked content
* Content → Programs → \[Select Program] → Paywall Settings
**Forms** → Clients submit forms with payment
* Tools → Forms → Form Builder → Add Product
One product can attach to multiple schedulers, programs, or forms. Reuse products across your offerings.
## Creating your first product
Ready to build a product?
Click **Payments → Products** in left sidebar
Blue **+ Create Product** button in top right
Select One-Time, Subscription, or Access Code
Complete required fields (name and price minimum)
Save immediately
[Full product creation guide →](/payments/creating-first-product)
## Product visibility: Where athletes can find products
Products don't automatically appear to athletes. You control visibility by choosing where to add them:
Add products to sections in **App Builder → Products**. Athletes see them when browsing your portal (web only—not visible on iOS/Android apps).
Every product has a shareable checkout URL. Athletes can only access it if you share the link with them.
Connect products as payment options in **Schedule → Schedulers → Payment Settings**. Athletes see them when booking sessions.
Add products to forms in **Tools → Forms**. Athletes see them when submitting the form.
**Key insight**: A product you create but don't add anywhere is effectively hidden. Athletes can't discover it unless you explicitly place it in one of these locations or share its direct link.
## Setting up products before launch
Want to create products now but launch them later? Here's the recommended workflow:
Build the product with all settings configured in **Payments → Products → + Create**.
* Don't add to Athlete Portal Products page
* Don't attach to any schedulers
* Don't attach to any forms
* Don't share the direct link
When you're ready to go live, add the product to wherever you want athletes to find it.
**No "draft mode" needed**: Products are invisible to athletes until you actively place them somewhere. You can take your time configuring everything before launch.
## Archiving products
Archive products you no longer want to sell. Archiving completely disables a product—it can't be purchased anywhere, including via direct link.
Navigate to **Payments → Products**.
Click on the product row to open the action menu.
**What you see:**
* Product name
* Type (One-Time, Subscription, Access Code)
* Price
* Date created
* Status indicator
**What you can do:**
* Search by product name
* Filter by type
* Sort by date or price
* Edit existing products
* Archive old products
* Create new products
Click any product name to open the Product Builder and see full details or make changes.
## When to use each type
**Best for single purchases**
Examples:
* Individual training sessions
* Skills assessments or evaluations
* One-time workshops
* Summer camps
* Merchandise or equipment
* Program access (one-time fee)
Client pays once and receives immediate access to what they purchased.
**Best for recurring revenue**
Examples:
* Monthly unlimited training
* Weekly session packages (4 credits/month)
* Facility membership
* Program access (monthly fee)
* Ongoing coaching packages
Client's card charges automatically each month. They receive credits or maintain access as long as subscription is active.
Subscriptions create predictable recurring revenue and reduce manual billing work.
**Best for special access**
Examples:
* Corporate partnership codes
* Sponsor/donor free access
* Team discount codes
* Referral program offers
* Promotional campaigns
Client enters a code during checkout. Discount applies or access is granted for free.
Access codes can have redemption limits. Track usage to ensure codes aren't overused.
## How products connect to your business
Products attach to three places in CoachIQ:
**Session Schedulers** → Clients book time slots and pay with products
* Schedule → Schedulers → \[Select Scheduler] → Payment Settings
**Programs** → Clients purchase access to locked content
* Content → Programs → \[Select Program] → Paywall Settings
**Forms** → Clients submit forms with payment
* Tools → Forms → Form Builder → Add Product
One product can attach to multiple schedulers, programs, or forms. Reuse products across your offerings.
## Creating your first product
Ready to build a product?
Click **Payments → Products** in left sidebar
Blue **+ Create Product** button in top right
Select One-Time, Subscription, or Access Code
Complete required fields (name and price minimum)
Save immediately
[Full product creation guide →](/payments/creating-first-product)
## Product visibility: Where athletes can find products
Products don't automatically appear to athletes. You control visibility by choosing where to add them:
Add products to sections in **App Builder → Products**. Athletes see them when browsing your portal (web only—not visible on iOS/Android apps).
Every product has a shareable checkout URL. Athletes can only access it if you share the link with them.
Connect products as payment options in **Schedule → Schedulers → Payment Settings**. Athletes see them when booking sessions.
Add products to forms in **Tools → Forms**. Athletes see them when submitting the form.
**Key insight**: A product you create but don't add anywhere is effectively hidden. Athletes can't discover it unless you explicitly place it in one of these locations or share its direct link.
## Setting up products before launch
Want to create products now but launch them later? Here's the recommended workflow:
Build the product with all settings configured in **Payments → Products → + Create**.
* Don't add to Athlete Portal Products page
* Don't attach to any schedulers
* Don't attach to any forms
* Don't share the direct link
When you're ready to go live, add the product to wherever you want athletes to find it.
**No "draft mode" needed**: Products are invisible to athletes until you actively place them somewhere. You can take your time configuring everything before launch.
## Archiving products
Archive products you no longer want to sell. Archiving completely disables a product—it can't be purchased anywhere, including via direct link.
Navigate to **Payments → Products**.
Click on the product row to open the action menu.
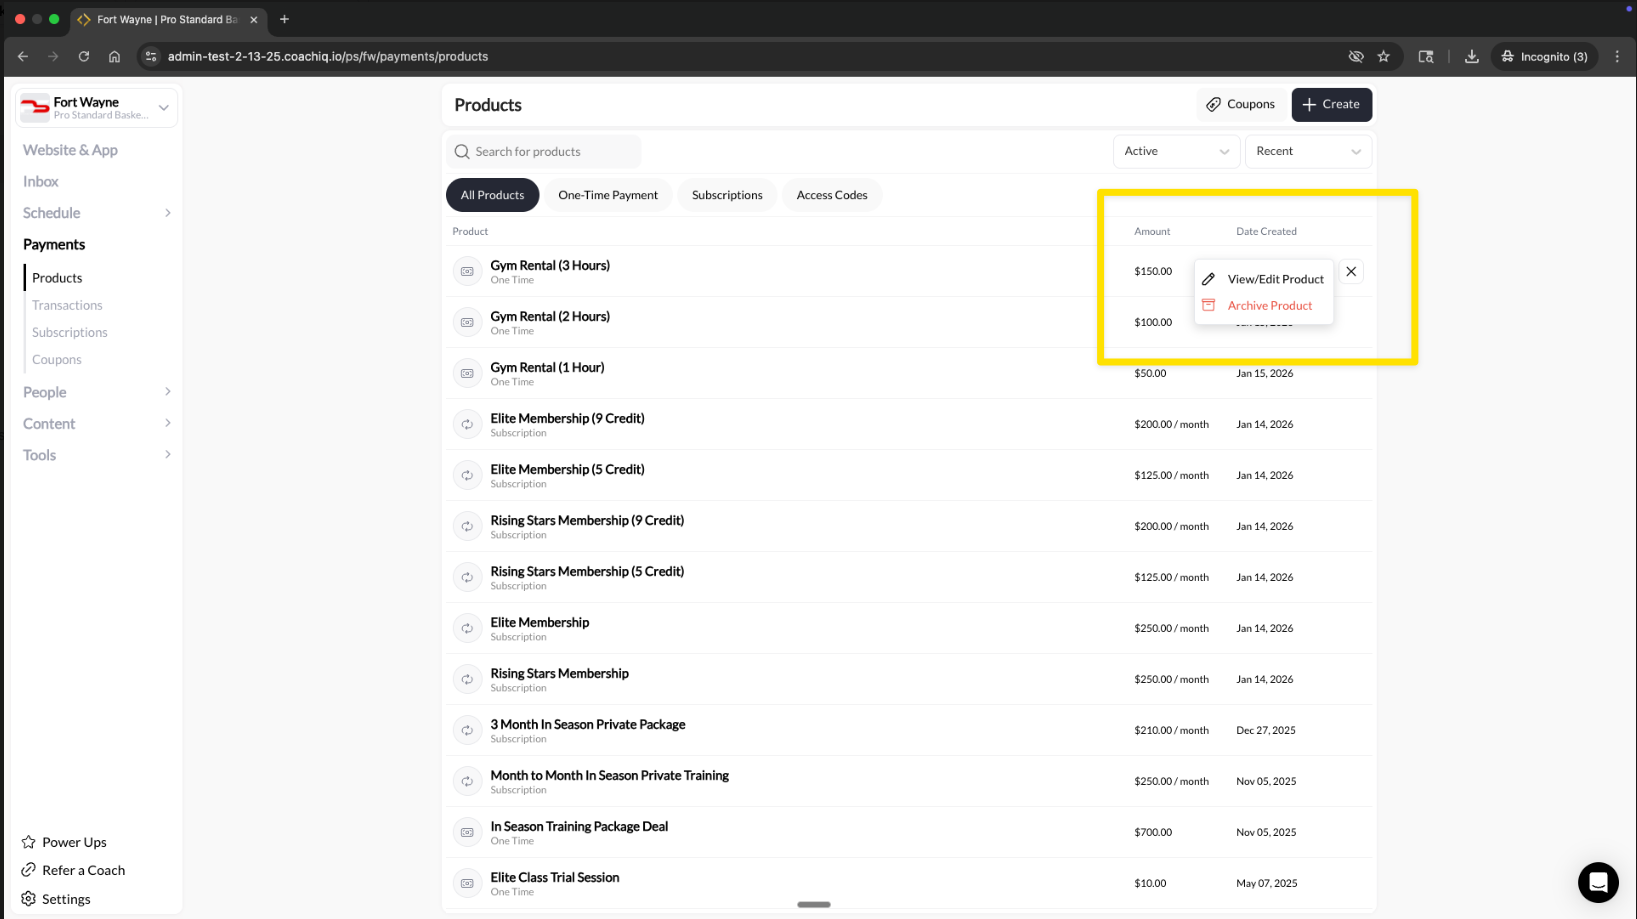 Click **Archive Product** to disable it.
**What happens when you archive:**
* Product can't be purchased anywhere (portal, schedulers, forms, direct links)
* Existing subscriptions and credits are not affected
* Transaction history and data remain intact
* Product moves to the "Archived" filter view
* You can unarchive later to re-enable the product
**Archive vs. not adding anywhere**: If you just want to hide a product temporarily, don't add it anywhere (or remove it from where it's displayed). Use Archive when you want to completely disable a product so it can't be purchased even if someone has the direct link.
### Viewing and restoring archived products
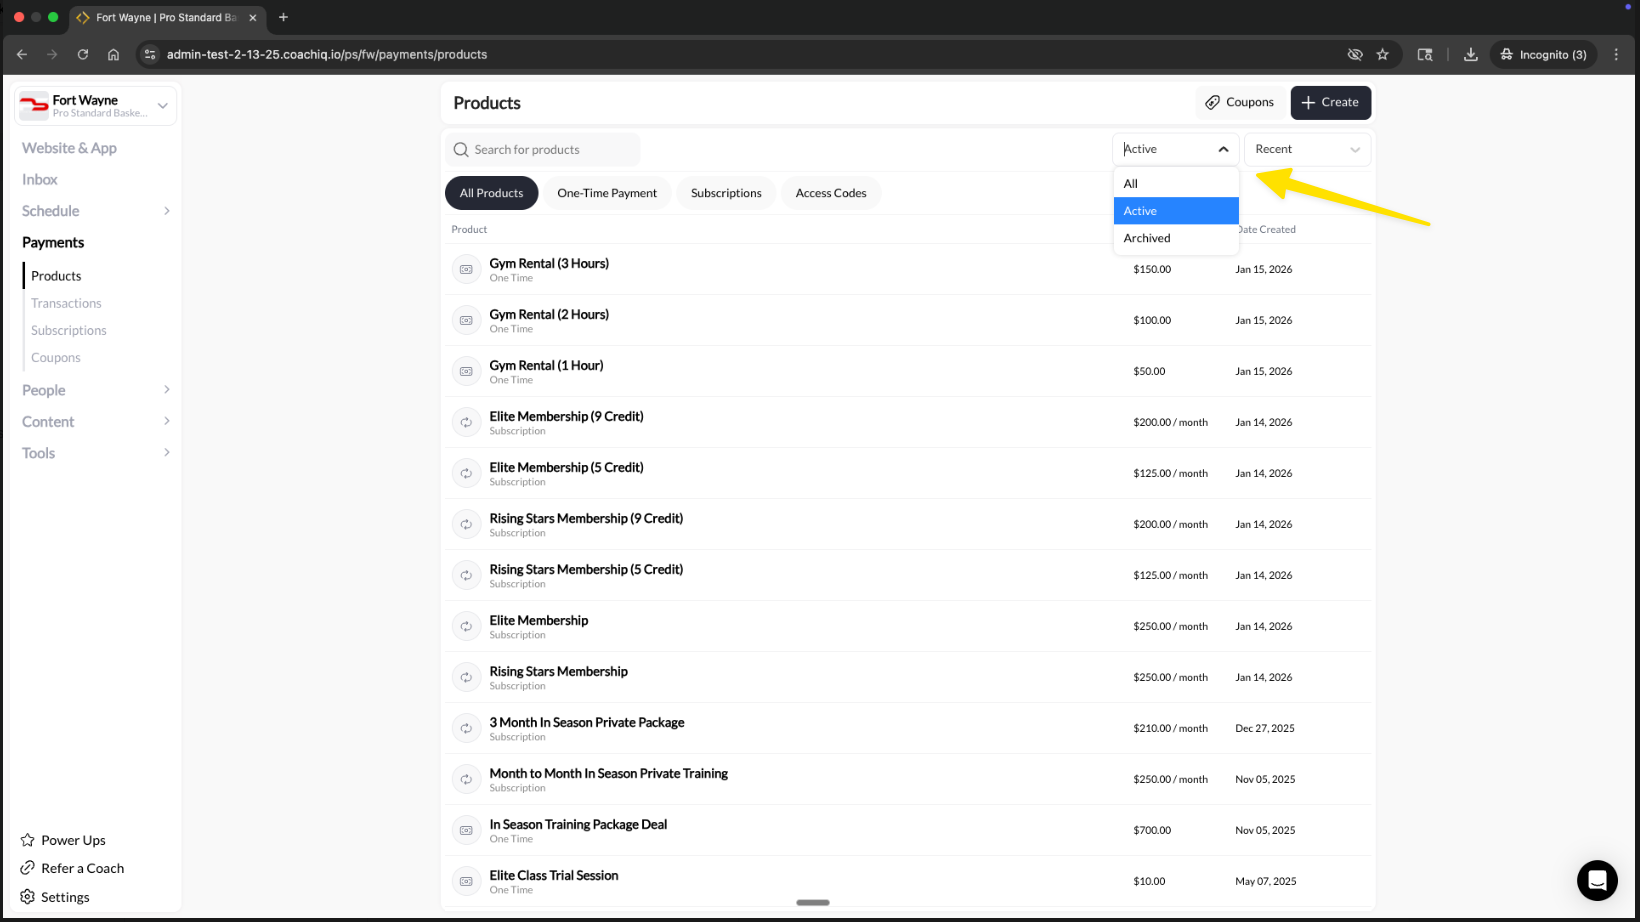
To see archived products, use the status filter dropdown on the Products page:
* **Active**: Products available for purchase
* **Archived**: Disabled products
* **All**: Both active and archived
Click **Archive Product** to disable it.
**What happens when you archive:**
* Product can't be purchased anywhere (portal, schedulers, forms, direct links)
* Existing subscriptions and credits are not affected
* Transaction history and data remain intact
* Product moves to the "Archived" filter view
* You can unarchive later to re-enable the product
**Archive vs. not adding anywhere**: If you just want to hide a product temporarily, don't add it anywhere (or remove it from where it's displayed). Use Archive when you want to completely disable a product so it can't be purchased even if someone has the direct link.
### Viewing and restoring archived products
To see archived products, use the status filter dropdown on the Products page:
* **Active**: Products available for purchase
* **Archived**: Disabled products
* **All**: Both active and archived
 To restore an archived product, view the archived product and select the option to unarchive it.
## What you need to know about products
**Stripe syncs automatically**: Products you create in CoachIQ appear in your Stripe dashboard. Products in Stripe appear in CoachIQ.
**Clients see product details**: Whatever you enter (name, description, features) displays during checkout. Write for your clients.
**Credits are optional**: Not every product needs to issue credits. Many coaches use products for payment only.
**Processing fees**: You choose whether to absorb Stripe fees (2.9% + \$0.30) or pass them to clients.
**Changes affect new purchases only**: Editing a product doesn't change existing transactions or active subscriptions.
## Next steps
1. [Getting Started](/payments/getting-started) - Learn how CoachIQ Payments works and how money flows from your clients to your bank account
2. [Connect Stripe](/payments/connecting-stripe) - Create and connect your Stripe account to start collecting payments
3. [Product Builder reference](/payments/product-builder) - Complete field-by-field documentation
To restore an archived product, view the archived product and select the option to unarchive it.
## What you need to know about products
**Stripe syncs automatically**: Products you create in CoachIQ appear in your Stripe dashboard. Products in Stripe appear in CoachIQ.
**Clients see product details**: Whatever you enter (name, description, features) displays during checkout. Write for your clients.
**Credits are optional**: Not every product needs to issue credits. Many coaches use products for payment only.
**Processing fees**: You choose whether to absorb Stripe fees (2.9% + \$0.30) or pass them to clients.
**Changes affect new purchases only**: Editing a product doesn't change existing transactions or active subscriptions.
## Next steps
1. [Getting Started](/payments/getting-started) - Learn how CoachIQ Payments works and how money flows from your clients to your bank account
2. [Connect Stripe](/payments/connecting-stripe) - Create and connect your Stripe account to start collecting payments
3. [Product Builder reference](/payments/product-builder) - Complete field-by-field documentation