> ## Documentation Index
> Fetch the complete documentation index at: https://help.coachiq.io/llms.txt
> Use this file to discover all available pages before exploring further.
# Adding & Editing Client Information
> Create new clients manually or import hundreds at once—plus how to keep client information accurate and up-to-date
**Where to find this**: Dashboard → **People** → **Clients** → **New User** button (top right)
## What you'll accomplish
Learn how to add individual clients to CoachIQ, bulk import your entire roster from a spreadsheet, edit client details as information changes, and add custom fields to track what matters most to your business.
***
## When to add clients manually vs bulk import
Choose your method based on your situation:
**Use the "New User" button when:**
* Adding 1-5 clients at a time
* Someone just signed up on your website
* You're onboarding a trial client
* You need immediate access to book them into a session
* You want to assign specific tags and roles during creation
**Advantage**: Full control, immediate profile creation, can add custom details right away
**Use spreadsheet import when:**
* Migrating from another platform (10+ clients)
* Starting fresh with CoachIQ and have an existing roster
* Adding an entire team or program cohort at once
* You already maintain a spreadsheet of athletes
**Advantage**: Add 100+ clients in seconds, no repetitive data entry, great for one-time migrations
**Pro tip**: Most coaches use manual entry for ongoing operations (new signups) and bulk import once during initial setup or when acquiring a new team/program.
***
## Adding clients manually
From **People → Clients**, click the **New User** button in the top-right corner.
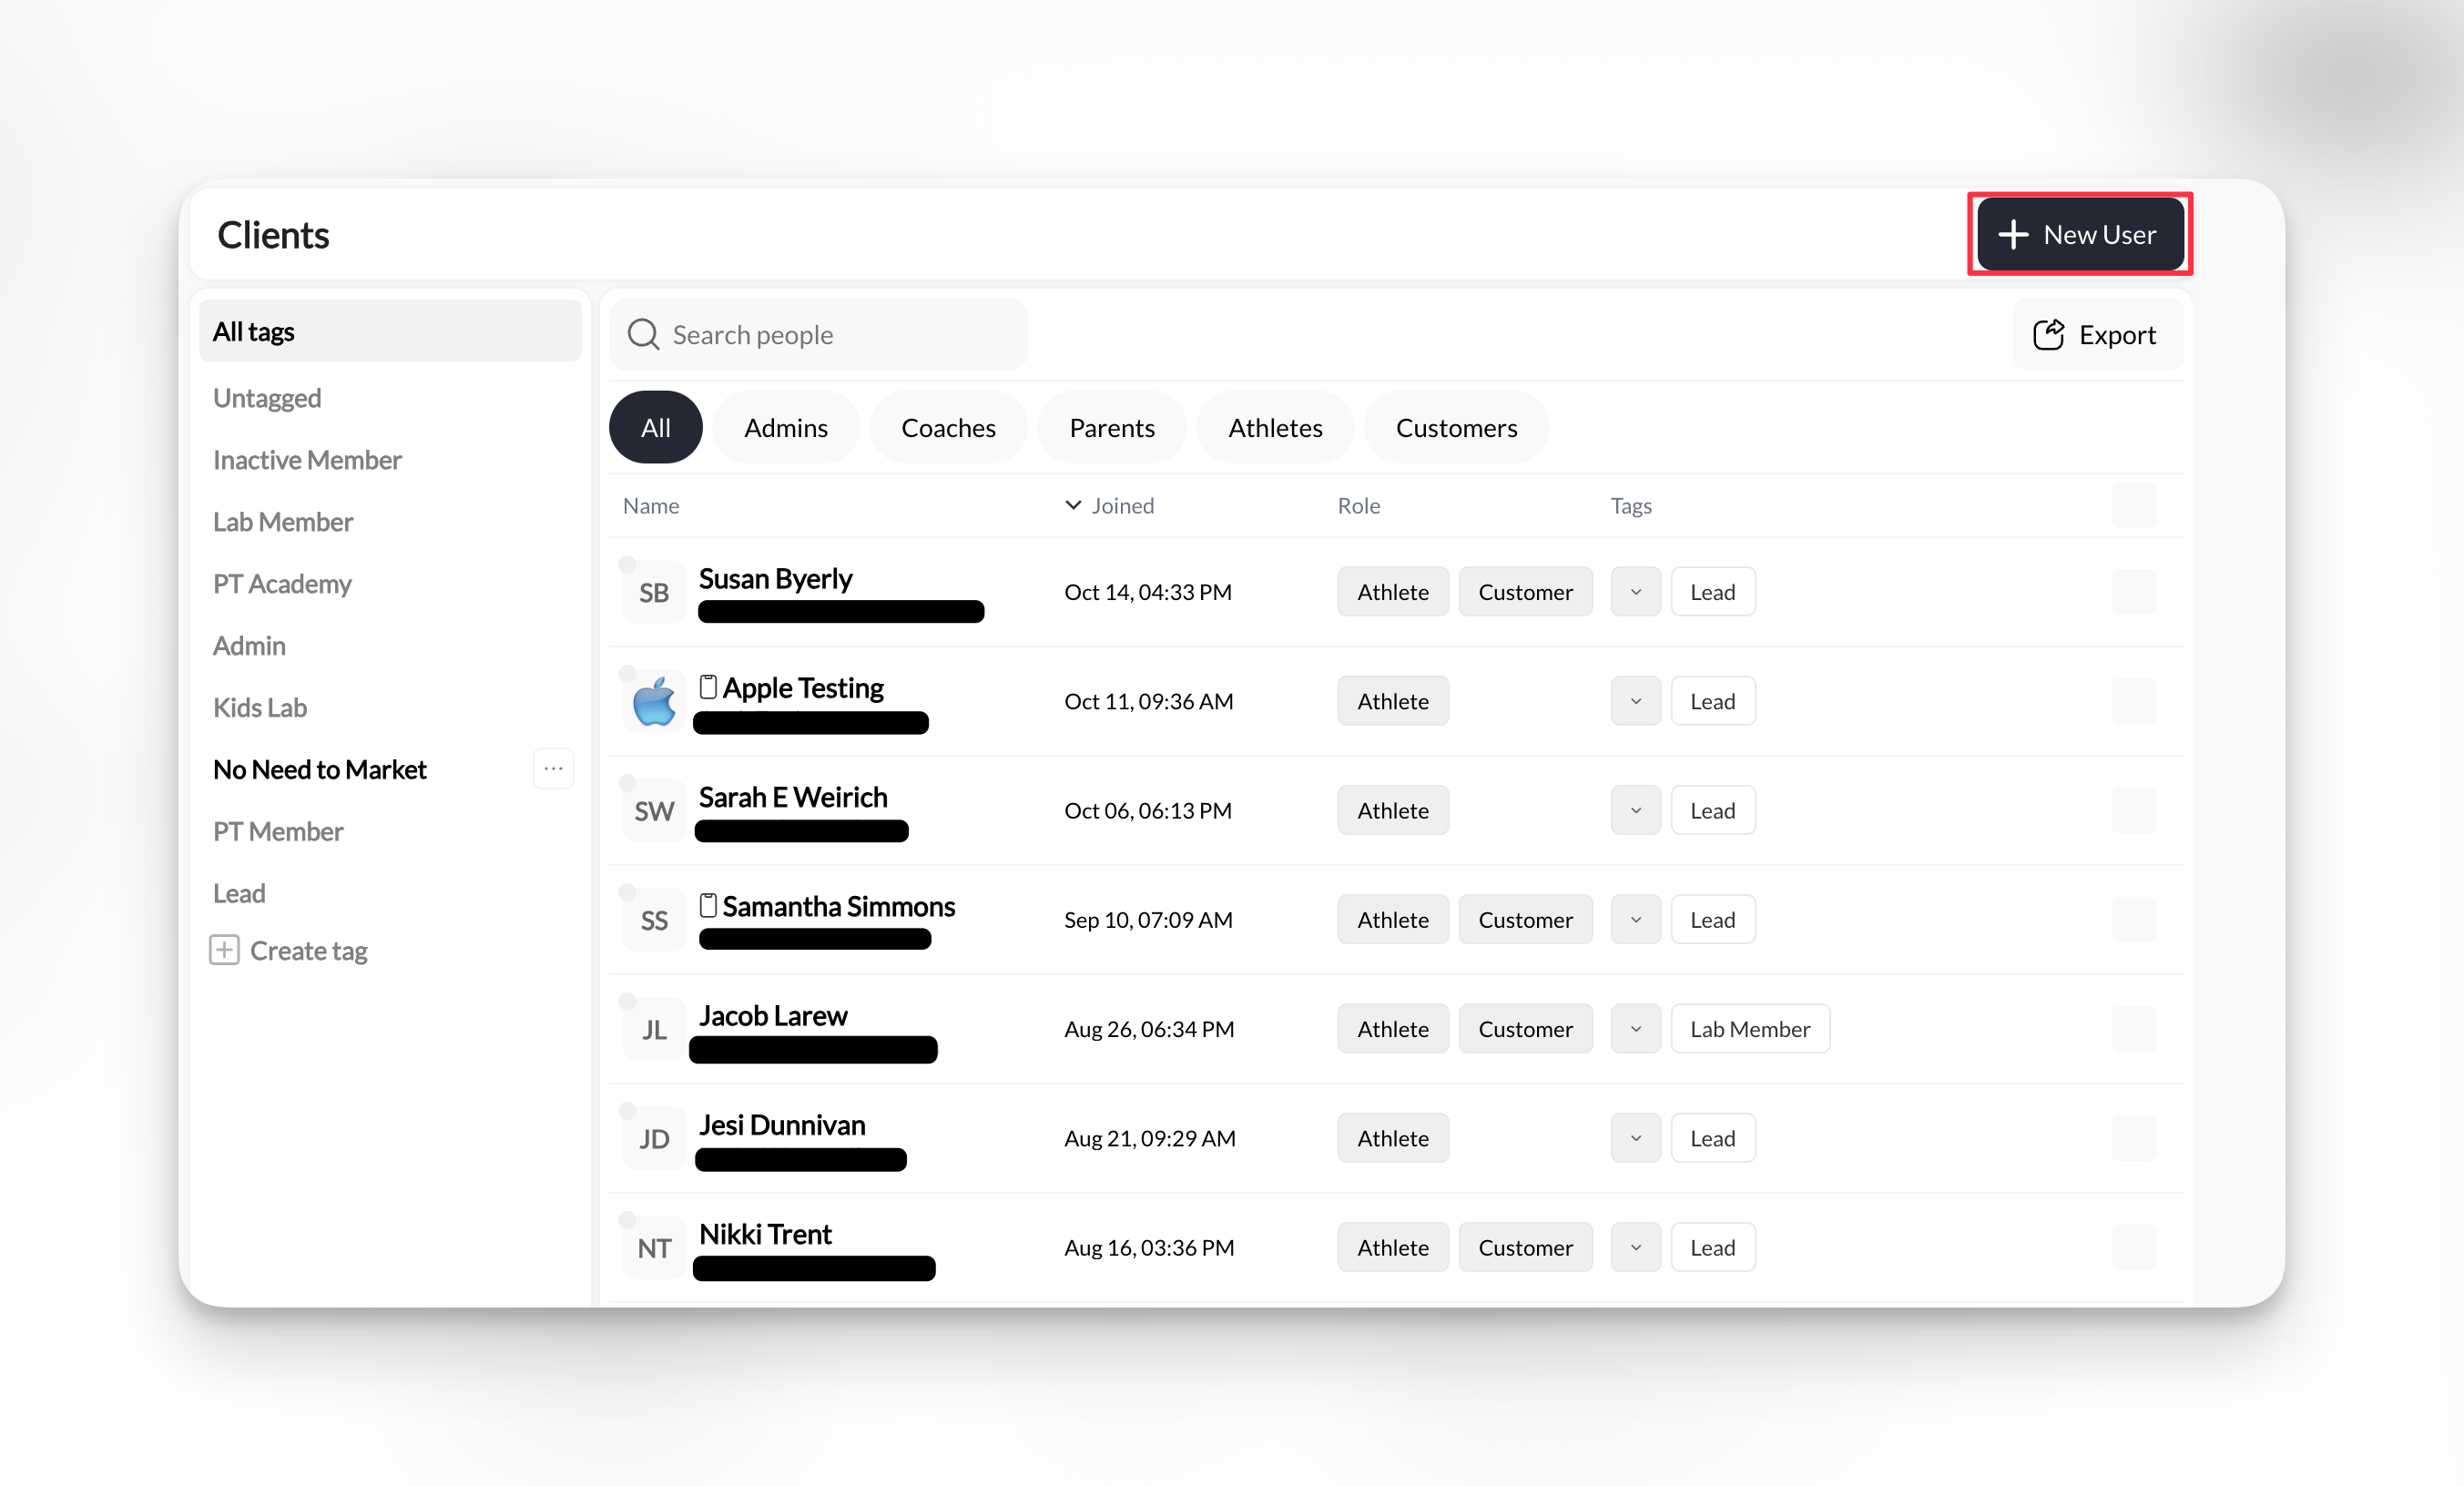 A form will appear with fields for client information.
Fill in the essential fields:
**Required fields:**
* **First Name** - Client's first name
* **Last Name** - Client's last name
* **Email** - Primary email address (used for login and communications)
* **Phone** - Mobile phone number for SMS (include country code)
**Email is critical**: This becomes their login credential for your Athlete Portal (mobile app/web). Use the email address they check regularly.
**Phone number format**: Use international format with country code, e.g., `+1 234 567 8900` for US numbers. This ensures SMS messages deliver correctly.
Select at least one role for this person:
**Common role selections:**
* **Athlete** - For anyone who trains with you (most common)
* **Parent** - For guardians of youth athletes
* **Coach** - If they also help deliver training (limited admin access)
* **Admin** - Full platform access (use sparingly)
**Multiple roles**: You can select multiple roles. For example, a paying athlete who trains with you would be both "Athlete" and "Customer".
**What roles control:**
* **App access**: Athletes/Parents see the athlete portal, Coaches/Admins see the coaching dashboard
* **Permissions**: What they can view, book, and manage
* **Filtering**: How they appear in your People list filters
Tags help you organize and filter clients. Add relevant tags during creation:
**Examples:**
* Program/group: "Elite Program", "Beginner Group", "Rising Stars"
* Status: "Trial", "Active Member", "Monthly Subscription"
* Location: "Downtown Facility", "North Campus"
* Custom: Whatever makes sense for your business
**Don't overthink it**: You can always add or change tags later. Start simple with 2-3 tags like program name and membership status.
**To add a tag**: Type the tag name in the "Tags" field. If it doesn't exist yet, CoachIQ will create it automatically.
Click **Create** **New User** button.
**Success!** The new client:
* Appears immediately in your People → Clients list
* Receives an email invitation to access your Athlete Portal
* Can now be booked into sessions, assigned products, and messaged
The client will receive an email with instructions to set their password and access your app/portal.
***
## Bulk importing from a spreadsheet
When you need to add many clients at once, bulk import saves hours of manual data entry.
Create a CSV or Excel file with these columns (headers must match exactly):
**Required columns:**
* `first_name`
* `last_name`
* `email`
* `phone`
**Optional columns:**
* `tags` (comma-separated, e.g., "Elite Program, Trial")
* `role` (e.g., "athlete", "parent")
**Example spreadsheet:**
| first\_name | last\_name | email | phone | tags | role |
| ----------- | ---------- | ------------------------------------------------- | --------------- | --------------------- | ------- |
| Sarah | Johnson | [sarah.j@email.com](mailto:sarah.j@email.com) | +1 555 123 4567 | Elite Program, Active | athlete |
| Mike | Chen | [mike.chen@email.com](mailto:mike.chen@email.com) | +1 555 234 5678 | Beginner Group | athlete |
**Clean your data first**:
* Remove duplicate email addresses (imports will fail for duplicates)
* Verify phone numbers include country codes
* Check for typos in email addresses
* Ensure consistent tag naming (case-sensitive)
From **People → Clients**, look for the **Import** button or navigate to **Settings → Import & Export → Import Athletes**.
**Location varies**: Some CoachIQ accounts have the import button directly in the People section, others access it through Settings. Check both locations.
1. Upload your CSV or Excel file
2. Map your spreadsheet columns to CoachIQ fields
3. Preview the first few rows to verify correct mapping
4. Choose whether to send invitation emails (recommended: No for bulk imports, send manually later)
**Test with 5 clients first**: Upload a small test file with 5 clients to verify your format works before importing your entire roster.
CoachIQ will show:
* How many clients will be imported
* Any errors or duplicates detected
* Which fields are missing
Click **Import** to process.
**Import complete!** Your clients now appear in the People list. You can filter by the tags you imported to verify everything processed correctly.
After bulk importing:
1. **Verify the import**: Filter by imported tags to check client count
2. **Send welcome messages**: Use Inbox to send a group message to all imported clients
3. **Provide login instructions**: Send app download links and first-time login guidance
4. **Assign products/programs**: If they should have access to content or credits, add those next
**Welcome automation**: Consider setting up an automation (Tools → Automations) that triggers when "New User" is created to send welcome messages automatically.
***
## Editing client information
Client details change—email addresses, phone numbers, roles, tags. Here's how to keep information current:
From **People → Clients**, click the client's name to open their full profile.
A form will appear with fields for client information.
Fill in the essential fields:
**Required fields:**
* **First Name** - Client's first name
* **Last Name** - Client's last name
* **Email** - Primary email address (used for login and communications)
* **Phone** - Mobile phone number for SMS (include country code)
**Email is critical**: This becomes their login credential for your Athlete Portal (mobile app/web). Use the email address they check regularly.
**Phone number format**: Use international format with country code, e.g., `+1 234 567 8900` for US numbers. This ensures SMS messages deliver correctly.
Select at least one role for this person:
**Common role selections:**
* **Athlete** - For anyone who trains with you (most common)
* **Parent** - For guardians of youth athletes
* **Coach** - If they also help deliver training (limited admin access)
* **Admin** - Full platform access (use sparingly)
**Multiple roles**: You can select multiple roles. For example, a paying athlete who trains with you would be both "Athlete" and "Customer".
**What roles control:**
* **App access**: Athletes/Parents see the athlete portal, Coaches/Admins see the coaching dashboard
* **Permissions**: What they can view, book, and manage
* **Filtering**: How they appear in your People list filters
Tags help you organize and filter clients. Add relevant tags during creation:
**Examples:**
* Program/group: "Elite Program", "Beginner Group", "Rising Stars"
* Status: "Trial", "Active Member", "Monthly Subscription"
* Location: "Downtown Facility", "North Campus"
* Custom: Whatever makes sense for your business
**Don't overthink it**: You can always add or change tags later. Start simple with 2-3 tags like program name and membership status.
**To add a tag**: Type the tag name in the "Tags" field. If it doesn't exist yet, CoachIQ will create it automatically.
Click **Create** **New User** button.
**Success!** The new client:
* Appears immediately in your People → Clients list
* Receives an email invitation to access your Athlete Portal
* Can now be booked into sessions, assigned products, and messaged
The client will receive an email with instructions to set their password and access your app/portal.
***
## Bulk importing from a spreadsheet
When you need to add many clients at once, bulk import saves hours of manual data entry.
Create a CSV or Excel file with these columns (headers must match exactly):
**Required columns:**
* `first_name`
* `last_name`
* `email`
* `phone`
**Optional columns:**
* `tags` (comma-separated, e.g., "Elite Program, Trial")
* `role` (e.g., "athlete", "parent")
**Example spreadsheet:**
| first\_name | last\_name | email | phone | tags | role |
| ----------- | ---------- | ------------------------------------------------- | --------------- | --------------------- | ------- |
| Sarah | Johnson | [sarah.j@email.com](mailto:sarah.j@email.com) | +1 555 123 4567 | Elite Program, Active | athlete |
| Mike | Chen | [mike.chen@email.com](mailto:mike.chen@email.com) | +1 555 234 5678 | Beginner Group | athlete |
**Clean your data first**:
* Remove duplicate email addresses (imports will fail for duplicates)
* Verify phone numbers include country codes
* Check for typos in email addresses
* Ensure consistent tag naming (case-sensitive)
From **People → Clients**, look for the **Import** button or navigate to **Settings → Import & Export → Import Athletes**.
**Location varies**: Some CoachIQ accounts have the import button directly in the People section, others access it through Settings. Check both locations.
1. Upload your CSV or Excel file
2. Map your spreadsheet columns to CoachIQ fields
3. Preview the first few rows to verify correct mapping
4. Choose whether to send invitation emails (recommended: No for bulk imports, send manually later)
**Test with 5 clients first**: Upload a small test file with 5 clients to verify your format works before importing your entire roster.
CoachIQ will show:
* How many clients will be imported
* Any errors or duplicates detected
* Which fields are missing
Click **Import** to process.
**Import complete!** Your clients now appear in the People list. You can filter by the tags you imported to verify everything processed correctly.
After bulk importing:
1. **Verify the import**: Filter by imported tags to check client count
2. **Send welcome messages**: Use Inbox to send a group message to all imported clients
3. **Provide login instructions**: Send app download links and first-time login guidance
4. **Assign products/programs**: If they should have access to content or credits, add those next
**Welcome automation**: Consider setting up an automation (Tools → Automations) that triggers when "New User" is created to send welcome messages automatically.
***
## Editing client information
Client details change—email addresses, phone numbers, roles, tags. Here's how to keep information current:
From **People → Clients**, click the client's name to open their full profile.
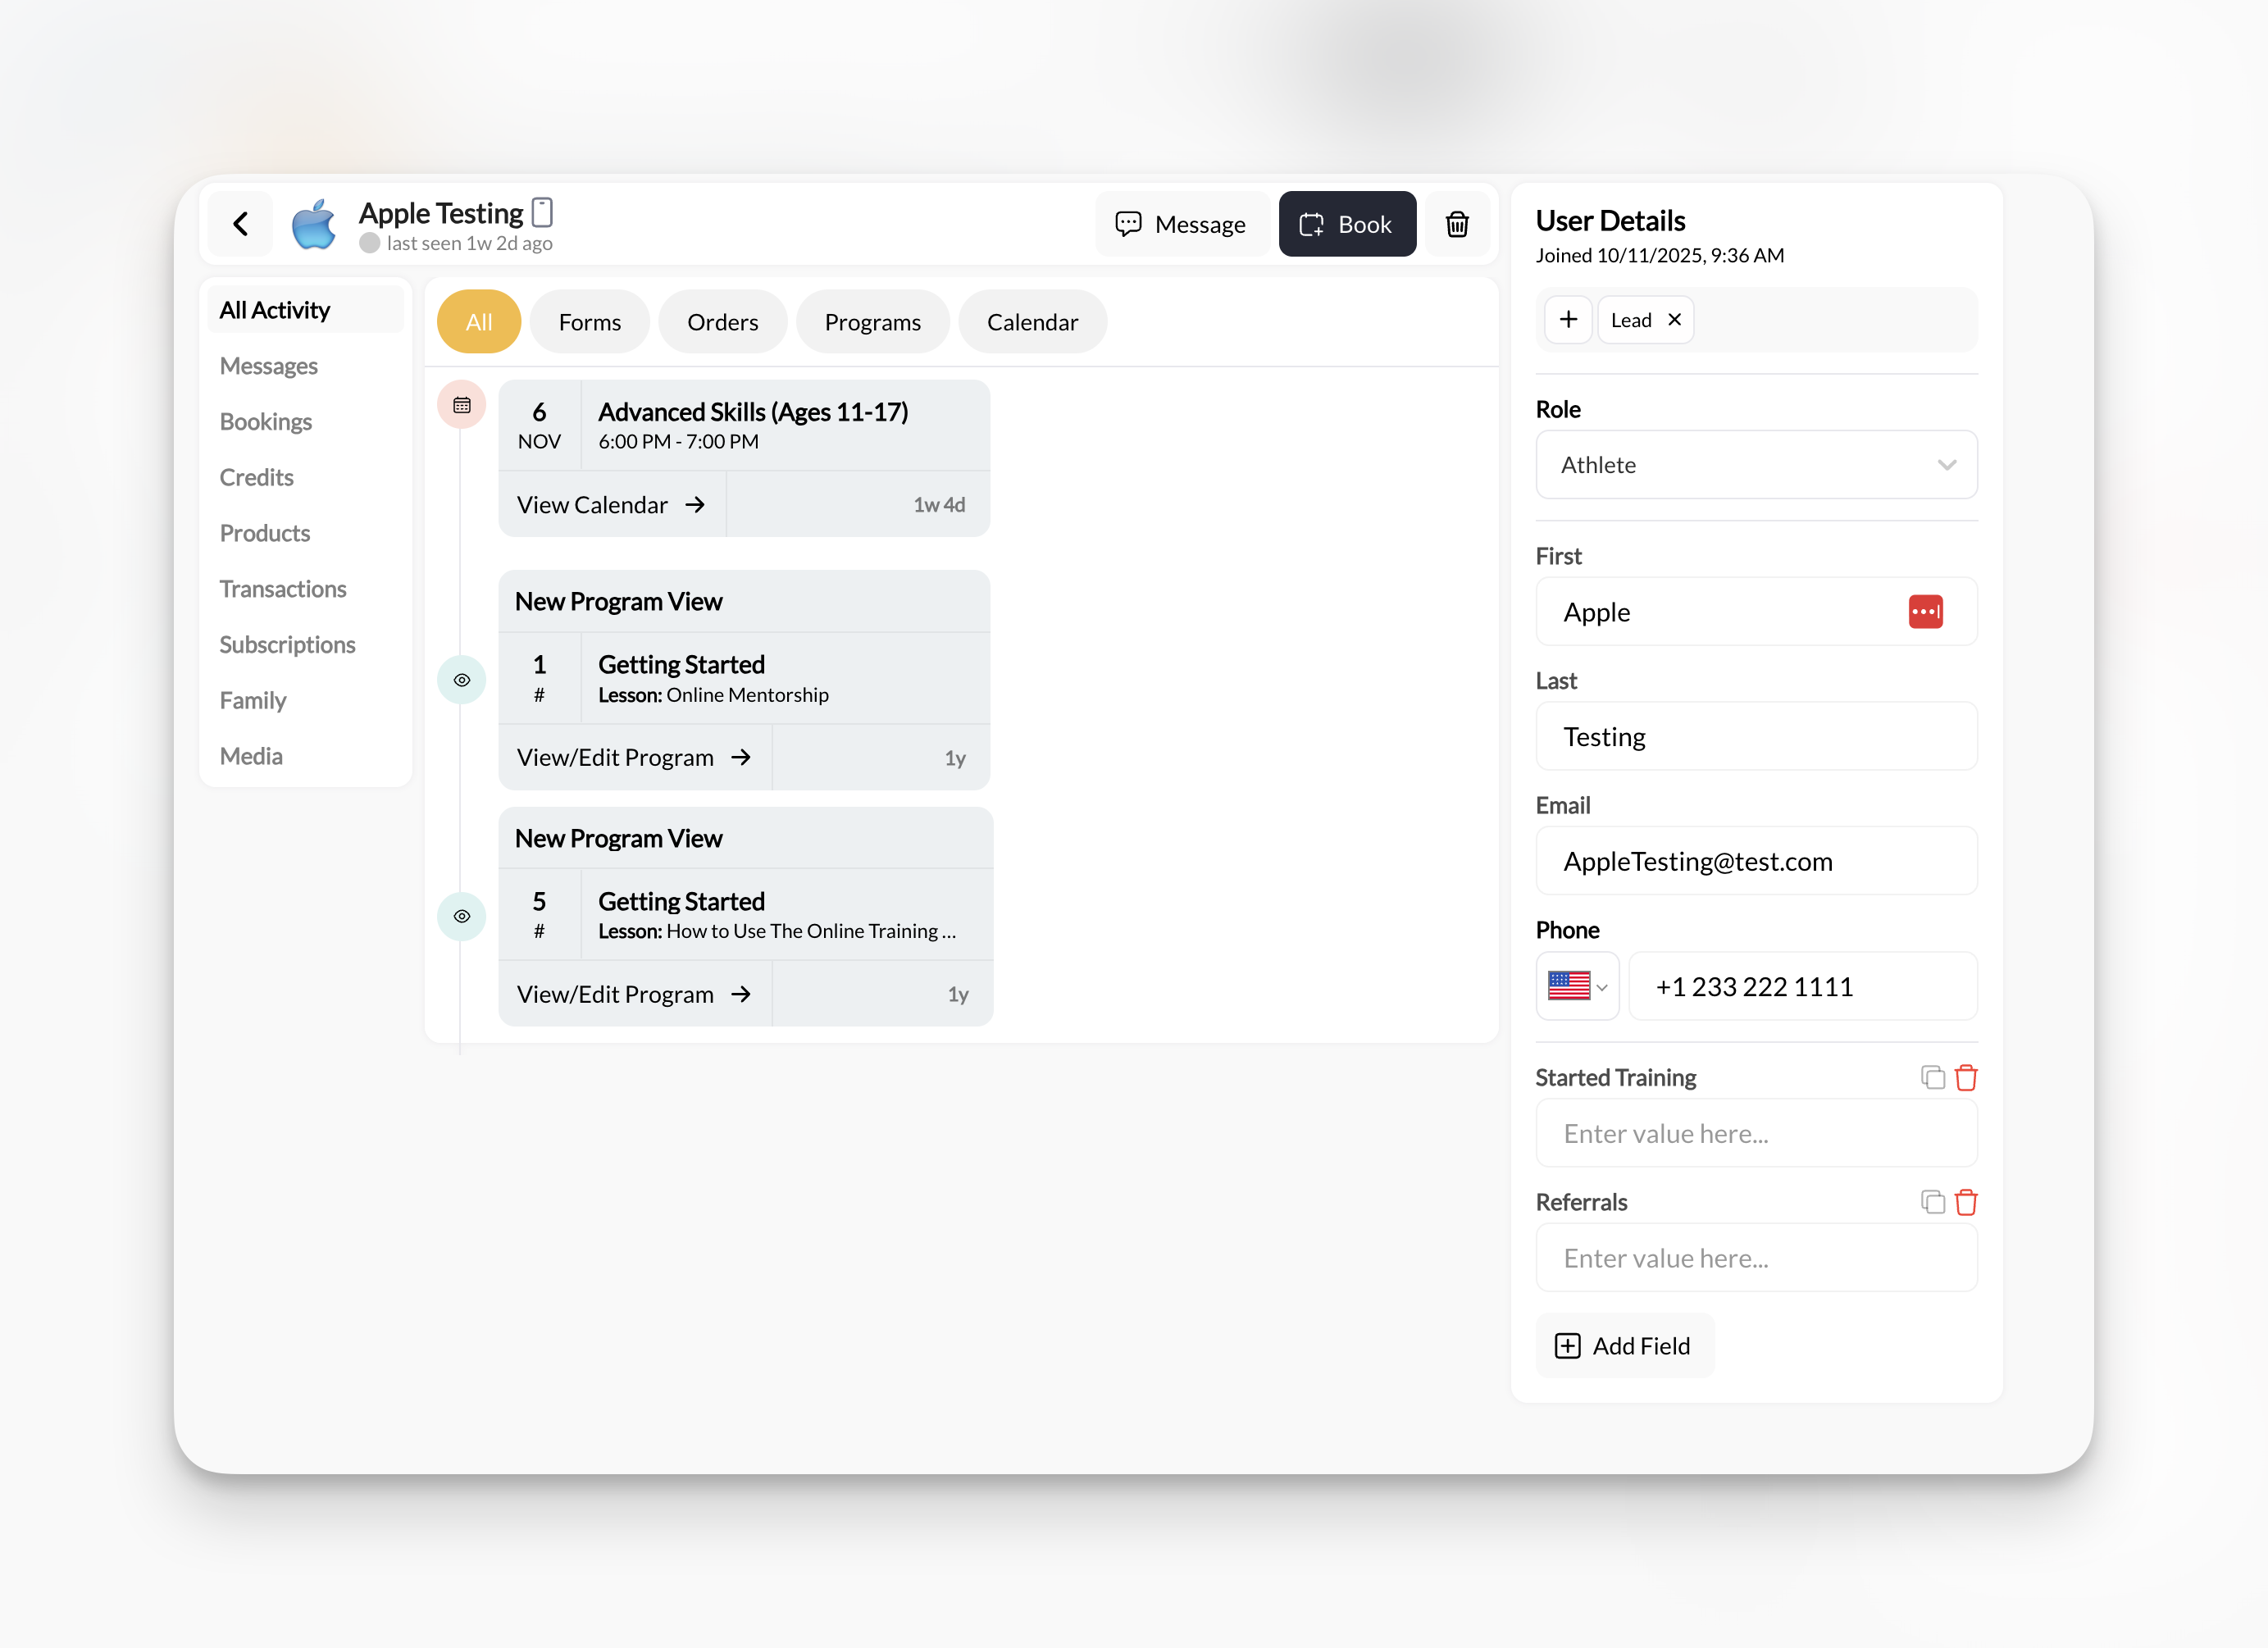 On the right side of the profile, you'll see the **User Details** panel with:
* Role dropdown
* First name field
* Last name field
* Email field
* Phone number field
* **+ Add Field** button (for custom fields)
**To edit**: Click into any field, make your change, and it saves automatically.
**Changing email addresses**: If you change someone's email, they'll need to use the NEW email to log in. Notify them immediately to avoid confusion.
**To change roles:**
1. Click the **Role** dropdown in User Details
2. Select/deselect roles as needed
3. Changes save automatically
**To update tags:**
1. Scroll to the Tags field in User Details
2. Add or remove tags (type to search existing tags)
3. Changes save immediately
**Bulk tag updates**: To change tags for multiple clients at once, use the Clients list view—select multiple clients, then use bulk actions to add/remove tags. Details in [Organizing Clients with Tags & Filters](/people/tags-filters).
***
## Adding custom fields
Beyond the standard fields (name, email, phone), you can track custom information specific to your business.
**Common custom field examples:**
* Emergency contact name/phone
* School or team affiliation
* Jersey number
* Graduation year
* Parent's work phone
* Medical conditions or allergies
* Referral source
In the User Details sidebar of any client profile, click **+ Add Field** at the bottom.
1. Enter a field name (e.g., "Emergency Contact")
2. Enter the value for this specific client
3. Click save
**Custom fields are global**: Once you create a custom field for one client, it becomes available for ALL clients. You don't have to fill it in for everyone—only for those where it's relevant.
After creating custom fields, you can:
* View them in the User Details sidebar for each client
* Edit values at any time
* Use them for reporting or segmentation
**Limitation**: Custom fields appear in client profiles but aren't currently available as filter options in the main Clients list. Use tags for filterable organization.
***
## Exporting client data
Need your client list in a spreadsheet? Use the export feature for backups, external tools, or reporting.
**To export:**
1. Go to **People → Clients**
2. Apply any filters (optional—export only filtered results)
3. Click **Export** button (top right)
4. Download the CSV file
**What's included in the export:**
* Name (first and last)
* Email address
* Phone number
* Role(s)
* Tags
* Join date
* Custom field values
**Privacy reminder**: Exported files contain personal information. Store securely, share only when necessary, and delete copies when no longer needed. Comply with your privacy policy and applicable regulations.
**Regular backups**: Consider exporting your full client list monthly as a backup. Store securely with your other business records.
***
## Common questions
Immediately after creation:
1. Client appears in your People → Clients list
2. They receive an email invitation to access your Athlete Portal
3. You can now book them into sessions, message them, and assign products
4. They can download your mobile app or access the web portal using the email you entered
**Email invitation**: Contains a link to set their password and get started. If they don't see it, check spam folders or resend from their profile.
No—email is required because it serves as their login credential for your Athlete Portal.
**Workarounds for special cases:**
* **Youth athletes without email**: Use a parent's email and set Role as "Parent", then link the child later
* **Team accounts**: Create a temporary email (e.g., `team-placeholder@yourfacility.com`) but you'll need to update it later for them to access the portal
**Best practice**: Always use real, working email addresses. It ensures clients can log in, receive booking confirmations, and get messages.
CoachIQ checks for duplicate email addresses during import. If a duplicate is detected:
* That row is skipped (not imported)
* You'll see an error message identifying the duplicate
* Other non-duplicate clients in the file still import successfully
**To fix**: Remove duplicate emails from your spreadsheet and re-import just those clients, or manually add them one by one.
Yes, partially. Clients can update their own:
* Name
* Email address
* Phone number
* Password
* Profile photo
They access these settings through the Athlete Portal (mobile app or web) under their account settings.
**You control**: Roles, tags, credits, product assignments, and custom fields—clients cannot change these.
From the client's profile, click the **Delete** button (trash icon) in the top-right corner near "Message" and "Book" buttons.
**What happens:**
* Client is removed from your People list
* They lose access to your Athlete Portal immediately
* Historical data (past bookings, transactions, messages) is preserved for your records
* They WILL be charged for any upcoming subscriptions. Subscriptions and billing are handled via Stripe. Be sure to cancel any active subscriptions before deleting a user.
**This cannot be undone easily**. Consider using an "Inactive" tag instead if they might return or you want to preserve their active status.
Yes! Roles can be changed at any time:
1. Open their profile (People → Clients or Staff)
2. In the User Details sidebar, update the **Role** dropdown
3. Changes save automatically
**Example**: An athlete who starts coaching for you can have both "Athlete" and "Coach" roles. They'll see the coaching dashboard AND their own athlete profile.
***
## Pro tips for client management
Always add at least 2 tags when creating clients: their program/group and their status (Trial, Member, etc.). Makes filtering and messaging much easier later.
Double-check email and phone before saving. Typos in email = client can't log in. Wrong phone = SMS won't deliver.
Decide on a format for names (First Last, or Nickname Full Last) and stick to it. Makes your client list clean and searchable.
Right after creating a client, open their profile and add a comment in their Activity with context: how you met, what they're training for, referral source. Future-you will thank you.
***
## What's next
Now that you know how to add and edit clients, explore what you can do with their profiles:
Understand the complete activity dashboard and all profile tabs
Master filtering, segmentation, and using tags for group messaging
How to book clients into sessions from their profile
Send individual or group messages to your client base
***
## Related articles
Back to main People section guide
Adding and managing coaching team
View and adjust client credit balances
Connect parent and child accounts
Update multiple clients at once with tags
Advanced import/export settings
***
**You now know how to**: Add individual clients manually, bulk import from spreadsheets, edit client information, add custom fields, and manage client data responsibly.
On the right side of the profile, you'll see the **User Details** panel with:
* Role dropdown
* First name field
* Last name field
* Email field
* Phone number field
* **+ Add Field** button (for custom fields)
**To edit**: Click into any field, make your change, and it saves automatically.
**Changing email addresses**: If you change someone's email, they'll need to use the NEW email to log in. Notify them immediately to avoid confusion.
**To change roles:**
1. Click the **Role** dropdown in User Details
2. Select/deselect roles as needed
3. Changes save automatically
**To update tags:**
1. Scroll to the Tags field in User Details
2. Add or remove tags (type to search existing tags)
3. Changes save immediately
**Bulk tag updates**: To change tags for multiple clients at once, use the Clients list view—select multiple clients, then use bulk actions to add/remove tags. Details in [Organizing Clients with Tags & Filters](/people/tags-filters).
***
## Adding custom fields
Beyond the standard fields (name, email, phone), you can track custom information specific to your business.
**Common custom field examples:**
* Emergency contact name/phone
* School or team affiliation
* Jersey number
* Graduation year
* Parent's work phone
* Medical conditions or allergies
* Referral source
In the User Details sidebar of any client profile, click **+ Add Field** at the bottom.
1. Enter a field name (e.g., "Emergency Contact")
2. Enter the value for this specific client
3. Click save
**Custom fields are global**: Once you create a custom field for one client, it becomes available for ALL clients. You don't have to fill it in for everyone—only for those where it's relevant.
After creating custom fields, you can:
* View them in the User Details sidebar for each client
* Edit values at any time
* Use them for reporting or segmentation
**Limitation**: Custom fields appear in client profiles but aren't currently available as filter options in the main Clients list. Use tags for filterable organization.
***
## Exporting client data
Need your client list in a spreadsheet? Use the export feature for backups, external tools, or reporting.
**To export:**
1. Go to **People → Clients**
2. Apply any filters (optional—export only filtered results)
3. Click **Export** button (top right)
4. Download the CSV file
**What's included in the export:**
* Name (first and last)
* Email address
* Phone number
* Role(s)
* Tags
* Join date
* Custom field values
**Privacy reminder**: Exported files contain personal information. Store securely, share only when necessary, and delete copies when no longer needed. Comply with your privacy policy and applicable regulations.
**Regular backups**: Consider exporting your full client list monthly as a backup. Store securely with your other business records.
***
## Common questions
Immediately after creation:
1. Client appears in your People → Clients list
2. They receive an email invitation to access your Athlete Portal
3. You can now book them into sessions, message them, and assign products
4. They can download your mobile app or access the web portal using the email you entered
**Email invitation**: Contains a link to set their password and get started. If they don't see it, check spam folders or resend from their profile.
No—email is required because it serves as their login credential for your Athlete Portal.
**Workarounds for special cases:**
* **Youth athletes without email**: Use a parent's email and set Role as "Parent", then link the child later
* **Team accounts**: Create a temporary email (e.g., `team-placeholder@yourfacility.com`) but you'll need to update it later for them to access the portal
**Best practice**: Always use real, working email addresses. It ensures clients can log in, receive booking confirmations, and get messages.
CoachIQ checks for duplicate email addresses during import. If a duplicate is detected:
* That row is skipped (not imported)
* You'll see an error message identifying the duplicate
* Other non-duplicate clients in the file still import successfully
**To fix**: Remove duplicate emails from your spreadsheet and re-import just those clients, or manually add them one by one.
Yes, partially. Clients can update their own:
* Name
* Email address
* Phone number
* Password
* Profile photo
They access these settings through the Athlete Portal (mobile app or web) under their account settings.
**You control**: Roles, tags, credits, product assignments, and custom fields—clients cannot change these.
From the client's profile, click the **Delete** button (trash icon) in the top-right corner near "Message" and "Book" buttons.
**What happens:**
* Client is removed from your People list
* They lose access to your Athlete Portal immediately
* Historical data (past bookings, transactions, messages) is preserved for your records
* They WILL be charged for any upcoming subscriptions. Subscriptions and billing are handled via Stripe. Be sure to cancel any active subscriptions before deleting a user.
**This cannot be undone easily**. Consider using an "Inactive" tag instead if they might return or you want to preserve their active status.
Yes! Roles can be changed at any time:
1. Open their profile (People → Clients or Staff)
2. In the User Details sidebar, update the **Role** dropdown
3. Changes save automatically
**Example**: An athlete who starts coaching for you can have both "Athlete" and "Coach" roles. They'll see the coaching dashboard AND their own athlete profile.
***
## Pro tips for client management
Always add at least 2 tags when creating clients: their program/group and their status (Trial, Member, etc.). Makes filtering and messaging much easier later.
Double-check email and phone before saving. Typos in email = client can't log in. Wrong phone = SMS won't deliver.
Decide on a format for names (First Last, or Nickname Full Last) and stick to it. Makes your client list clean and searchable.
Right after creating a client, open their profile and add a comment in their Activity with context: how you met, what they're training for, referral source. Future-you will thank you.
***
## What's next
Now that you know how to add and edit clients, explore what you can do with their profiles:
Understand the complete activity dashboard and all profile tabs
Master filtering, segmentation, and using tags for group messaging
How to book clients into sessions from their profile
Send individual or group messages to your client base
***
## Related articles
Back to main People section guide
Adding and managing coaching team
View and adjust client credit balances
Connect parent and child accounts
Update multiple clients at once with tags
Advanced import/export settings
***
**You now know how to**: Add individual clients manually, bulk import from spreadsheets, edit client information, add custom fields, and manage client data responsibly.