> ## Documentation Index
> Fetch the complete documentation index at: https://help.coachiq.io/llms.txt
> Use this file to discover all available pages before exploring further.
# Sign-up & Profile: Control What You Collect at Sign-up
> Decide whether new accounts are parents or athletes, choose which fields appear on your sign-up form, mark them required, and add custom profile fields.
**Where to find this**: **People → Sign-up & Profile**
## What you'll accomplish
Shape the account people create when they join you: force the right account type, pick the fields they fill in, make the important ones required, and add your own custom fields (jersey size, emergency contact, school) so every profile has what you need from day one.
Everything on this page applies both to **public sign-up** (someone registers through your website, athlete portal, or a form) and to the form you see when you **add a user yourself**.
***
## The page at a glance
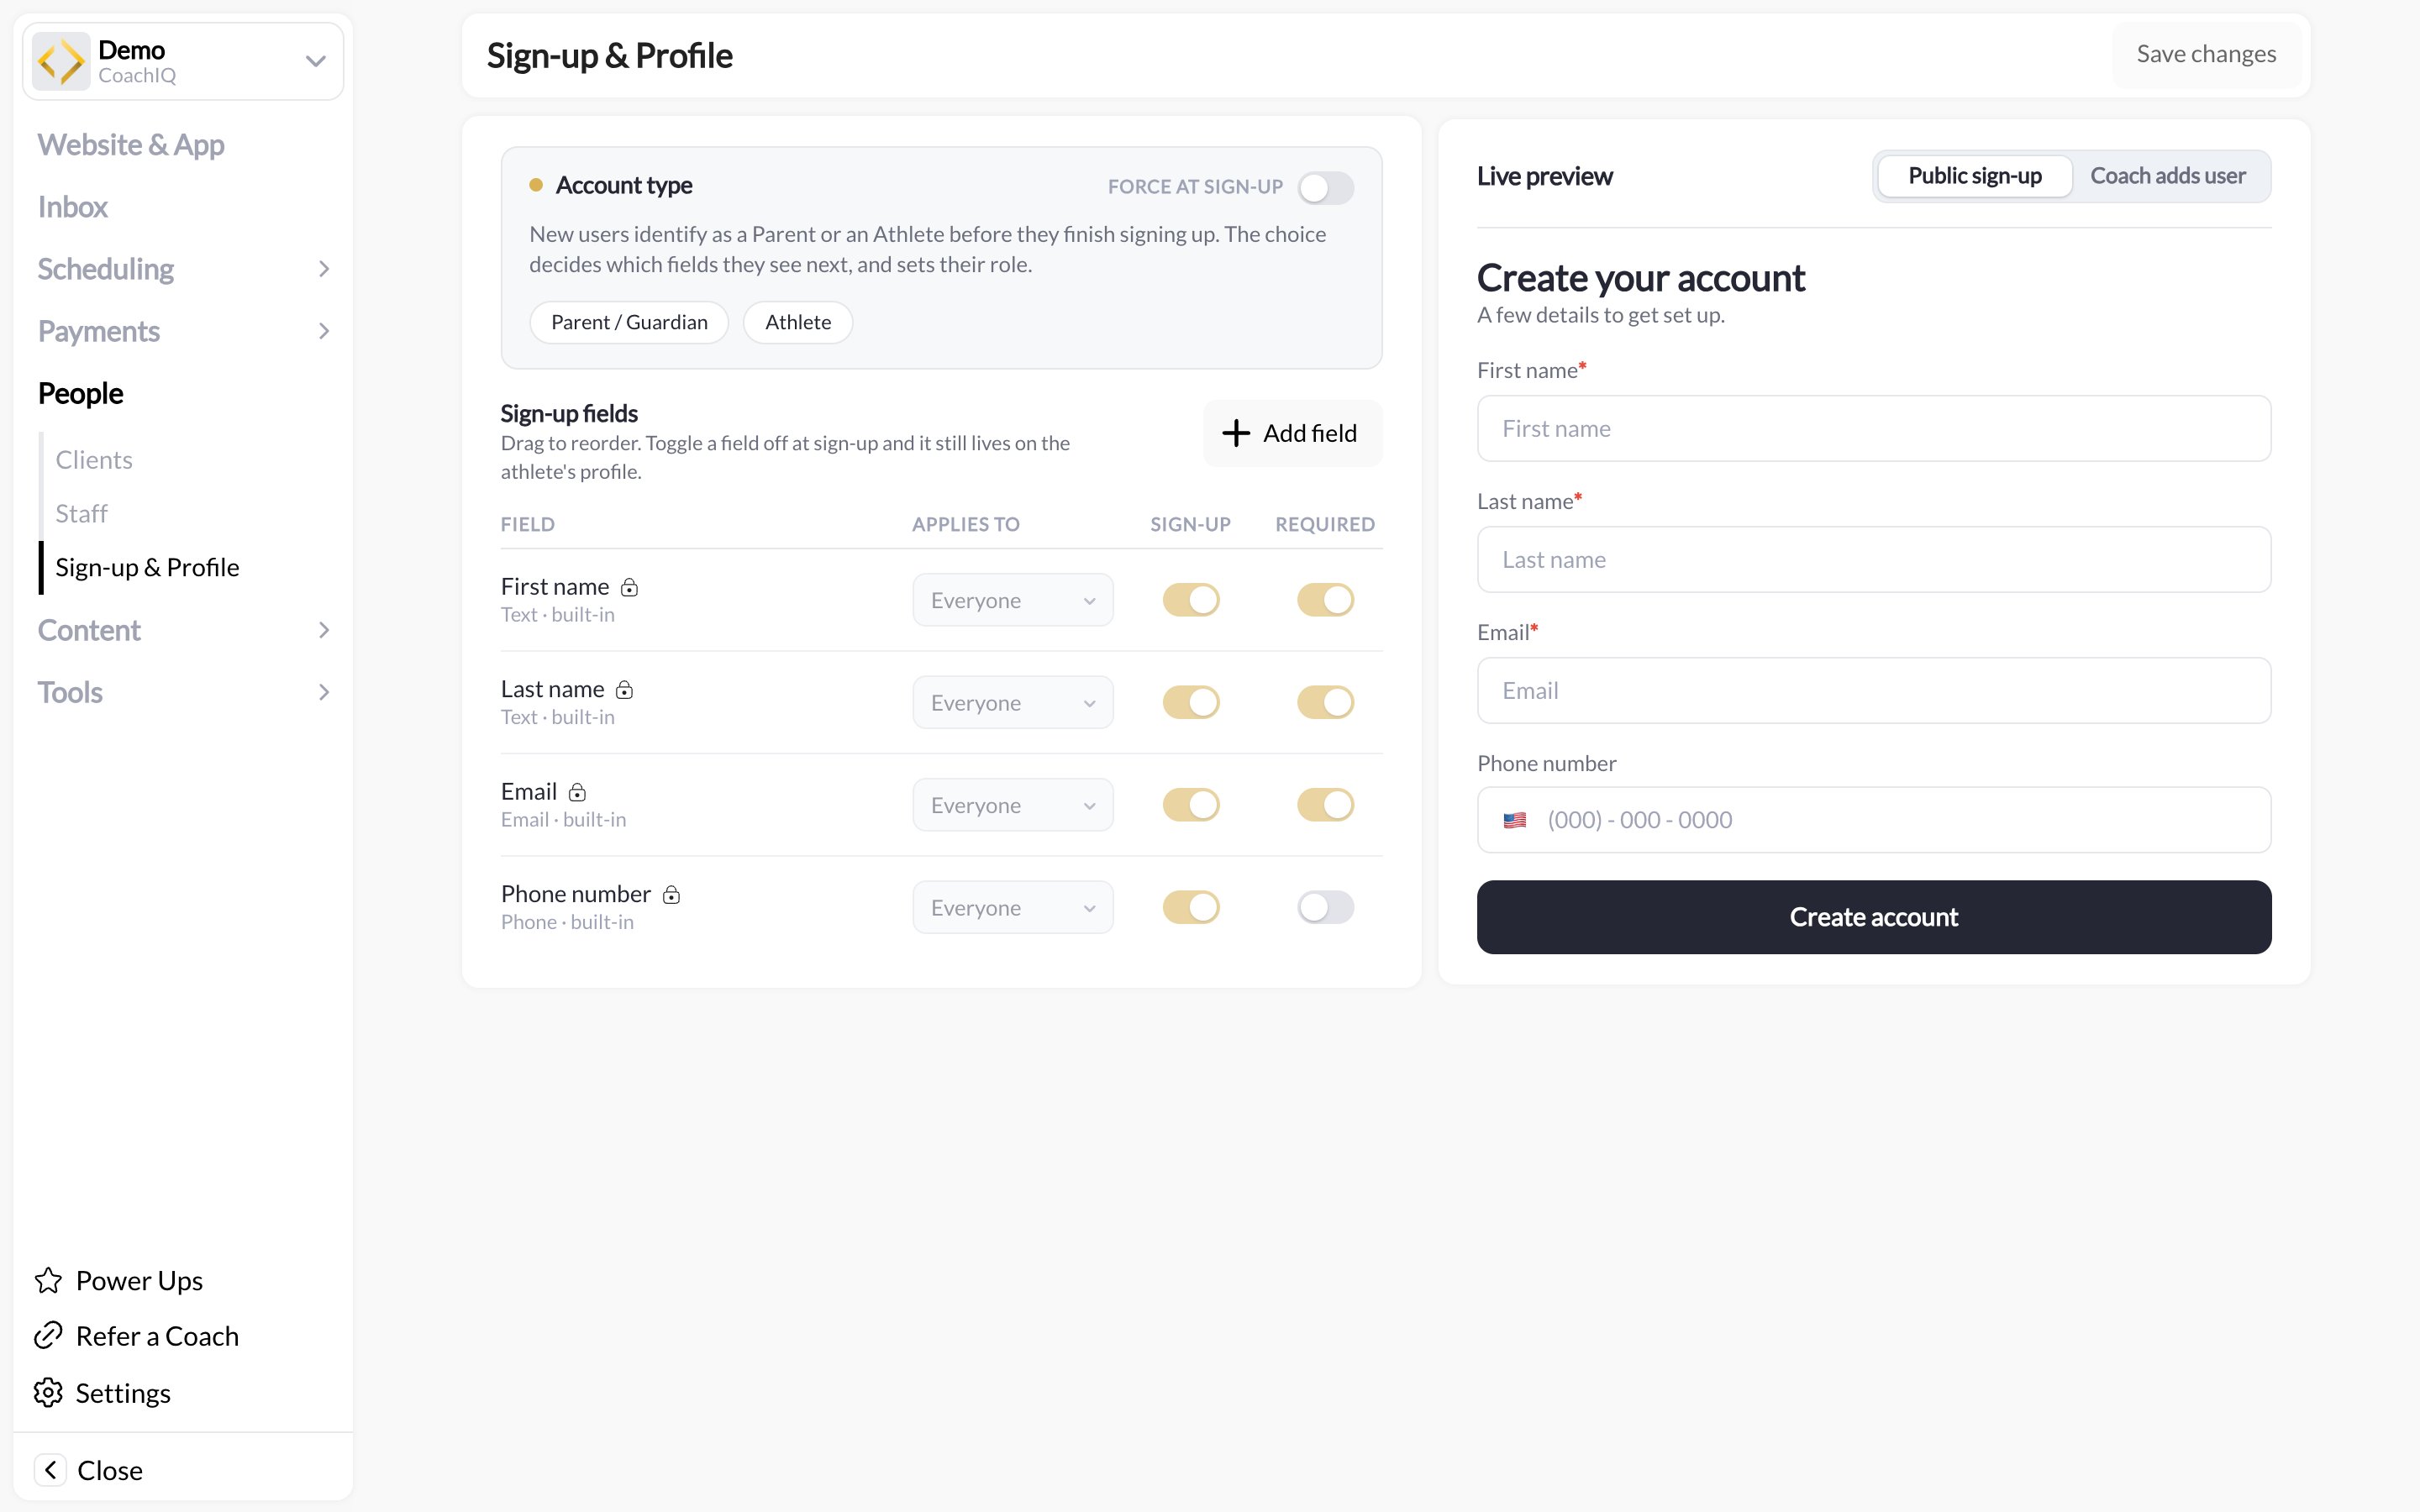
The page has three parts:
| Section | What it controls |
| ------------------ | --------------------------------------------------------------------------------------------------------------------------- |
| **Account type** | Whether new sign-ups are created as a **Parent/Guardian** or an **Athlete**, and whether you force one or let people choose |
| **Sign-up fields** | The table of fields on your sign-up form: which appear, which are required, and their order |
| **Live preview** | A rendered copy of the form as it will look, with a toggle between **Public sign-up** and **Coach adds user** |
 ***
## Account type
Use **FORCE AT SIGN-UP** to decide who is creating the account. As the app puts it: new users identify as a Parent or an Athlete before they finish signing up; the choice decides which fields they see next and sets their role.
* **Parent/Guardian** — the person signing up is the parent. They create their own login, then add their children as connected athletes. Choose this if you coach youth players and want parents to hold the account, the payment method, and the messages.
* **Athlete** — the person signing up is the player. Choose this for adult clients, college athletes, or any program where the athlete manages their own account.
When you force an account type, the sign-up form skips the "who are you?" question and creates the correct role every time. Leave it unforced and the person picks for themselves.
Most youth programs force **Parent/Guardian**. It stops 12-year-olds from creating orphaned accounts that never get a payment method attached. Parents connect children from their profile — see [Connect children](/people/client-profiles/client-profiles#connect-children).
***
## Sign-up fields
The **Sign-up fields** table lists every field a new account can carry. Each row has four columns:
| Column | Meaning |
| -------------- | -------------------------------------------------------------------------- |
| **FIELD** | The field's label, as the person sees it |
| **APPLIES TO** | Who the field is collected for: **Everyone**, **Parents**, or **Athletes** |
| **SIGN-UP** | Toggle: show this field on the sign-up form |
| **REQUIRED** | Toggle: the form cannot be submitted until it is filled in |
### Built-in fields
**First name**, **Last name**, **Email**, and **Phone number** are built in (each row shows its type, for example "Text · built-in"). Email is the login credential, so it always stays on the form. Turn phone on and make it required if you rely on SMS reminders; a profile with no phone number cannot receive texts.
Toggling a field off at sign-up does not delete it. It still lives on the profile, where you or the client can fill it in later.
### Custom fields
Click **Add field** to create your own. Give it a label, pick who it applies to, then switch **SIGN-UP** and **REQUIRED** on as needed. Typical custom fields:
* Emergency contact name and number
* Date of birth or graduation year
* Position, handedness, or skill level
* School or club team
* Jersey or T-shirt size for camps
Custom fields appear in the **User Details** panel of every client profile, where you or the client can update them later. See [Client Profiles](/people/client-profiles/client-profiles#the-user-details-sidebar).
### Reorder fields
Drag rows up or down to change the order they appear in on the form. Put the fields people always know (name, email) first and the optional extras last.
Nothing applies until you click **Save changes** at the top of the page.
Every required field is a place someone can abandon your sign-up. Require what you genuinely need on day one and collect the rest later with a [form](/tools/forms/overview) or in the profile.
***
## Live preview
The right-hand preview updates as you change fields. Toggle between:
* **Public sign-up** — what a new person sees when they register through your site or portal
* **Coach adds user** — what you see under **People → Clients → New User**
The public preview is titled **Create your account** with the line "A few details to get set up." and ends in a **Create account** button. Use it to check the wording, the order, and that required markers land where you expect before you share a sign-up link.
***
## How this connects to the rest of CoachIQ
* **Forms** — a form with **Log in / Sign up** turned on uses these same account settings when a new person submits it. See [Creating Forms](/tools/forms/creating-forms).
* **Products** — guest checkout can create an account at purchase; the account type you force applies. See [Product Builder](/payments/product-builder).
* **Automations** — the **New User** trigger fires after sign-up, so you can welcome people or tag them by a custom field value. See [Triggers and actions](/tools/automations/triggers-actions-reference).
* **Import** — bulk imports through **Settings → Data → Import People** skip the sign-up form entirely. See [Data settings](/settings/data#import-people).
***
## Common questions
No. Requirements apply at sign-up. Existing profiles keep whatever they have; you can fill gaps from their profile or ask them to update it in the athlete portal.
Yes. Set **APPLIES TO** on each field. A parent-only field (say, "Preferred contact time") is hidden when an athlete signs up, and vice versa.
You can turn it off for sign-up so nobody new is asked for it. Removing it from existing profiles clears data you may want, so turn it off first and confirm you no longer need the values.
In the **User Details** panel on the client's profile, and in the **Clients** list when you export.
***
## Related articles
Create users yourself and edit any field afterwards
Where custom field values live once an account exists
The full first-experience flow from sign-up to first session
Collect more detail after sign-up without bloating the form
***
## Account type
Use **FORCE AT SIGN-UP** to decide who is creating the account. As the app puts it: new users identify as a Parent or an Athlete before they finish signing up; the choice decides which fields they see next and sets their role.
* **Parent/Guardian** — the person signing up is the parent. They create their own login, then add their children as connected athletes. Choose this if you coach youth players and want parents to hold the account, the payment method, and the messages.
* **Athlete** — the person signing up is the player. Choose this for adult clients, college athletes, or any program where the athlete manages their own account.
When you force an account type, the sign-up form skips the "who are you?" question and creates the correct role every time. Leave it unforced and the person picks for themselves.
Most youth programs force **Parent/Guardian**. It stops 12-year-olds from creating orphaned accounts that never get a payment method attached. Parents connect children from their profile — see [Connect children](/people/client-profiles/client-profiles#connect-children).
***
## Sign-up fields
The **Sign-up fields** table lists every field a new account can carry. Each row has four columns:
| Column | Meaning |
| -------------- | -------------------------------------------------------------------------- |
| **FIELD** | The field's label, as the person sees it |
| **APPLIES TO** | Who the field is collected for: **Everyone**, **Parents**, or **Athletes** |
| **SIGN-UP** | Toggle: show this field on the sign-up form |
| **REQUIRED** | Toggle: the form cannot be submitted until it is filled in |
### Built-in fields
**First name**, **Last name**, **Email**, and **Phone number** are built in (each row shows its type, for example "Text · built-in"). Email is the login credential, so it always stays on the form. Turn phone on and make it required if you rely on SMS reminders; a profile with no phone number cannot receive texts.
Toggling a field off at sign-up does not delete it. It still lives on the profile, where you or the client can fill it in later.
### Custom fields
Click **Add field** to create your own. Give it a label, pick who it applies to, then switch **SIGN-UP** and **REQUIRED** on as needed. Typical custom fields:
* Emergency contact name and number
* Date of birth or graduation year
* Position, handedness, or skill level
* School or club team
* Jersey or T-shirt size for camps
Custom fields appear in the **User Details** panel of every client profile, where you or the client can update them later. See [Client Profiles](/people/client-profiles/client-profiles#the-user-details-sidebar).
### Reorder fields
Drag rows up or down to change the order they appear in on the form. Put the fields people always know (name, email) first and the optional extras last.
Nothing applies until you click **Save changes** at the top of the page.
Every required field is a place someone can abandon your sign-up. Require what you genuinely need on day one and collect the rest later with a [form](/tools/forms/overview) or in the profile.
***
## Live preview
The right-hand preview updates as you change fields. Toggle between:
* **Public sign-up** — what a new person sees when they register through your site or portal
* **Coach adds user** — what you see under **People → Clients → New User**
The public preview is titled **Create your account** with the line "A few details to get set up." and ends in a **Create account** button. Use it to check the wording, the order, and that required markers land where you expect before you share a sign-up link.
***
## How this connects to the rest of CoachIQ
* **Forms** — a form with **Log in / Sign up** turned on uses these same account settings when a new person submits it. See [Creating Forms](/tools/forms/creating-forms).
* **Products** — guest checkout can create an account at purchase; the account type you force applies. See [Product Builder](/payments/product-builder).
* **Automations** — the **New User** trigger fires after sign-up, so you can welcome people or tag them by a custom field value. See [Triggers and actions](/tools/automations/triggers-actions-reference).
* **Import** — bulk imports through **Settings → Data → Import People** skip the sign-up form entirely. See [Data settings](/settings/data#import-people).
***
## Common questions
No. Requirements apply at sign-up. Existing profiles keep whatever they have; you can fill gaps from their profile or ask them to update it in the athlete portal.
Yes. Set **APPLIES TO** on each field. A parent-only field (say, "Preferred contact time") is hidden when an athlete signs up, and vice versa.
You can turn it off for sign-up so nobody new is asked for it. Removing it from existing profiles clears data you may want, so turn it off first and confirm you no longer need the values.
In the **User Details** panel on the client's profile, and in the **Clients** list when you export.
***
## Related articles
Create users yourself and edit any field afterwards
Where custom field values live once an account exists
The full first-experience flow from sign-up to first session
Collect more detail after sign-up without bloating the form