> ## Documentation Index
> Fetch the complete documentation index at: https://help.coachiq.io/llms.txt
> Use this file to discover all available pages before exploring further.
# Automation Builder Reference
> What each section of the automation builder does: Details, Triggers, Data Sources, Conditions, Actions, Execution Logs, Settings, and Test Run.
**Where to find this**: **Tools → Automations**, then click any automation or **Create Automation**
## The builder, top to bottom
The builder is one long page with a section for each part of the automation, and a side menu (**Details · Triggers · Data Sources · Conditions · Actions · Logs · Settings**) that jumps to each. The header holds **Test Run** and **Update** (labelled **Create** for a new automation). Nothing you change is saved until you click Update.
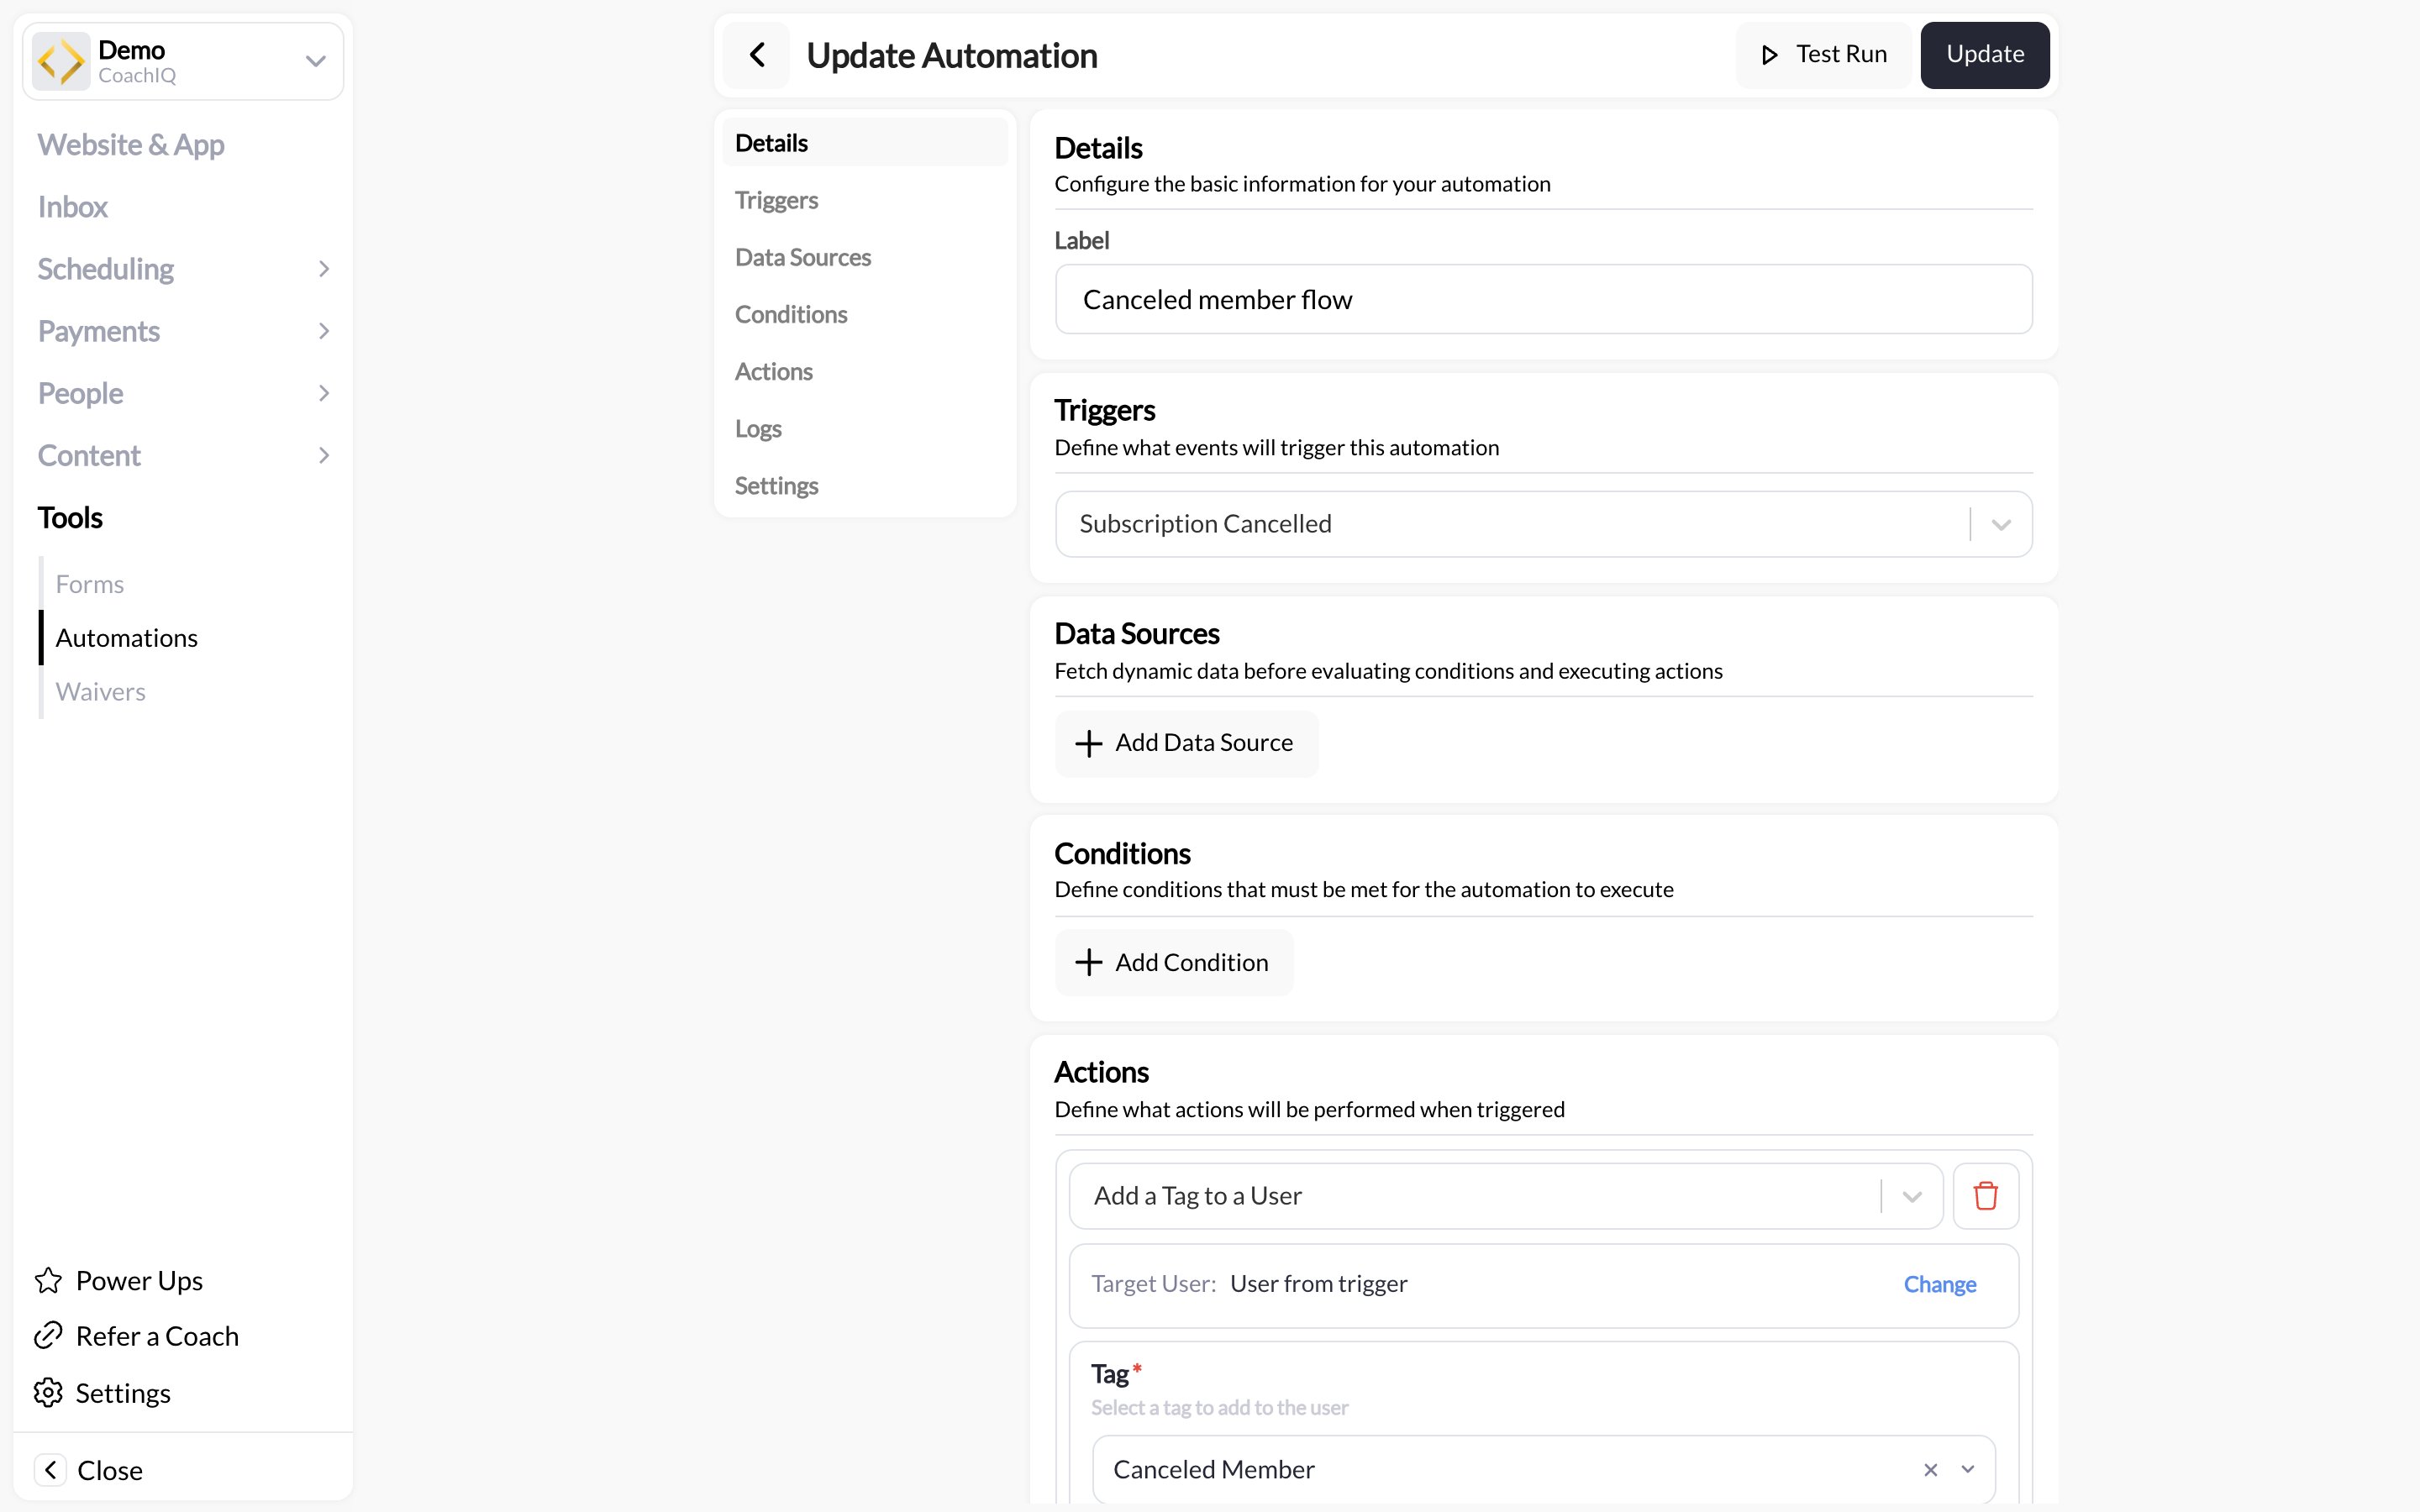 Section names and labels were checked against the live app on 2026-09-02. For the full list of triggers, actions, and dynamic fields see the [Triggers and actions reference](/tools/automations/triggers-actions-reference).
### Details
The automation's **label**. This is what you see in the Automations list and in Execution Logs, so make it specific: "Trial → membership nudge, day 3" rather than "Follow-up".
### Triggers
The event that starts the automation, such as **Purchase Made**, **Booking Made**, **Form Submitted**, or a schedule. One trigger per automation. When the event fires, the person it happened to becomes the **user** every later section can reference.
### Data Sources
Extra information fetched **before** the conditions run. Use a data source when your condition or message needs something the trigger alone does not carry: the athlete's current credit balance, their active subscription, their upcoming bookings. Add the source here and its fields become available in Conditions and Actions.
### Conditions
Filters that decide whether the automation continues. Each rule compares a field to a value: **Product Label · Equal To · "Summer Camp"**, **Interval · Equal To · month**, and so on.
Click **Add Rule** for another rule. Rules sit inside groups, and you choose how a group combines them:
* **And** — every rule in the group must be true
* **Or** — any one rule is enough
**Add And/Or** creates a nested group, so you can express things like "(bought a membership **or** a credit pack) **and** has no future booking". If there are no conditions, the automation runs for every trigger event.
### Actions
What happens when the conditions pass. Click **Add Action** for each step. The two most used:
| Action | Fields |
| ------------------------ | ---------------------------------------------------------------------------------------------------------------------------------------------------------------------------------------------------- |
| **Send an Announcement** | **Target User** (defaults to *User from trigger*; click **Change** to pick someone else), **From** (*Default*, or **Set** to choose which admin it appears to come from), **Title**, and **Message** |
| **Send an SMS Message** | **Target User**, **From**, and **Message**, with a live counter such as **180 / 160** so you can see when a text splits into a second segment. The hint reads "Keep it under 160 characters for SMS" |
Inside any message field, type `#` to insert a **field option** from the trigger or a data source, or `@` to insert a **CoachIQ field** such as the athlete's first name, the session title, or the booking time (the field hint says exactly that: "Use # for field options, and @ for CoachIQ fields"). Fields fill in per person when the automation runs.
Actions run in order. Put the message you most want delivered first.
### Execution Logs
A record of every time the automation ran: when it fired, for whom, which conditions passed, and what each action returned. Click **Check for events** to refresh. This is the first place to look when someone says they did not get a message.
### Settings
The **Enabled** toggle. Off means the automation is saved but never runs. There is no separate delete button; the section says "Disable above to delete this automation", so switch Enabled off first and the delete option appears. Prefer **Archive** from the Automations list if you may want it back.
### Test Run
**Test Run** in the header runs the automation once against a sample, so you can read the filled-in message before real athletes do. Use it after every edit to a message or condition.
## A note on the older screenshots
Some pages in this section show an earlier version of the builder with a blank canvas and a **Select Trigger** button. The sections above are the current layout; the concepts are the same.
## Common questions
Open **Execution Logs**. If the run shows conditions failing, the person did not match. If an action shows an error, check the target user has a phone (for SMS) or a portal login (for announcements).
No. Create a second automation with the other trigger. Templates make that quick: see [Automation templates](/tools/automations/automation-templates).
`#` fields come from the event that fired or a data source you added (the product bought, the form answers). `@` fields are CoachIQ's standard fields about the person and your business (first name, session title, your group name).
## Related articles
Every trigger, action, and dynamic field
Prebuilt automations to start from
Automations that run on a timer instead of an event
A guided first build
Section names and labels were checked against the live app on 2026-09-02. For the full list of triggers, actions, and dynamic fields see the [Triggers and actions reference](/tools/automations/triggers-actions-reference).
### Details
The automation's **label**. This is what you see in the Automations list and in Execution Logs, so make it specific: "Trial → membership nudge, day 3" rather than "Follow-up".
### Triggers
The event that starts the automation, such as **Purchase Made**, **Booking Made**, **Form Submitted**, or a schedule. One trigger per automation. When the event fires, the person it happened to becomes the **user** every later section can reference.
### Data Sources
Extra information fetched **before** the conditions run. Use a data source when your condition or message needs something the trigger alone does not carry: the athlete's current credit balance, their active subscription, their upcoming bookings. Add the source here and its fields become available in Conditions and Actions.
### Conditions
Filters that decide whether the automation continues. Each rule compares a field to a value: **Product Label · Equal To · "Summer Camp"**, **Interval · Equal To · month**, and so on.
Click **Add Rule** for another rule. Rules sit inside groups, and you choose how a group combines them:
* **And** — every rule in the group must be true
* **Or** — any one rule is enough
**Add And/Or** creates a nested group, so you can express things like "(bought a membership **or** a credit pack) **and** has no future booking". If there are no conditions, the automation runs for every trigger event.
### Actions
What happens when the conditions pass. Click **Add Action** for each step. The two most used:
| Action | Fields |
| ------------------------ | ---------------------------------------------------------------------------------------------------------------------------------------------------------------------------------------------------- |
| **Send an Announcement** | **Target User** (defaults to *User from trigger*; click **Change** to pick someone else), **From** (*Default*, or **Set** to choose which admin it appears to come from), **Title**, and **Message** |
| **Send an SMS Message** | **Target User**, **From**, and **Message**, with a live counter such as **180 / 160** so you can see when a text splits into a second segment. The hint reads "Keep it under 160 characters for SMS" |
Inside any message field, type `#` to insert a **field option** from the trigger or a data source, or `@` to insert a **CoachIQ field** such as the athlete's first name, the session title, or the booking time (the field hint says exactly that: "Use # for field options, and @ for CoachIQ fields"). Fields fill in per person when the automation runs.
Actions run in order. Put the message you most want delivered first.
### Execution Logs
A record of every time the automation ran: when it fired, for whom, which conditions passed, and what each action returned. Click **Check for events** to refresh. This is the first place to look when someone says they did not get a message.
### Settings
The **Enabled** toggle. Off means the automation is saved but never runs. There is no separate delete button; the section says "Disable above to delete this automation", so switch Enabled off first and the delete option appears. Prefer **Archive** from the Automations list if you may want it back.
### Test Run
**Test Run** in the header runs the automation once against a sample, so you can read the filled-in message before real athletes do. Use it after every edit to a message or condition.
## A note on the older screenshots
Some pages in this section show an earlier version of the builder with a blank canvas and a **Select Trigger** button. The sections above are the current layout; the concepts are the same.
## Common questions
Open **Execution Logs**. If the run shows conditions failing, the person did not match. If an action shows an error, check the target user has a phone (for SMS) or a portal login (for announcements).
No. Create a second automation with the other trigger. Templates make that quick: see [Automation templates](/tools/automations/automation-templates).
`#` fields come from the event that fired or a data source you added (the product bought, the form answers). `@` fields are CoachIQ's standard fields about the person and your business (first name, session title, your group name).
## Related articles
Every trigger, action, and dynamic field
Prebuilt automations to start from
Automations that run on a timer instead of an event
A guided first build