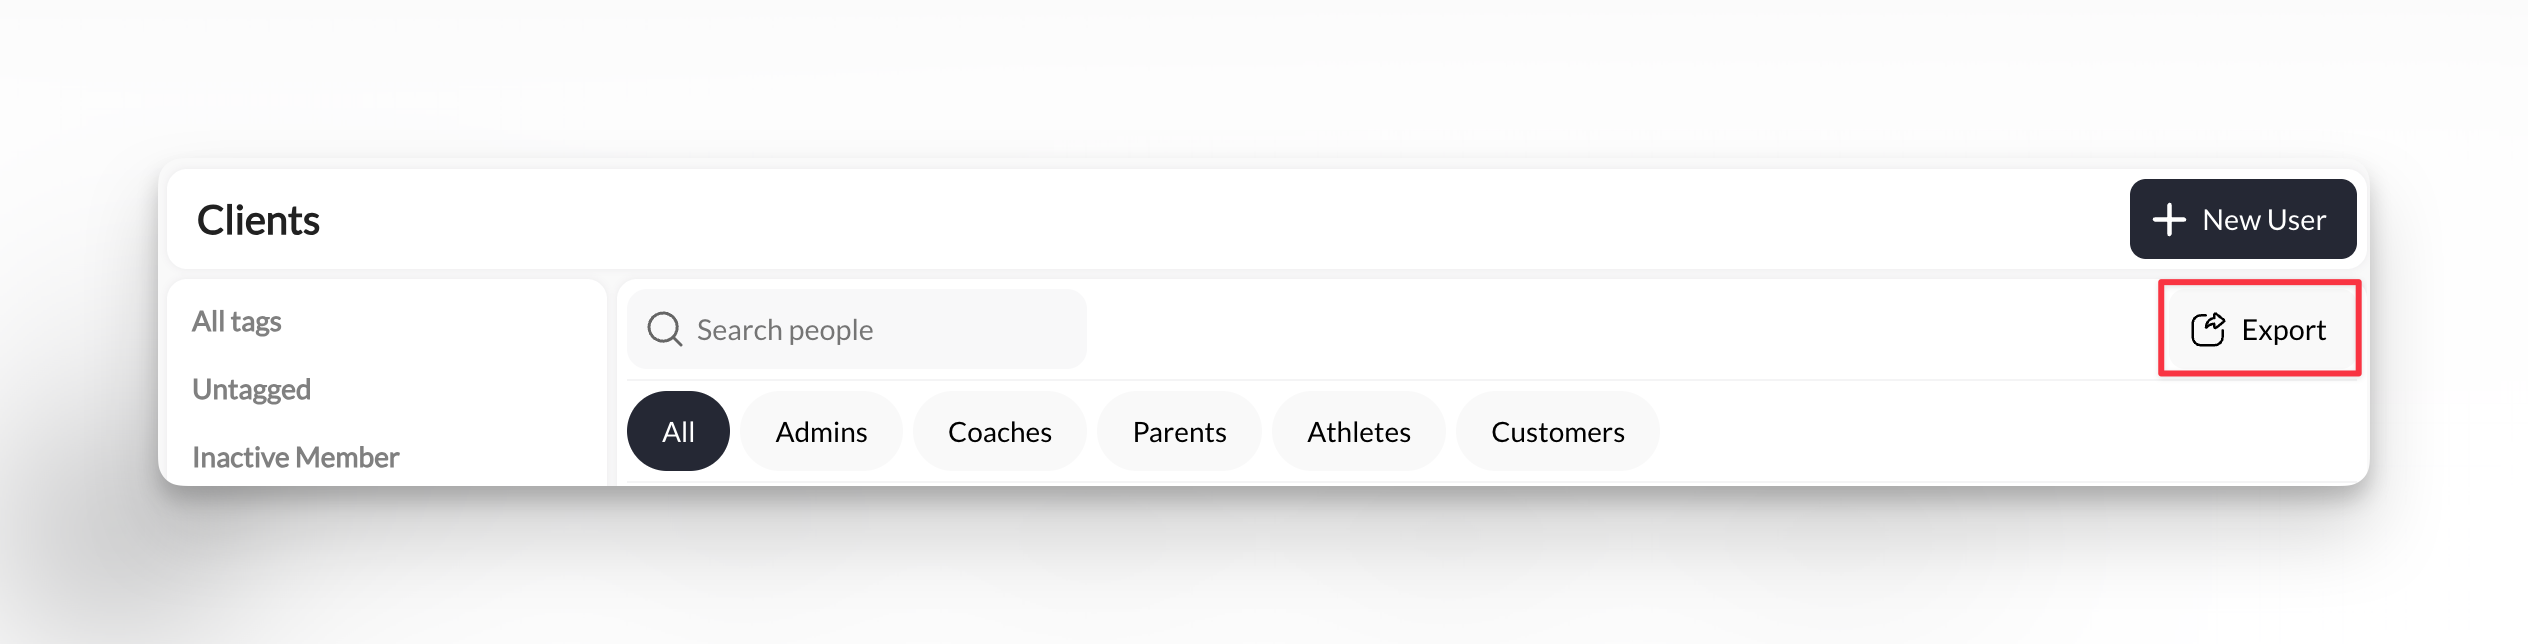
Where to find this: Dashboard → People → Clients → Tag sidebar (left) and filter tabs (top)
What you’ll accomplish
Learn how to create and apply tags to organize your clients, use filters to find exactly who you’re looking for, and leverage tags for powerful group messaging and bulk operations.Why tags matter
Tags are your organizational superpower in CoachIQ. Without them, you’re stuck scrolling through long client lists. With them, you can instantly filter to exactly who you need. Real-world examples:- Program Organization
- Status Tracking
- Location Management
- Custom Segmentation
Problem: You run 3 different training programs and need to see who’s in each one.Solution: Tag clients by program:
- “Elite Program”
- “Beginner Group”
- “Rising Stars”
Understanding the tag sidebar
When you’re on the People → Clients page, the left sidebar shows all your tags: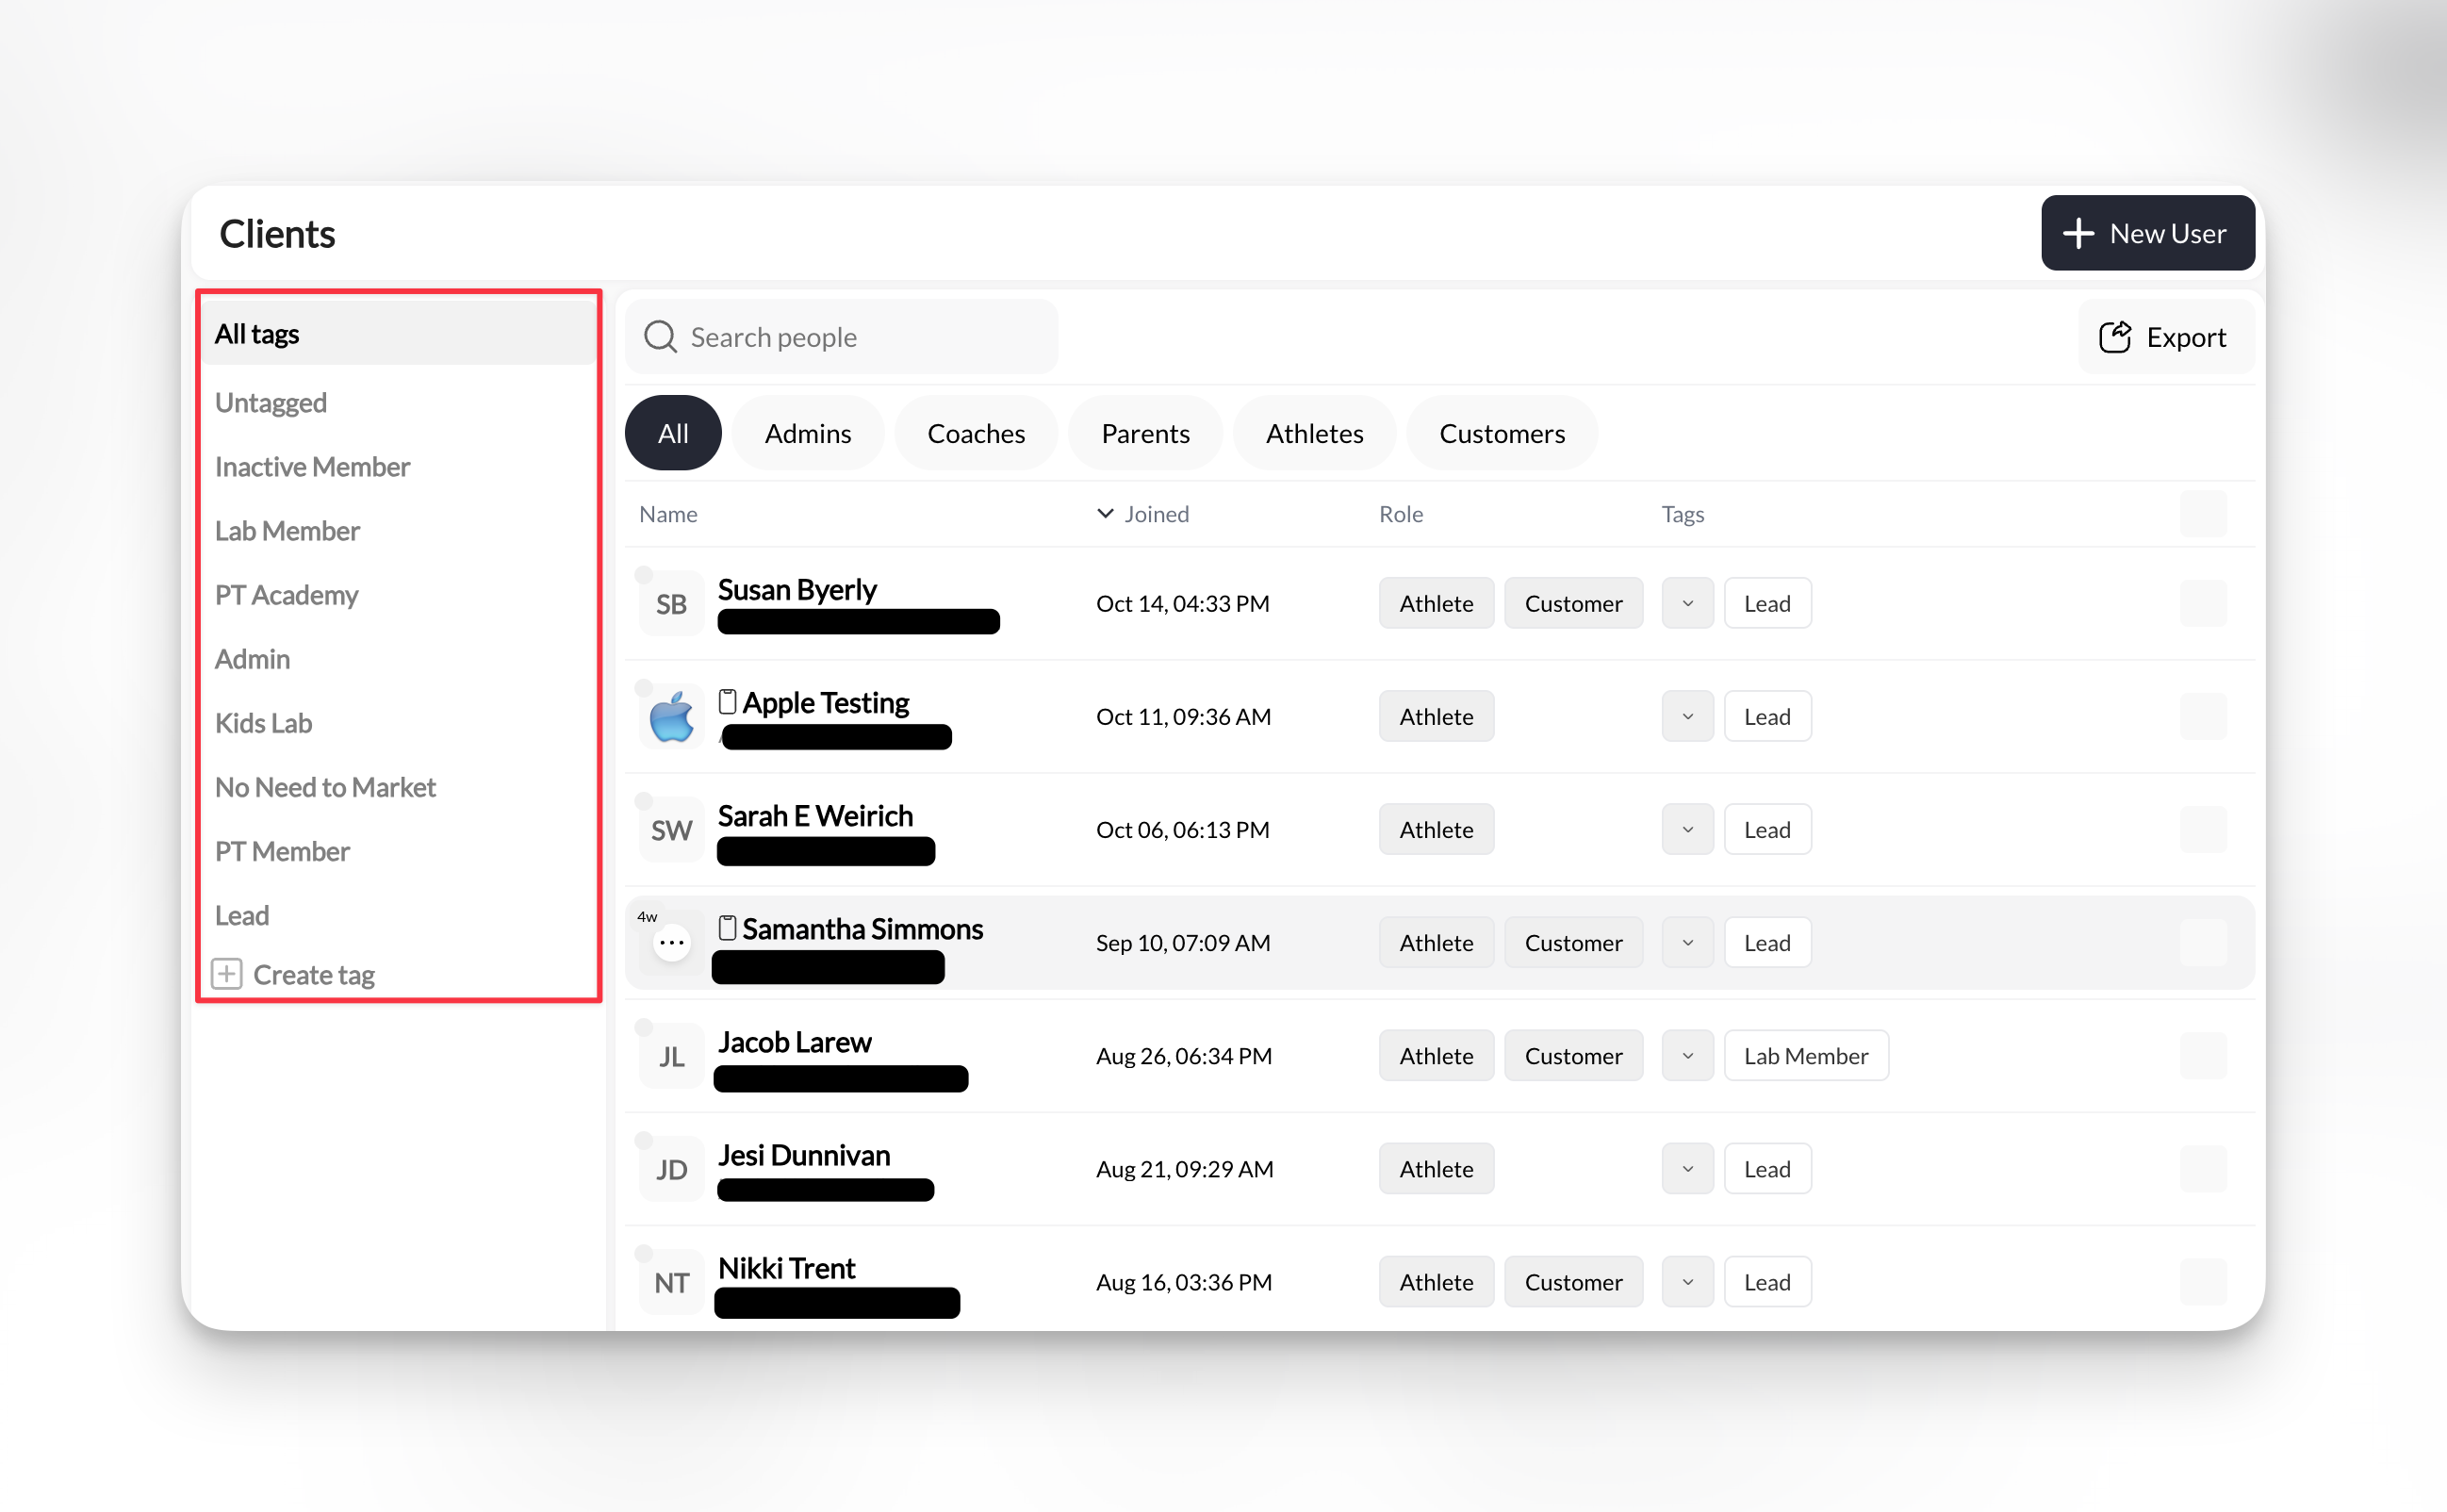
| Element | What it shows | How to use it |
|---|---|---|
| All tags | Every client, no filter | Click to clear all tag filters |
| Untagged | Clients with no tags assigned | Find clients to organize |
| Custom tags | Your created tags (alphabetical) | Click to filter to that tag |
| + Create tag | Add new tag | Create tags on-the-fly |
Tags are case-sensitive: “Elite Program” and “elite program” are treated as different tags. Use consistent capitalization to avoid duplicates.
Creating tags
You can create tags in two ways: from the tag sidebar or while adding/editing clients.Method 1: Create from the sidebar
Click '+ Create tag'
In the tag sidebar on the Clients page, click the + Create tag button at the bottom.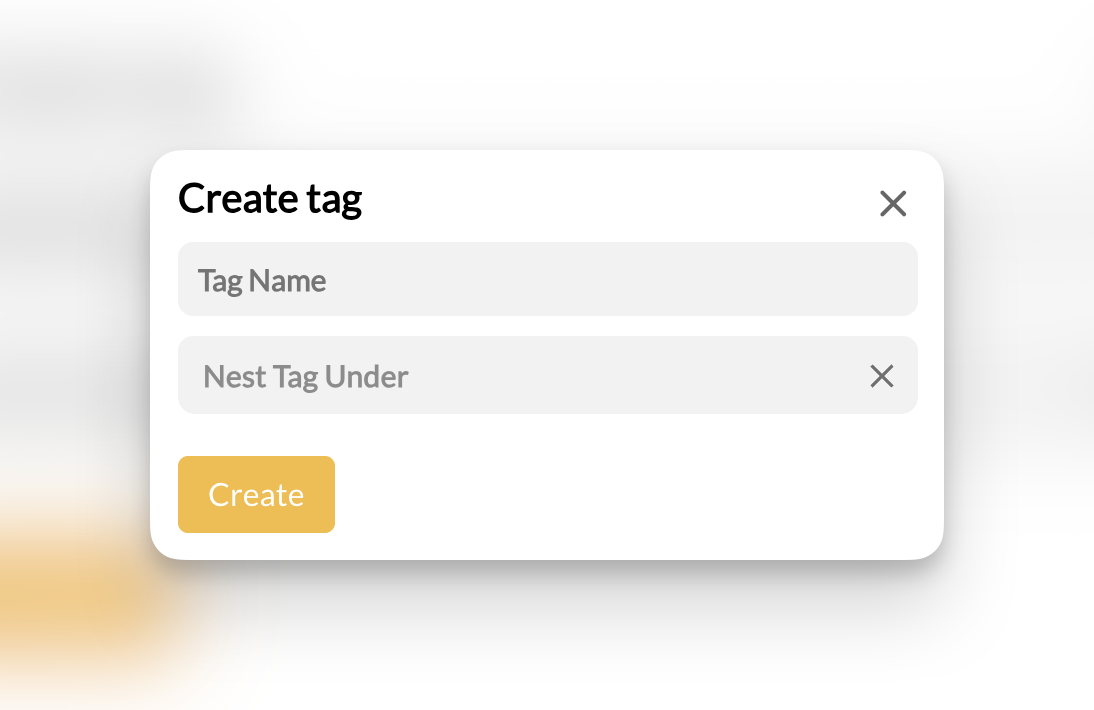
Name your tag
Enter a descriptive tag name:Good tag names:
- Specific: “Rising Stars Class” not just “Class”
- Action-oriented: “Needs Follow-up” not “Follow-up”
- Consistent: Decide on a naming convention (Title Case, sentence case, etc.)
- Generic terms: “Group”, “Team” (too vague)
- Numbers only: “1”, “2” (not descriptive)
- Special characters: Use letters, numbers, spaces, hyphens only
Method 2: Create while tagging clients
Tags can also be created on-the-fly when adding or editing clients:- Open a client profile or click “New User”
- In the Tags field, start typing a new tag name
- If it doesn’t exist, CoachIQ creates it automatically
- Apply it to this client
Applying tags to clients
Once tags exist, you can assign them to individual clients or in bulk.Tagging individual clients
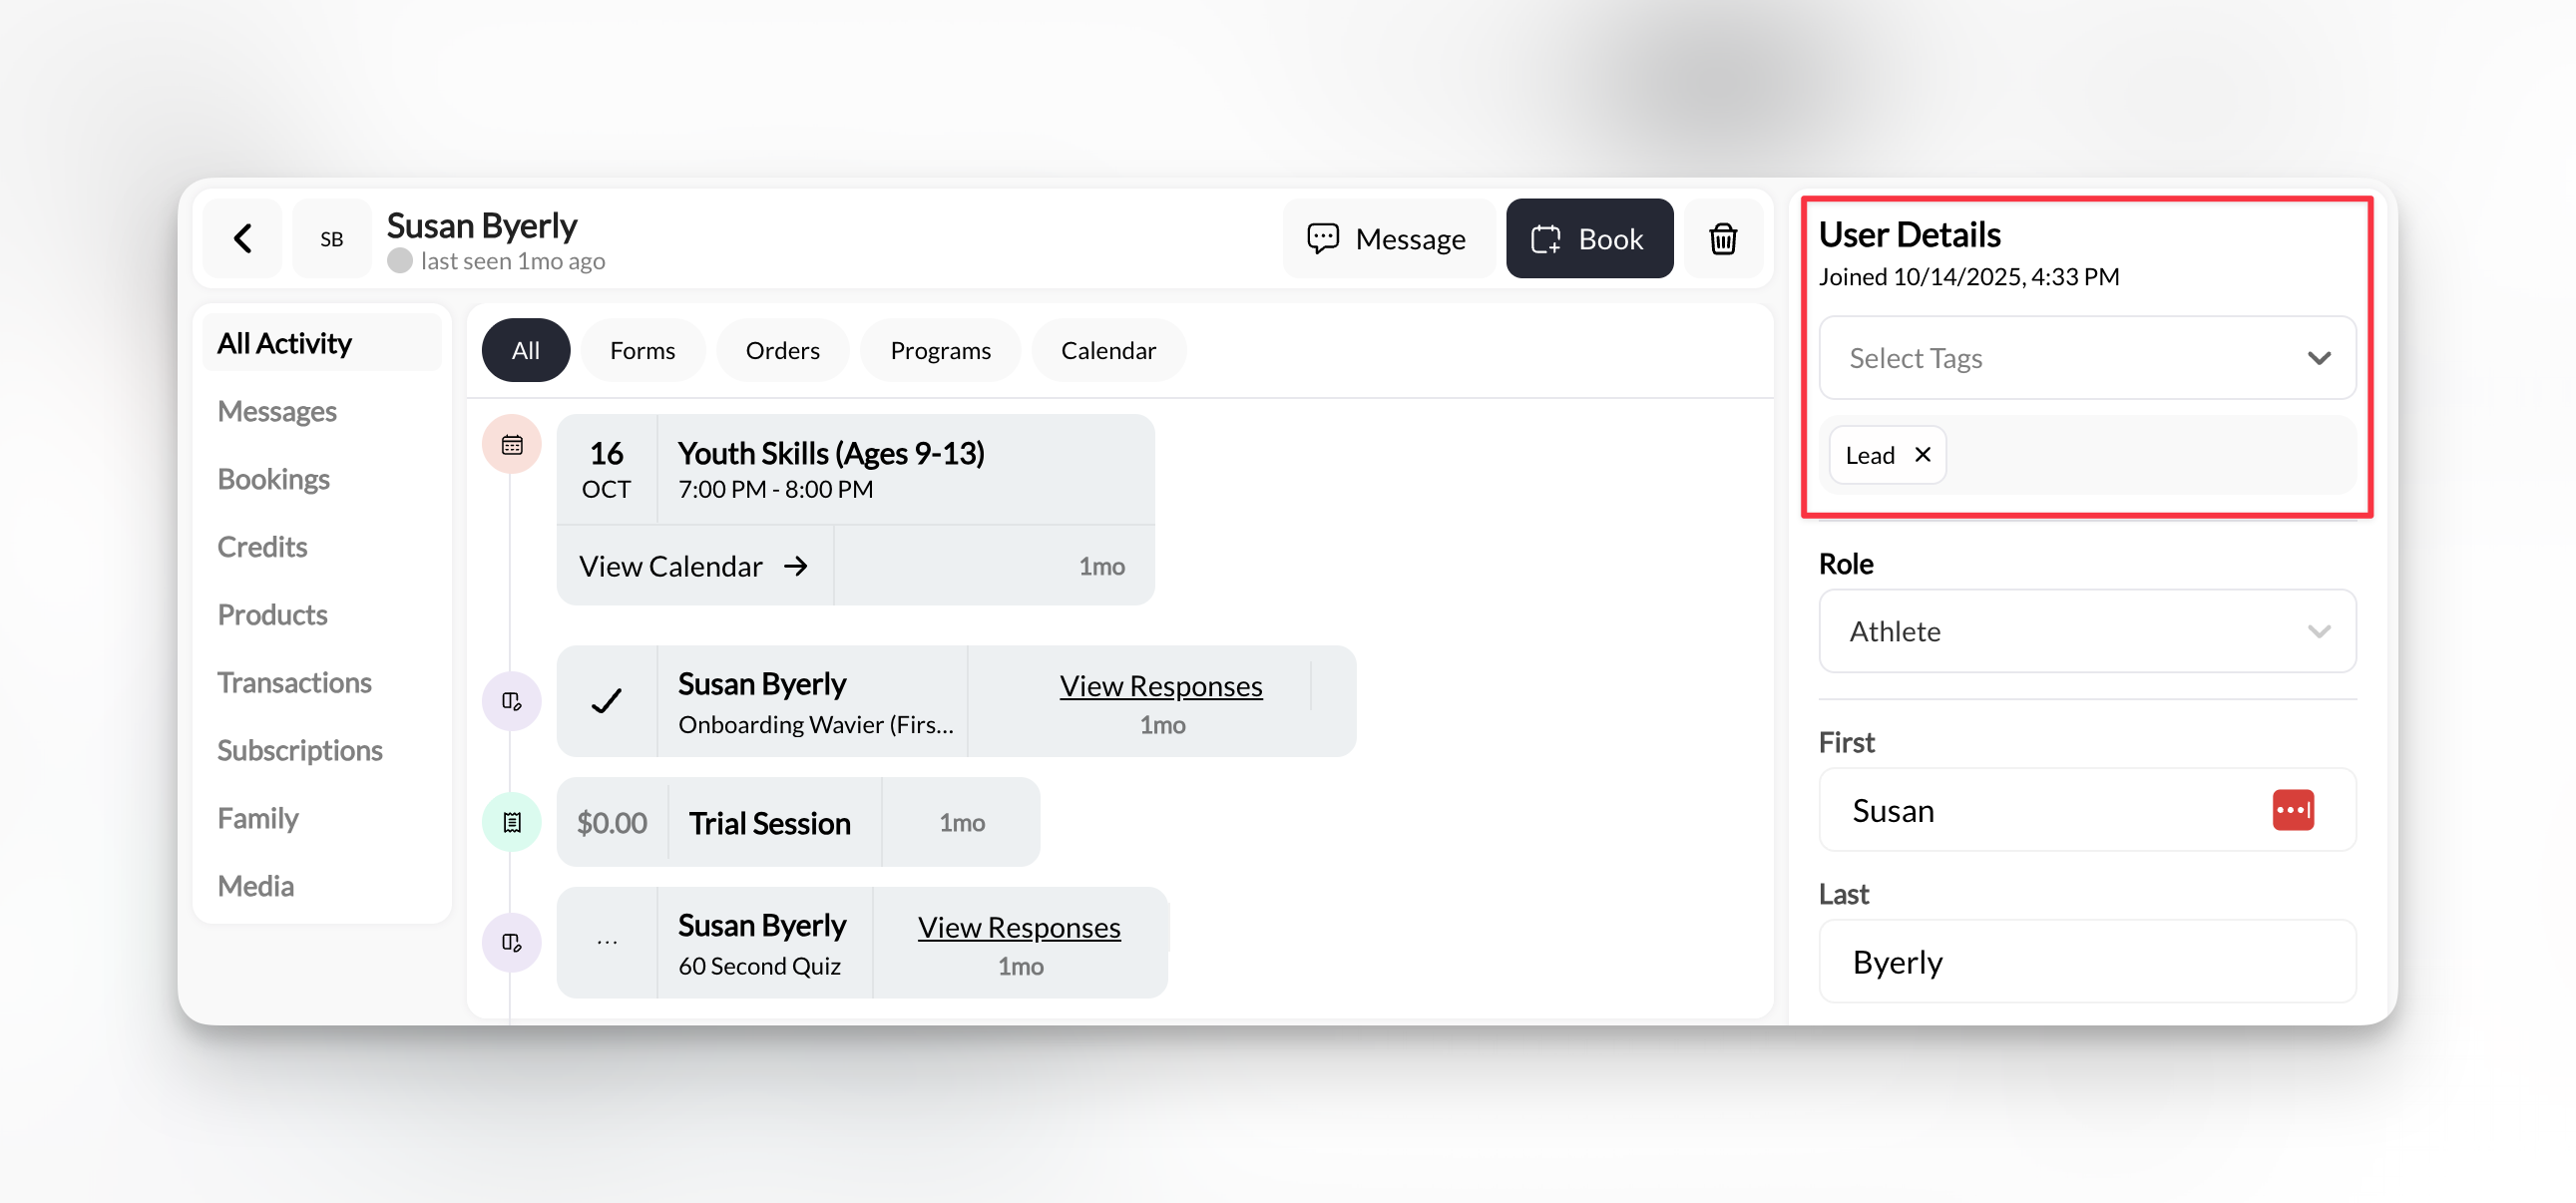
Add or remove tags
To add a tag:
- Click into the Tags field
- Start typing to search existing tags
- Select from the dropdown or create a new tag
- Tag applies immediately (auto-saves)
- Click the × icon next to the tag name
- Tag is removed immediately
Multiple tags: Clients can have unlimited tags. Apply as many as needed to organize effectively.
Bulk tagging multiple clients
When you need to tag many clients at once (e.g., tagging an entire program cohort):Select multiple clients
On the People → Clients list page:
- Use checkboxes to select multiple clients
- Or use filters to narrow to a group, then “Select All”
Using filters to find clients
Filters help you slice your client list in multiple ways: by role, by tag, or by search.Filter by role tabs
At the top of the Clients page, role tabs let you filter by user type: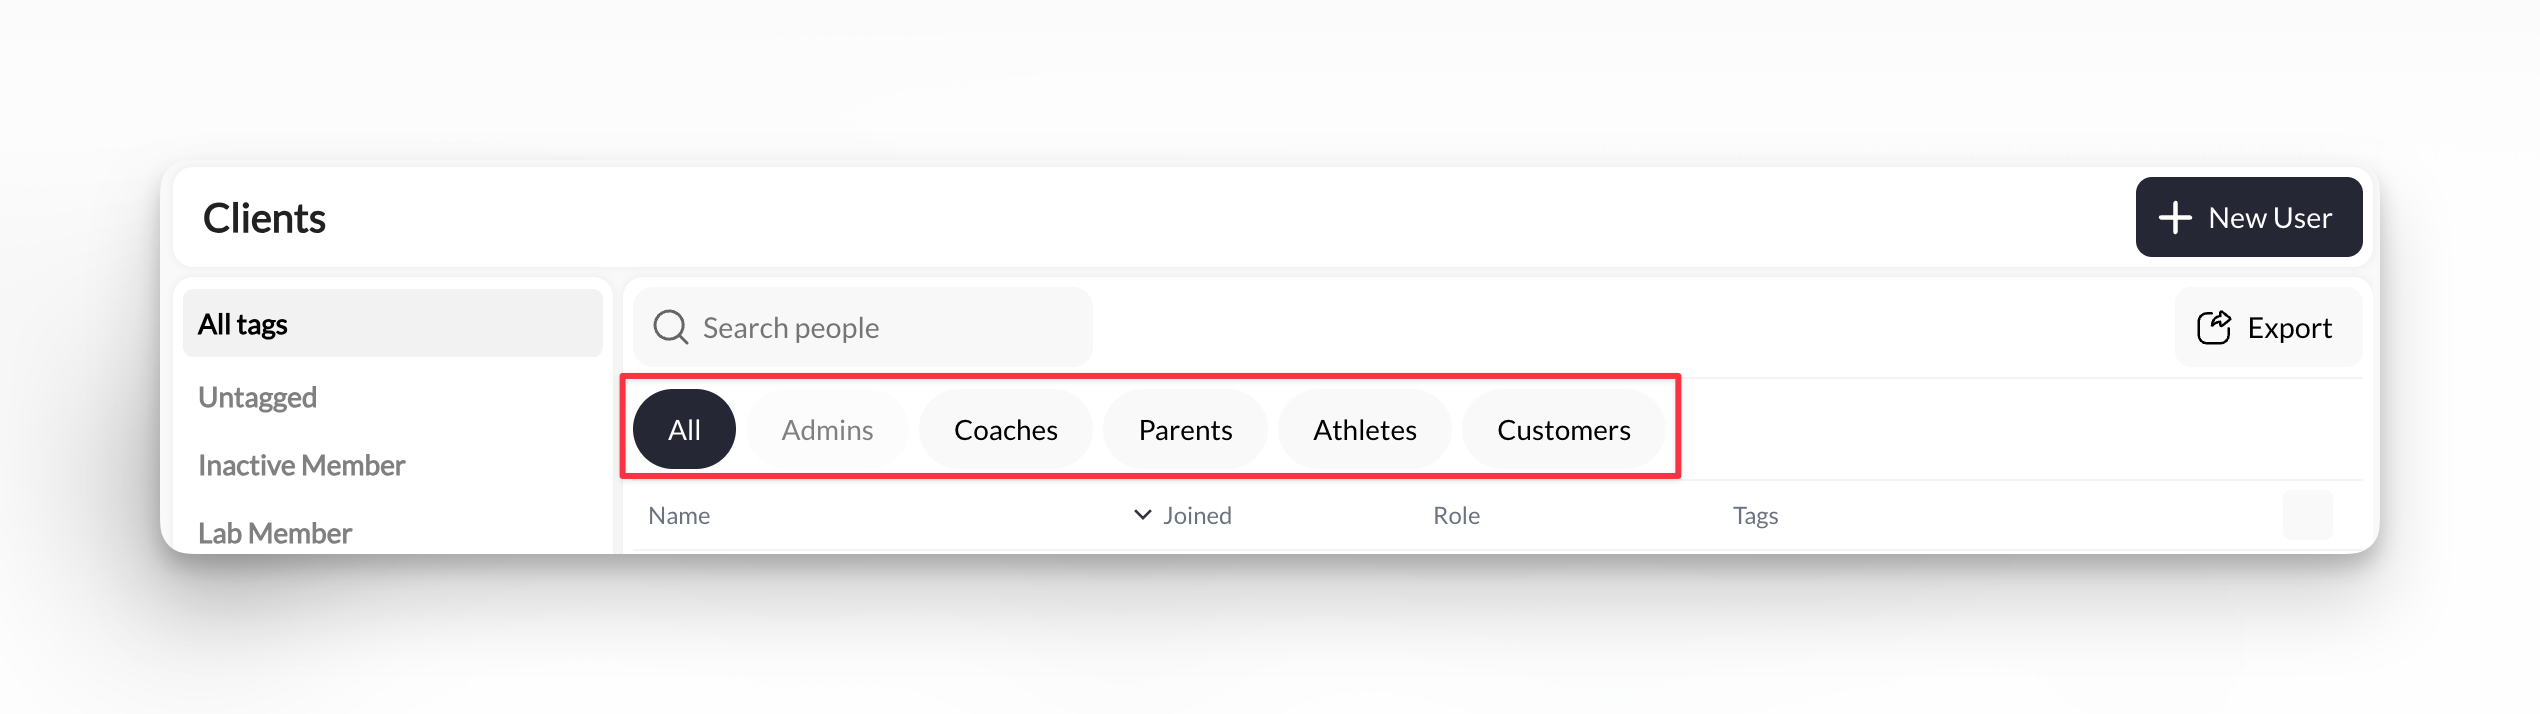
- All - Everyone (no role filter)
- Admins - Users with admin permissions
- Coaches - Your coaching staff
- Parents - Guardians of youth athletes
- Athletes - People who train with you
- Customers - Anyone who has made a purchase
Multiple roles: A client tagged as both “Athlete” and “Customer” appears in both filter views. Role filters are not exclusive.
Filter by tags
Click any tag in the sidebar to filter the client list to only people with that tag: Single tag filter:- Click a tag name in the sidebar
- Client list updates to show only tagged clients
- Tag name highlights to show active filter
- Click first tag (e.g., “Elite Program”)
- Click second tag (e.g., “Active Member”)
- Client list shows only clients with BOTH tags
Search for specific clients
The Search people bar at the top finds clients by name, email, or tag: To search:- Click into the search bar
- Type any part of:
- First or last name
- Email address
- Tag name
- Results filter as you type
- Searches are instant (no need to press Enter)
- Partial matches work (“sar” finds “Sarah” and “Sara”)
- Case-insensitive
- Clear search to return to full list
Can I search by phone number?
Can I search by phone number?
Not directly in the People search bar. Phone numbers aren’t searchable from the Clients list.Workaround: If you need to find someone by phone, use the main CoachIQ search bar (top of dashboard) or export your client list and search in the spreadsheet.
Can I filter by date joined?
Can I filter by date joined?
Not through the UI filters. The “Joined” column sorts chronologically, but there’s no date range filter.Workaround: Click the “Joined” column header to sort by date (newest first or oldest first). Or export and filter in Excel/Google Sheets.
Combining filters for powerful segmentation
The real power comes from stacking filters to find exactly who you need: Example scenarios:- Find trial athletes ready to convert
- Find inactive members
- Find athletes at specific location
- Find untagged clients to organize
Goal: Message all trial clients who have attended a sessionFilters to use:
- Click Athletes role tab
- Click “Trial” or “Lead” tag in sidebar
- Manually review their Bookings tab for session count
Using tags for group messaging
One of the most powerful uses of tags is instant group messaging. Instead of selecting clients one-by-one, message everyone with a specific tag.Filter to your target group
Use tag filters to narrow to the exact group you want to message:
- Click the tag in the sidebar (e.g., “Rising Stars Class”)
- Verify the filtered list shows only your intended recipients
Select recipients by tag
When composing a new message: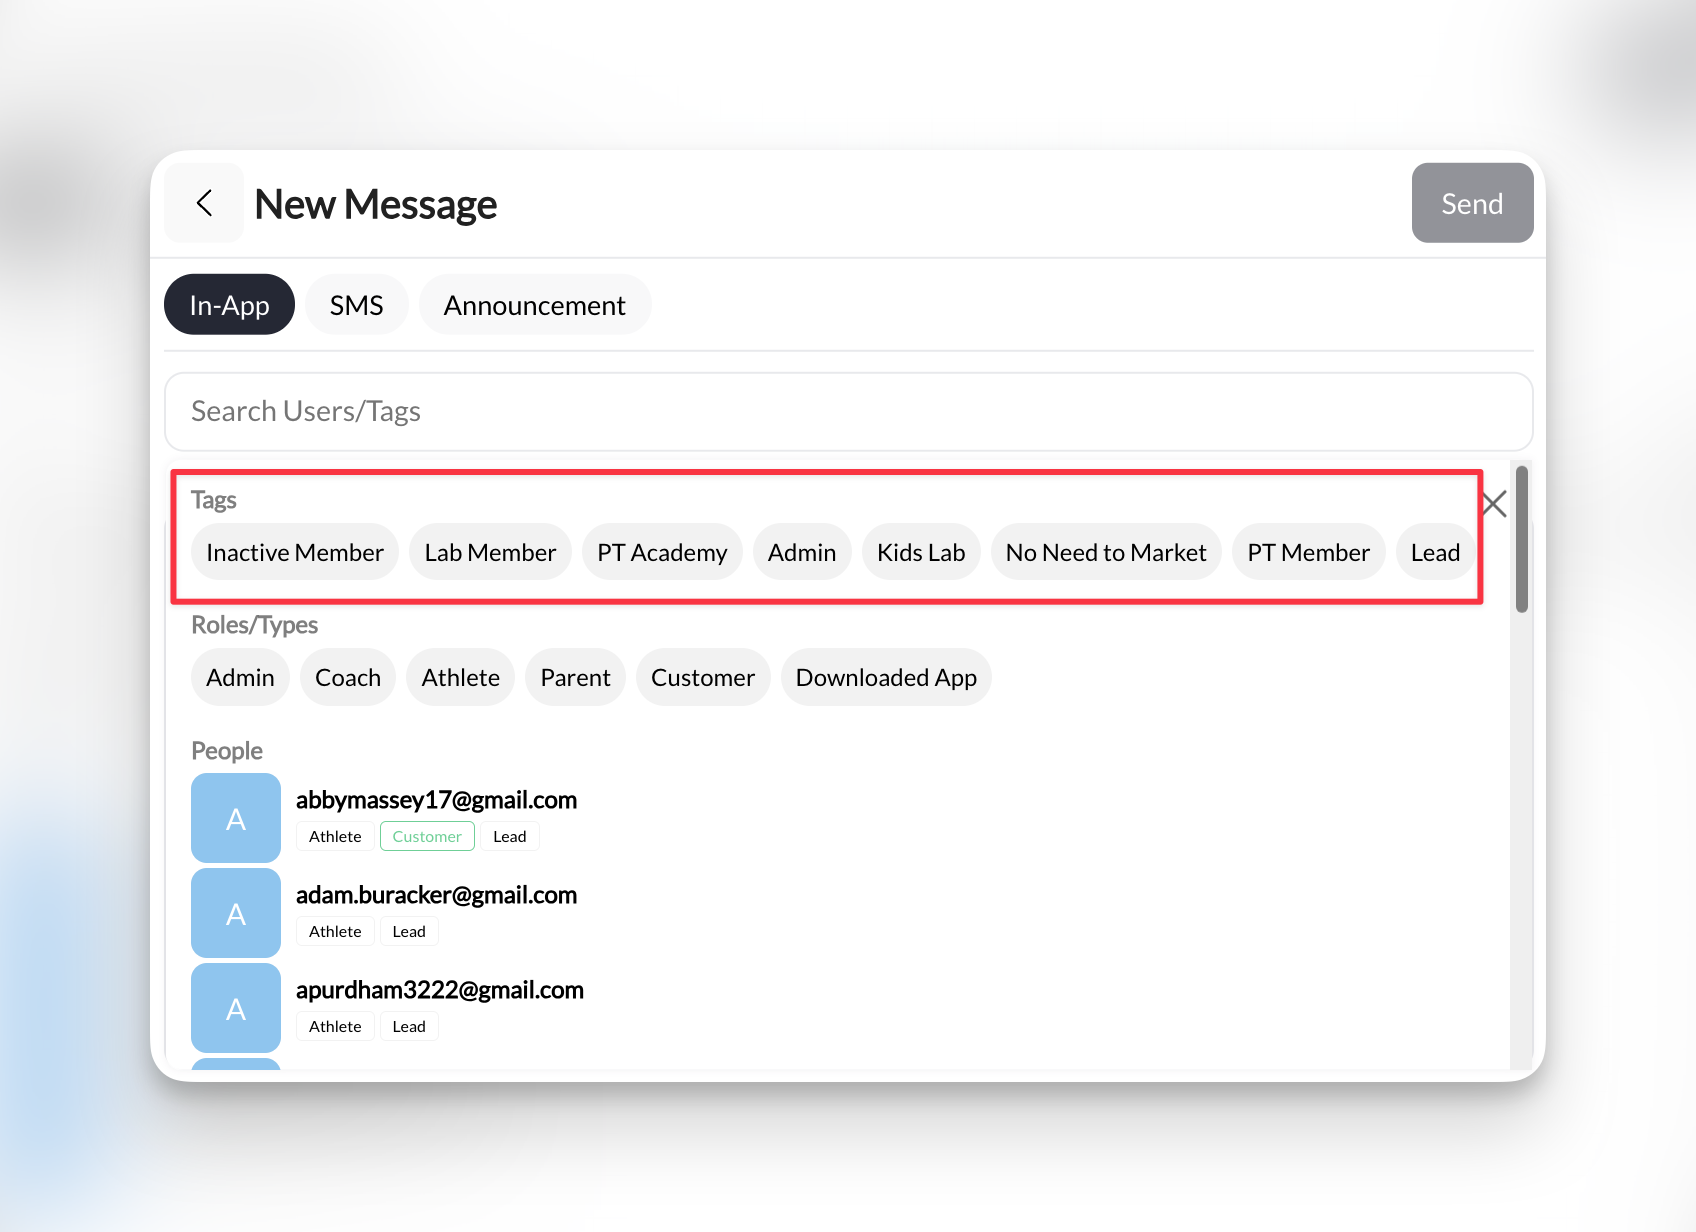
- In the “To” field, select “Tags” option
- Choose the tag you filtered by (e.g., “Rising Stars Class”)
- All clients with that tag are added as recipients
Program Announcements
Message everyone in “Elite Program” about schedule changes, new content, or events
Trial Follow-ups
Send welcome series to all “Trial” tagged clients with onboarding resources
Payment Reminders
Message “Past Due” tagged clients about outstanding balances
Location Updates
Notify “Downtown Facility” clients about facility closure or equipment updates
Tag management best practices
Use Descriptive Names
“Monthly Basketball Membership” is better than “BBall Monthly”. Future-you (and your team) will understand it immediately.
Establish Naming Conventions
Decide on Title Case, sentence case, or lowercase. Use consistently across all tags to avoid duplicates.
Clean Up Regularly
Every quarter, review your tag list. Delete unused tags, merge duplicates (e.g., “trial” and “Trial”), rename unclear tags.
Document Tag Meanings
Keep a simple document explaining what each tag means and when to use it. Essential if multiple staff members tag clients.
Limit Tag Count
Don’t create 50 tags. Most coaches use 10-15 total. If you have too many, consider combining or using fewer tags more strategically.
Tag New Clients Immediately
Make tagging part of your client creation workflow. Add at least 2 tags (program + status) when creating every new client.
Common tag examples by business type
Solo coach with 1 program:- “Active Member”
- “Trial”
- “Monthly Subscription”
- “Inactive”
- “Youth Development”
- “Elite Training”
- “Adult Fitness”
- “Trial - Youth”
- “Trial - Elite”
- “Active Member”
- “Location - Downtown”
- “Location - Westside”
- “Location - Mobile”
- “Elite Program”
- “Beginner Group”
- “Active”
- “Past Due”
- “Fall Season 2024”
- “Spring Season 2025”
- “Off-Season Training”
- “Camp Attendee”
- “Tournament Team”
Exporting filtered lists
After filtering to a specific group, you can export just those clients:
Why export filtered lists:
- Import into email marketing tools (Mailchimp, etc.)
- Share with external partners or sponsors
- Create custom reports in Excel/Google Sheets
- Backup specific segments
Privacy reminder: Exported client data contains personal information. Use it responsibly, comply with your privacy policy, and delete copies when no longer needed.
Common questions
Can clients see what tags I've assigned them?
Can clients see what tags I've assigned them?
What happens if I delete a tag?
What happens if I delete a tag?
When you delete a tag:
- Historical messages sent to that tag remain (not deleted)
- Clients aren’t notified
- You cannot undo the deletion
Can I rename a tag?
Can I rename a tag?
CoachIQ doesn’t have a direct “rename tag” feature. Here’s the workaround:
- Create the new tag with the desired name
- Filter to clients with the old tag
- Bulk add the new tag to all of them
- Bulk remove the old tag
- Delete the old tag
How many tags can one client have?
How many tags can one client have?
Can I import tags with bulk client uploads?
Can I import tags with bulk client uploads?
Do tags sync with the Athlete Portal?
Do tags sync with the Athlete Portal?
What’s next
Now that you’ve mastered tags and filters, explore related features:Group Messaging with Tags
Send targeted messages to tagged groups instantly
Managing Staff
Apply tags to coaching staff for team organization
Client Profiles
Deep dive into individual client activity and history
Bulk Operations
Edit multiple clients at once using tags
Related articles
People Overview
Complete People section guide
Adding Clients
Create and import clients with tags
Client Profiles
Individual client dashboards
Inbox Overview
Messaging system guide
Automations
Auto-tag clients based on actions
Forms
Tag clients based on form responses
You now know how to: Create tags, apply them to individual or multiple clients, use filters to segment your client base, combine filters for powerful searches, and leverage tags for group messaging.