What you’ll accomplish
Complete your scheduler configuration by assigning coaches, setting session locations, and configuring automated reminders. These settings add the final operational details that make your schedulers ready for real-world use.Before you begin
- Capacity, booking limits, cancellation policies → Scheduler Settings: Limits & Permissions
- Buffer time and scheduling windows → Also covered in Limits & Permissions article
- Payment configuration → Payment Options
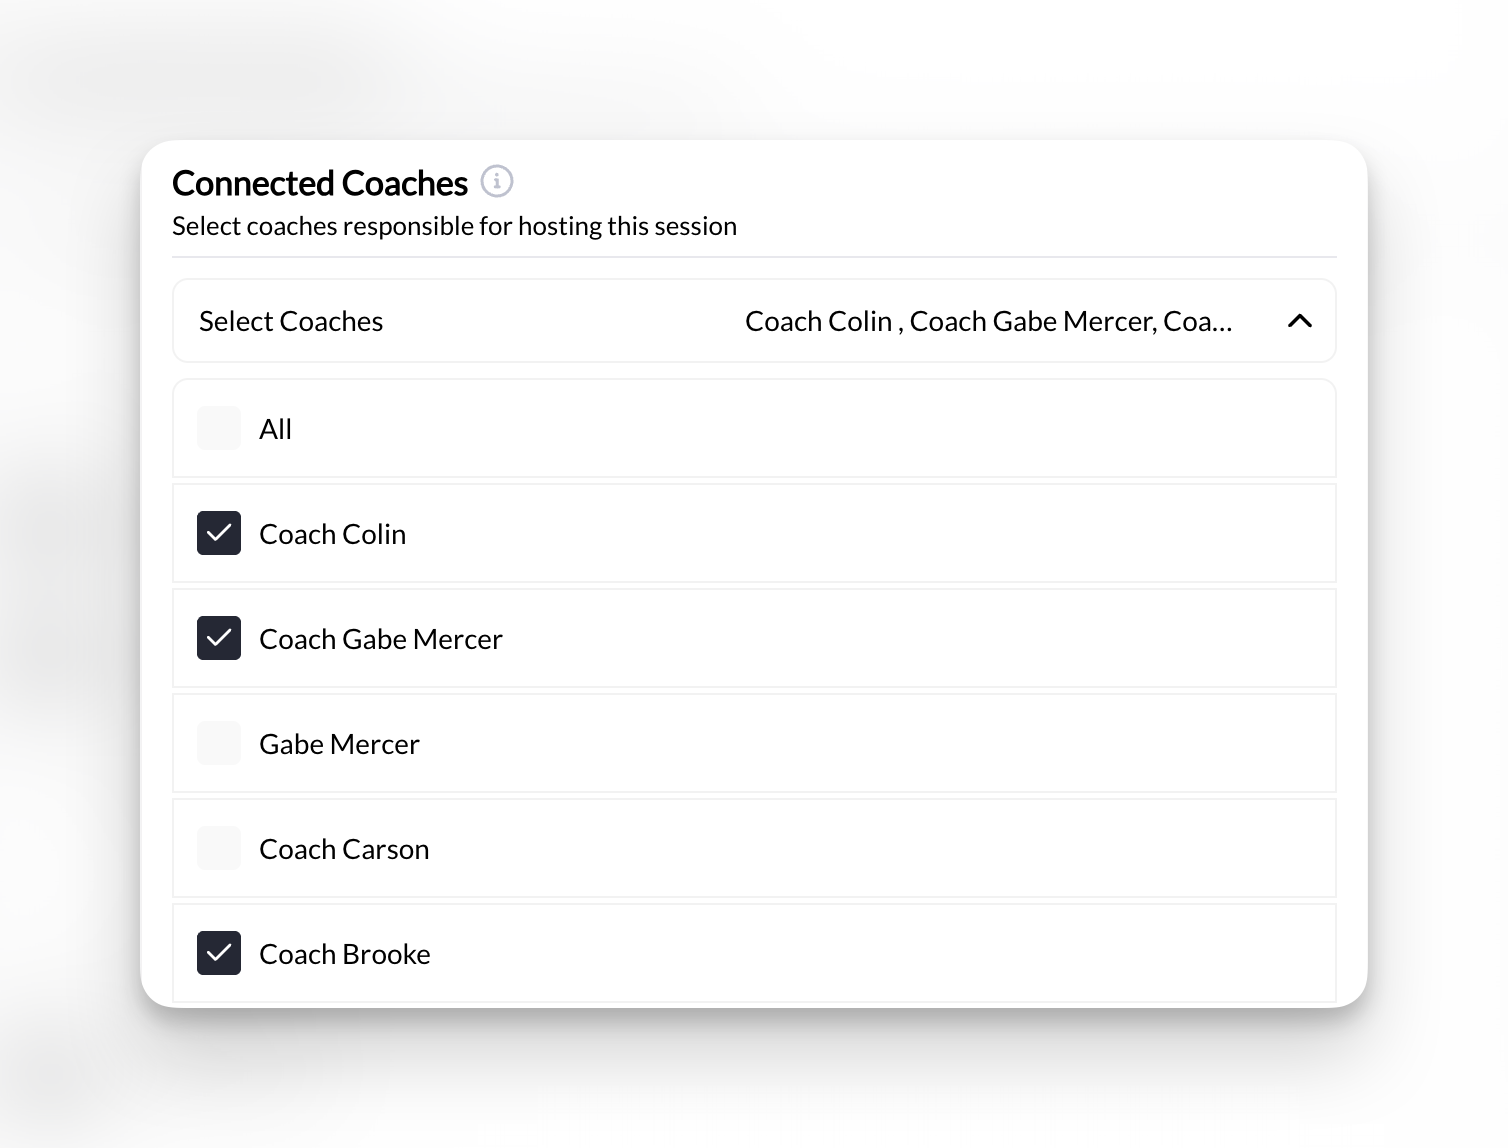
Setting 1: Connected coaches
Assign which coaches can deliver sessions from this scheduler.What it does
Connected Coaches links coaches to specific schedulers for two purposes:- Clarity: Shows which coaches deliver which services
- Double-booking prevention: Prevents the same coach from being booked in multiple places at the same time
How coach assignment works
Understanding coach availability
- Which schedulers they’re assigned to
- The availability template those schedulers use
- Their existing bookings
- Coach Sarah is assigned to “Private Training” scheduler
- “Private Training” uses “Weekday Afternoons” availability (Mon-Fri, 2pm-6pm)
- Therefore, Coach Sarah is available Mon-Fri 2pm-6pm for private training sessions
Single coach assignment
- You’re a solo coach
- Each scheduler represents one specific coach’s service
- You want clear coach-to-service relationships
- Edit scheduler
- Connected Coaches section
- Select your name
- Save
Multiple coach assignment
- Team of coaches offering the same service
- Coaches are interchangeable for this service type
- Need system to prevent double-booking across schedulers
- All assigned coaches share the same availability template
- When a time slot is booked, the system assigns ONE coach
- That coach is blocked from other bookings at that time
- Other coaches remain available for that time slot
When to use multiple coaches per scheduler
- Use Multiple Coaches When...
- Use Separate Schedulers When...
- Interchangeable service delivery
- All coaches teach same style/methodology
- Service quality consistent across coaches
- Athletes comfortable with any coach
- Team-based facilities
- Facility has multiple staff coaches
- “House” style coaching approach
- Athletes book the service, not the coach
- Scale operations
- Need multiple coaches to meet demand
- Can’t have one coach as bottleneck
- Want flexible staffing
- “Foundation Group Class”
- Assigned: 5 coaches
- Why: Any coach can run the standardized curriculum
- Result: More class capacity, flexible staffing
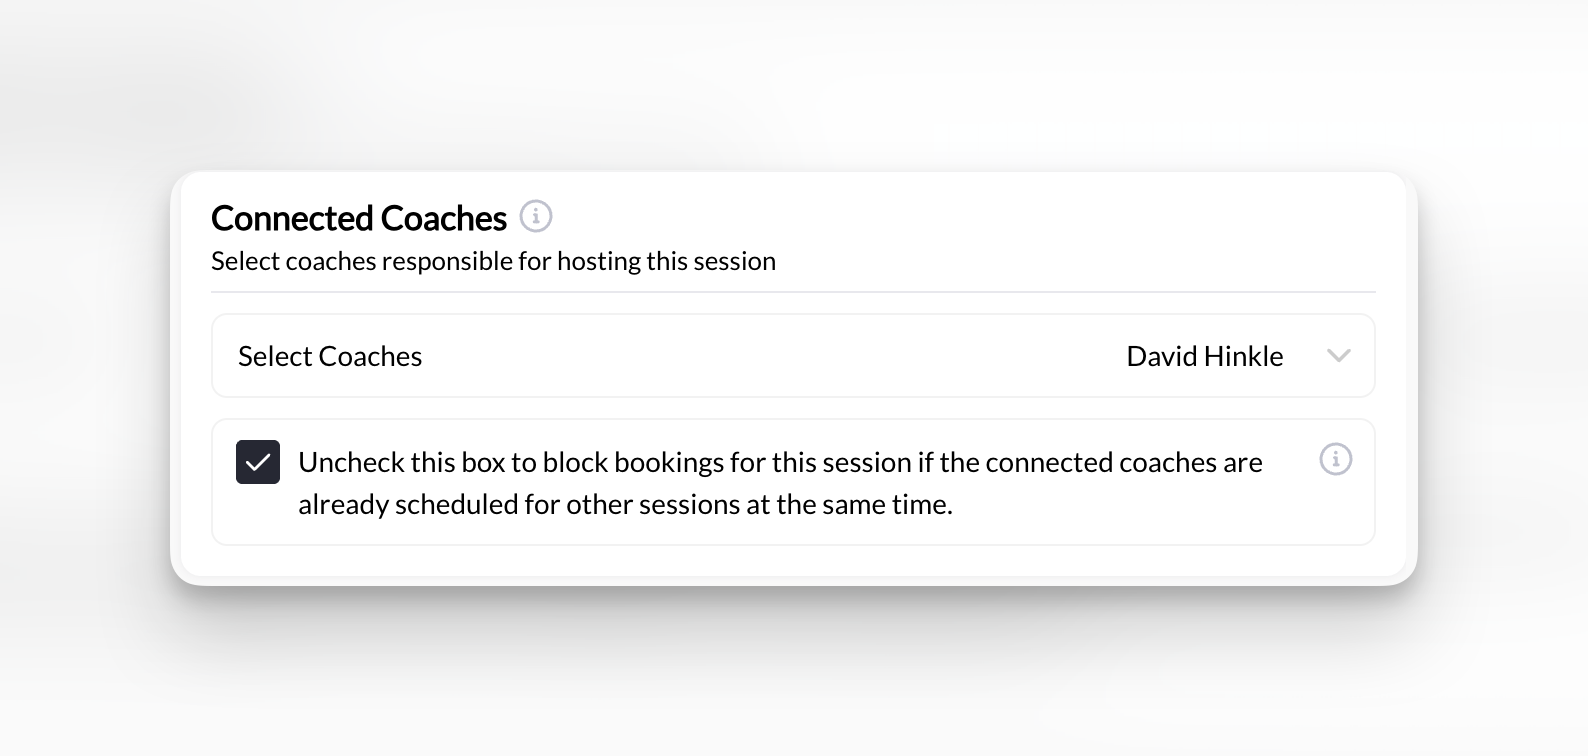
Double-booking prevention
How the system protects coaches: When you assign Coach Sarah to multiple schedulers, the system tracks her across ALL of them: Example scenario:- Unchecked (default): System prevents double-booking ✅
- Checked: System allows double-booking (NOT recommended)
Configuration steps
Navigate to scheduler settings
- Go to Schedule → Schedulers
- Click on the scheduler you want to edit
- Find Connected Coaches section
Add coaches
- Click Add Coach or dropdown menu
- Select coach from your organization’s roster
- Repeat to add multiple coaches (if applicable)
Configure double-booking setting
- Locate “Allow double-booking” checkbox
- Leave unchecked (recommended) to prevent conflicts
- Only check if you have specific business need for double-booking
- Coach can genuinely handle two things at once (rare)
- Testing scheduling scenarios
- Special override situations
Save changes
Common coach assignment scenarios
Solo coach: Assign yourself to all schedulers
Solo coach: Assign yourself to all schedulers
- You’re the only coach
- Create 5 different schedulers (Private 30-min, Private 60-min, Group Class, etc.)
- Assign yourself to ALL of them
- You’re the coach for everything
- System prevents you from being double-booked across schedulers
- If someone books Private Training 3pm, Group Class 3pm becomes unavailable
Team of coaches: Service-based assignment
Team of coaches: Service-based assignment
- 4 coaches on staff
- All coaches can run group classes
- Only 2 coaches do private training
- “Group Class” scheduler → Assign all 4 coaches
- “Private Training” scheduler → Assign only 2 specialized coaches
- Group classes have 4 coaches available (high capacity)
- Private training has 2 coaches available (specialized service)
- System prevents double-booking for each coach
Coach-specific schedulers for personal brands
Coach-specific schedulers for personal brands
- 3 coaches with personal followings
- Athletes want to book specific coaches
- Different expertise/styles
- “Private Training - Coach Mike” → Assign only Mike
- “Private Training - Coach Sarah” → Assign only Sarah
- “Private Training - Coach John” → Assign only John
- Athletes choose their coach by selecting scheduler
- Each coach has own pricing/availability
- Clear coach differentiation
Facility with rotating instructors
Facility with rotating instructors
- Gym with 8 instructors
- Any instructor can teach any class
- Need maximum flexibility
- “Monday 6am Bootcamp” → Assign all 8 instructors
- “Monday 6pm Yoga” → Assign all 8 instructors
- System assigns based on availability
- High coverage (8 instructors available)
- Flexible scheduling (no single-point-of-failure)
- System handles assignment automatically
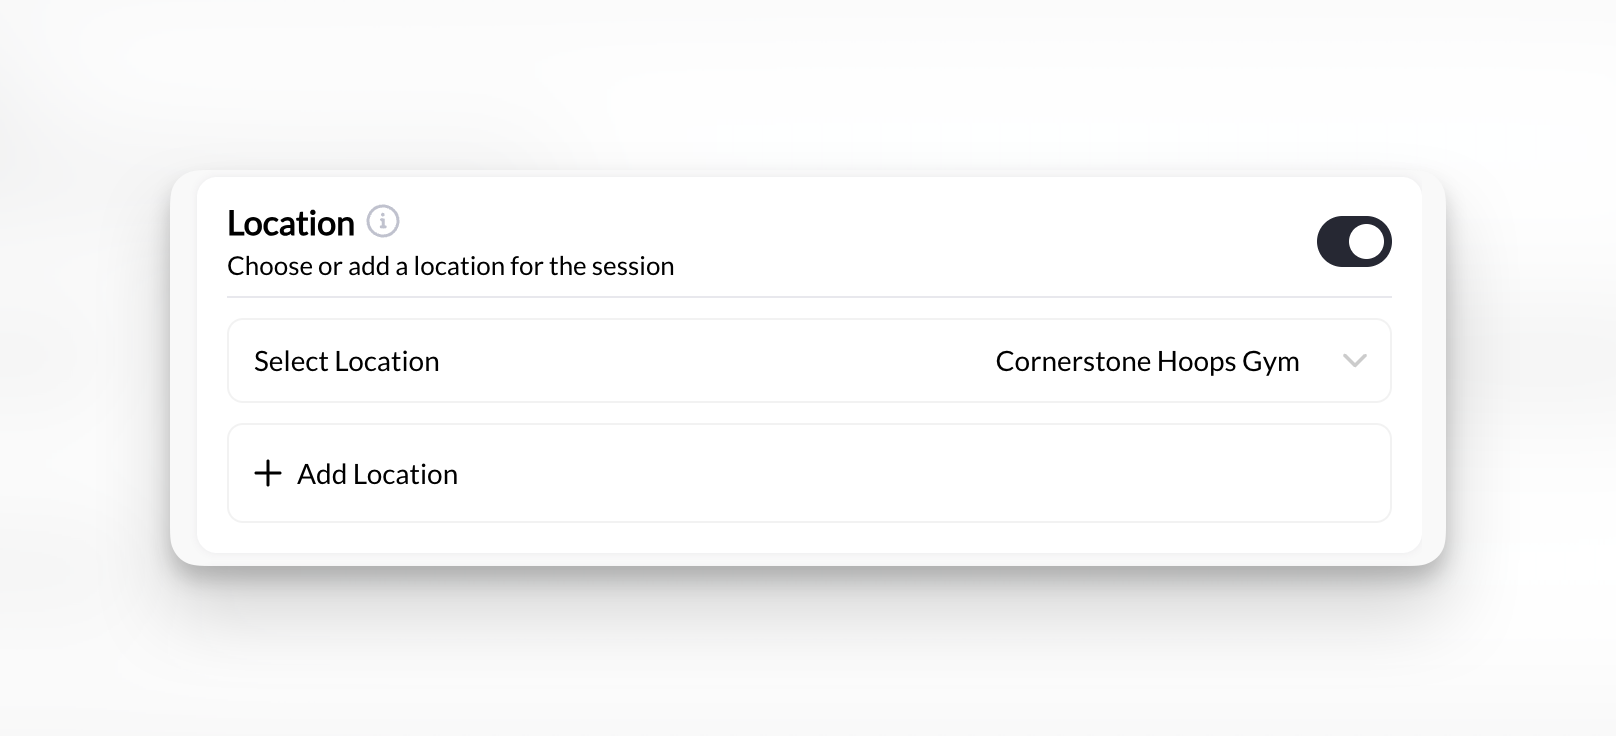
Setting 2: Session locations
Set where sessions take place.What it does
Location setting specifies the physical address where sessions from this scheduler occur. This helps athletes know where to show up and provides clarity for logistics planning. Critical limitation: One location per scheduler. If you train at multiple locations, you’ll need separate schedulers for each.Configuration options
Location field accepts: Physical street addresses only- ✅ Full street address (123 Main St, City, State, ZIP)
- ✅ Facility name + address
- ✅ Landmark or building name
- ❌ No virtual meeting links (can’t add Zoom URLs here)
When location settings matter
- Studio/Facility-Based Training
- Mobile Training (You Travel)
- Multiple Locations
- Virtual/Online Training
- Location: Your facility address
- Athletes see this when booking
- Everyone knows where to go
Setting your location
Navigate to scheduler settings
- Go to Schedule → Schedulers
- Click on the scheduler to edit
- Find Location section
Enter address
- Click in the Location field
- Type your physical address
- System may auto-complete if recognized
123 Main Street, Los Angeles, CA 90210Elite Fitness Center, 456 Gym Rd, Suite 100, Chicago, IL 60601Downtown Training Facility, 789 Wellness Way, Austin, TX 78701
Add contextual details (optional)
- Parking instructions
- Entrance details
- Check-in procedures
- Facility access codes
- Public transit options
Save and verify
- View booking page as an athlete
- Confirm location displays correctly
- Check that address is clear and complete
Common location mistakes
Vague location (not helpful)
Vague location (not helpful)
- Athletes don’t know exact address
- Can’t map directions
- Causes confusion and potential no-shows
Different locations, same scheduler
Different locations, same scheduler
- Location field only shows one address
- Athletes book expecting Location A, you show up at Location B
- Scheduling chaos
Virtual links in location field
Virtual links in location field
https://zoom.us/j/123456789 in location fieldProblem:- Field not designed for URLs
- May not format or clickable
- Looks unprofessional
- Location field: “Virtual Session” or “Online Training”
- Send Zoom link via booking confirmation email
- Include in automated reminders
- Add to session details after booking
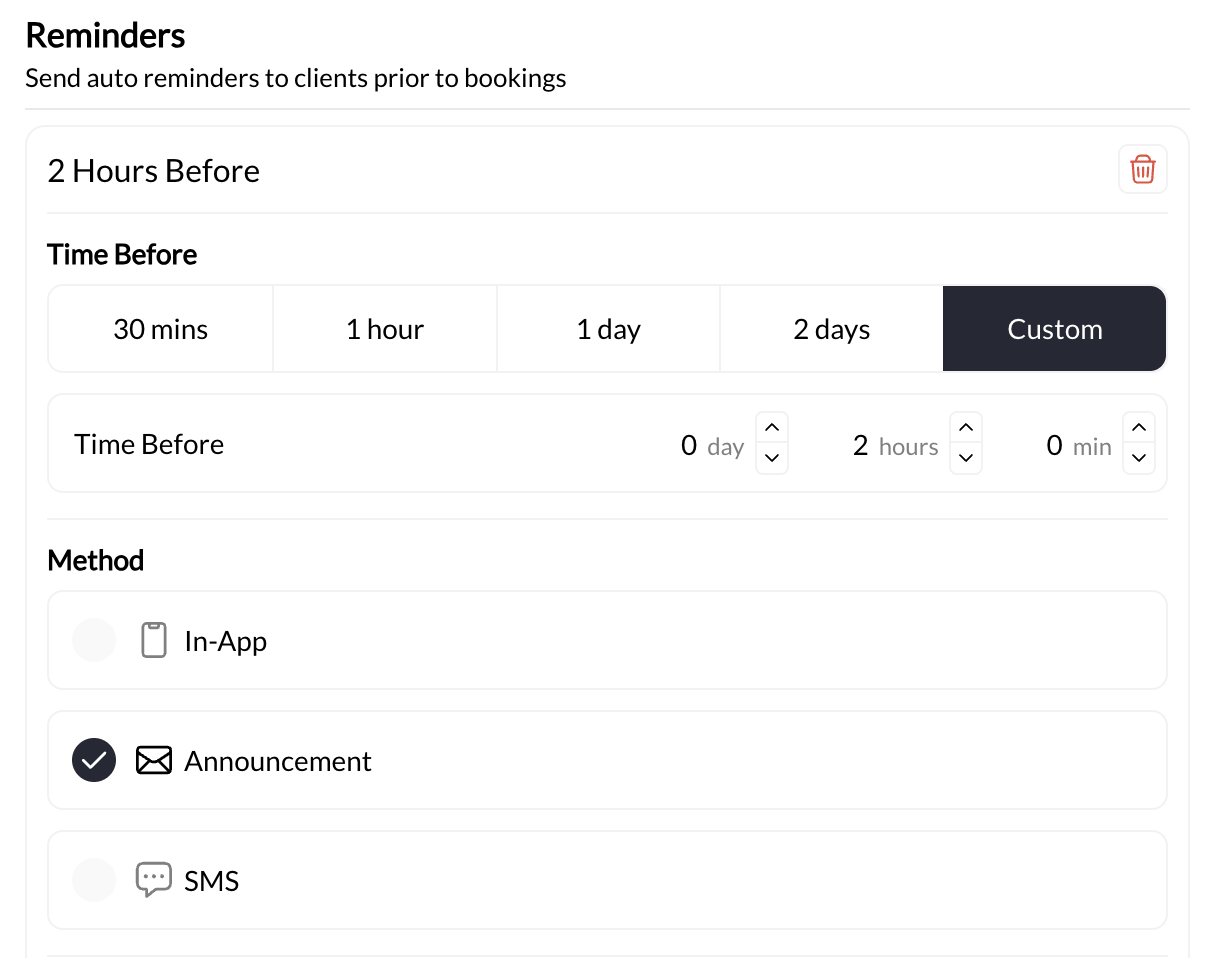
Setting 3: Automated reminders
Configure automatic notifications that remind athletes about upcoming sessions.What it does
Automated reminders send notifications to athletes before their scheduled sessions. This reduces no-shows and helps athletes remember their commitments. Important note: Reminder settings in CoachIQ are account-wide, not scheduler-specific. When you configure reminders, they apply to all schedulers across your account.Reminder configuration options
Timing options
- 1 week before session
- 1 day before session
- 6 hours before session
- 1 hour before session
- 30 minutes before session
- First reminder: 1 day before
- Second reminder: 1 hour before
- Result: Athletes get two reminders for each session
Delivery methods
- ✅ SMS (text message)
- ✅ In-app notification (push notification if athlete has app)
- Single channel (SMS only)
- Multiple channels (SMS + Email)
- All three channels (SMS + Email + Push)
Message customization
- The message text/body
- Tone and language
- Additional instructions or details
- Message formatting (system templates handle this)
- Dynamic fields (athlete name, time, date auto-insert)
{athlete_name}- Athlete’s first name{time}- Session time{date}- Session date{location}- Session location
Reminder best practices
- How Many Reminders?
- Message Content Strategy
- Channel Selection
- First reminder: 24 hours before
- Gives athletes time to reschedule if needed
- Respects your cancellation policy window
- Top-of-mind reminder
- Second reminder: 1-2 hours before
- Last-minute nudge
- “Leave now” reminder
- Reduces day-of no-shows
- 3+ reminders feels excessive
- Can annoy athletes
- Diminishing returns
- 1 reminder = higher no-show rate
- Athletes need both advance notice + day-of nudge
Configuring reminders
Access reminder settings
Enable reminders
- Toggle Automated Reminders to ON
- System will now send reminders for all bookings
Set timing
- Click Add Reminder
- Select timing from dropdown (or choose custom)
- Repeat to add additional reminders
- Reminder 1: 1 day before
- Reminder 2: 1 hour before
Choose delivery channels
- SMS
- Push notification
Customize message
- Click Edit Message for each reminder
- Write your custom message text
- Use template variables:
{athlete_name},{time},{date},{location} - Keep SMS messages under 160 characters if possible (avoids multi-part messages)
Save and test
- Click Save to apply reminder settings
- Test by booking yourself for a session
- Verify you receive reminders at configured times
Reminder troubleshooting
Athletes not receiving SMS reminders
Athletes not receiving SMS reminders
- SMS not enabled: Check Settings → Notifications → SMS is turned ON
- No phone number: Athlete profile missing phone number
- Wrong phone number: Phone number incorrect in athlete profile
- Carrier blocking: Some carriers block automated SMS (rare)
- SMS credits depleted: Account may need SMS credits topped up
- Verify SMS is enabled account-wide
- Check athlete profile has valid phone number
- Test with your own number first
- Contact support if persistent issues
Reminders sending at wrong time
Reminders sending at wrong time
- Timezone mismatch: Account timezone doesn’t match actual location
- Reminder timing misconfigured: Set to wrong interval
- Verify timezone: Settings → Account Settings → Timezone
- Double-check reminder timing: Should say “1 day before” not “1 day after”
- Test with upcoming session to verify timing
Too many/too few reminders
Too many/too few reminders
- Reduce from 3+ reminders to 2 reminders
- Recommended: 24hr + 1hr only
- Increase from 1 reminder to 2 reminders
- Add both advance notice (24hr) and day-of (1hr) reminders
Reminder message not saving
Reminder message not saving
- Special characters: Message contains characters that don’t save properly
- Too long: Message exceeds character limits
- Missing template variables: Required variables not formatted correctly
- Remove special characters (emojis, symbols)
- Shorten message if too long
- Verify template variables format:
{athlete_name}notathlete_name - Try saving simpler message first, then add complexity
Impact of reminders on no-shows
Expected results with automated reminders:- First reminder = biggest impact (reduces no-shows by 50%)
- Second reminder = additional 30-40% reduction
- Third+ reminders = minimal additional benefit
Setting 4: Active/Inactive toggle
Control whether a scheduler is available for use.What it does
Active/Inactive toggle is an on/off switch for your scheduler:- Active: Scheduler can be used (but still needs to be added to website/portal/shared via link)
- Inactive: Scheduler cannot be used or booked at all
- Added scheduler to your website or athlete portal, OR
- Shared the direct booking link with athletes
When to use inactive status
Temporarily pausing a service
Temporarily pausing a service
- Scheduler still exists in your system
- Settings and configuration preserved
- Athletes cannot book (even if link was previously shared)
- When spring arrives, flip to Active and resume bookings
Building scheduler before ready to launch
Building scheduler before ready to launch
- You can configure all settings
- Test bookings (manual only)
- Preview how it looks
- When ready, flip to Active and add to website
Seasonal services
Seasonal services
- During active months: Athletes can book
- During inactive months: Scheduler hidden/unavailable
- Easy seasonal on/off control
Testing new offerings
Testing new offerings
- Create scheduler (Inactive)
- Manually book a few test athletes
- Gather feedback
- If successful, flip to Active and promote widely
- If unsuccessful, delete or keep Inactive
Active vs. Inactive: What’s the difference?
Setting active/inactive status
Navigate to scheduler
- Go to Schedule → Schedulers
- Find the scheduler you want to activate/deactivate
- Click to edit
Toggle status
Save changes
- Active: Scheduler appears in your available schedulers list
- Inactive: Scheduler marked as inactive (may show with different color or badge)
What happens to existing bookings when you deactivate?
Important: Setting a scheduler to Inactive does NOT:- Cancel existing bookings
- Affect sessions already scheduled
- Remove bookings from your calendar
- ✅ Remain on your calendar
- ✅ Athletes can still attend
- ✅ Reminders still send
- ✅ Athletes can view their booking
- ❌ No NEW bookings can be made
- ❌ Athletes can’t book additional sessions
- ❌ Scheduler doesn’t appear in athlete portal/website
- You have “Summer Camp” scheduler with 50 bookings scheduled
- You set it to Inactive on August 31
- All 50 existing bookings remain valid and proceed normally
- No new bookings can be made for future dates
Setting 5: Other configuration options
Additional settings you might encounter in scheduler builder.Duration settings
What it is: Session length configuration Already covered: Duration is configured during scheduler creation (Creating Your First Scheduler) Options:- Preset durations: 15, 30, 45, 60, 90 minutes
- Custom duration: Enter any minute value
- Private training: 45-60 minutes typical
- Group classes: 45-60 minutes typical
- Assessments: 60-90 minutes typical
- Quick sessions: 15-30 minutes typical
Scheduler description
What it is: Public-facing description athletes see when viewing scheduler Best practices:- Explain what the session includes
- Set expectations (intensity level, format, what to bring)
- Include logistics (parking, arrival time, what to wear)
- Mention any prerequisites
Visibility settings
What it is: Control who can see/book this scheduler Typical options:- Public: Anyone with link can book
- Members only: Only athletes in your system
- Specific groups: Only certain athlete groups/teams
- Private: Only visible to you (manual booking only)
- Public: General services open to all
- Members only: Services for existing clients
- Specific groups: Team-specific training
- Private: VIP or by-invitation-only services
Putting it all together: Complete configuration checklist
Before launching a scheduler, verify all advanced settings are configured:Pre-launch configuration checklist
✅ Coach Assignment Verified
✅ Coach Assignment Verified
- Correct coach(es) assigned to scheduler
- If multiple coaches, confirmed they’re interchangeable for this service
- “Allow double-booking” is UNCHECKED (unless specific need)
- Tested that coach availability prevents conflicts
✅ Location Is Clear
✅ Location Is Clear
- Physical address entered (if applicable)
- Address is complete (street, city, state, ZIP)
- Scheduler description includes additional logistics (parking, entrance, etc.)
- If mobile training, approach is clear to athletes
- If virtual training, process for sharing meeting link is established
✅ Reminders Configured
✅ Reminders Configured
- Automated reminders enabled account-wide
- At least 2 reminders configured (24hr + 1hr recommended)
- SMS and/or email channels enabled
- Custom message written with your brand voice
- Template variables correctly formatted:
{athlete_name},{time}, etc. - Test reminder sent and received successfully
✅ Active/Inactive Status Set
✅ Active/Inactive Status Set
- Scheduler set to Active (if ready for bookings)
- Or set to Inactive (if not ready yet or seasonal pause)
- Confirmed status matches your launch intention
✅ All Other Settings Reviewed
✅ All Other Settings Reviewed
- Duration is correct
- Description is clear and informative
- Visibility settings match intended audience
- Capacity, limits, cancellation policy configured (from Article #11)
- Payment settings configured (from Article #10)
- Availability template assigned (from Articles #5-7)
Common configuration mistakes
1. No coach assigned
Symptom: Bookings failing or scheduler not working properly Fix: Edit scheduler → Connected Coaches → Add coach → Save2. Multiple locations in one scheduler
Symptom: Athletes confused about where to go Fix: Create separate schedulers per location, each with specific address3. “Allow double-booking” accidentally checked
Symptom: Same coach booked in two places at once, scheduling conflicts Fix: Edit scheduler → Uncheck “Allow double-booking” → Save4. Reminders not configured
Symptom: High no-show rates, athletes forgetting sessions Fix: Settings → Notifications → Enable automated reminders with 24hr + 1hr timing5. Scheduler Active but not added to portal/website
Symptom: Athletes can’t find scheduler to book Fix: Active status doesn’t automatically display scheduler. You must:- Add to athlete portal (App Builder → Schedule)
- Add to website (Website Builder → Embed scheduler)
- Or share direct booking link
Troubleshooting advanced settings
Scheduler won’t save changes
Possible causes:- Missing required fields (coach, availability, etc.)
- Invalid location format
- Browser/connection issue
- Verify all required fields completed
- Try refreshing page and re-entering
- Try different browser
- Contact support if persistent
Changes not appearing on booking page
Possible causes:- Didn’t click Save after making changes
- Browser cache showing old version
- Changes only apply to future bookings, not existing
- Confirm you clicked Save/Update
- Hard refresh browser (Ctrl+Shift+R or Cmd+Shift+R)
- Wait a few minutes for changes to propagate
- Check in incognito/private browsing mode
Athletes reporting incorrect information
Common issues:- Wrong location showing → Update location field
- Wrong coach name → Update connected coaches
- Outdated description → Update scheduler description
- Missing reminders → Configure account-wide reminder settings