
Where to find this: Tools → Automations → Create
What you’re building
Step by step
1
Start a new automation
Go to Tools → Automations and click Create (or Start from scratch if you have none yet). The builder opens full screen as a column of cards: When, Only if and the steps. It’s off and Not saved yet.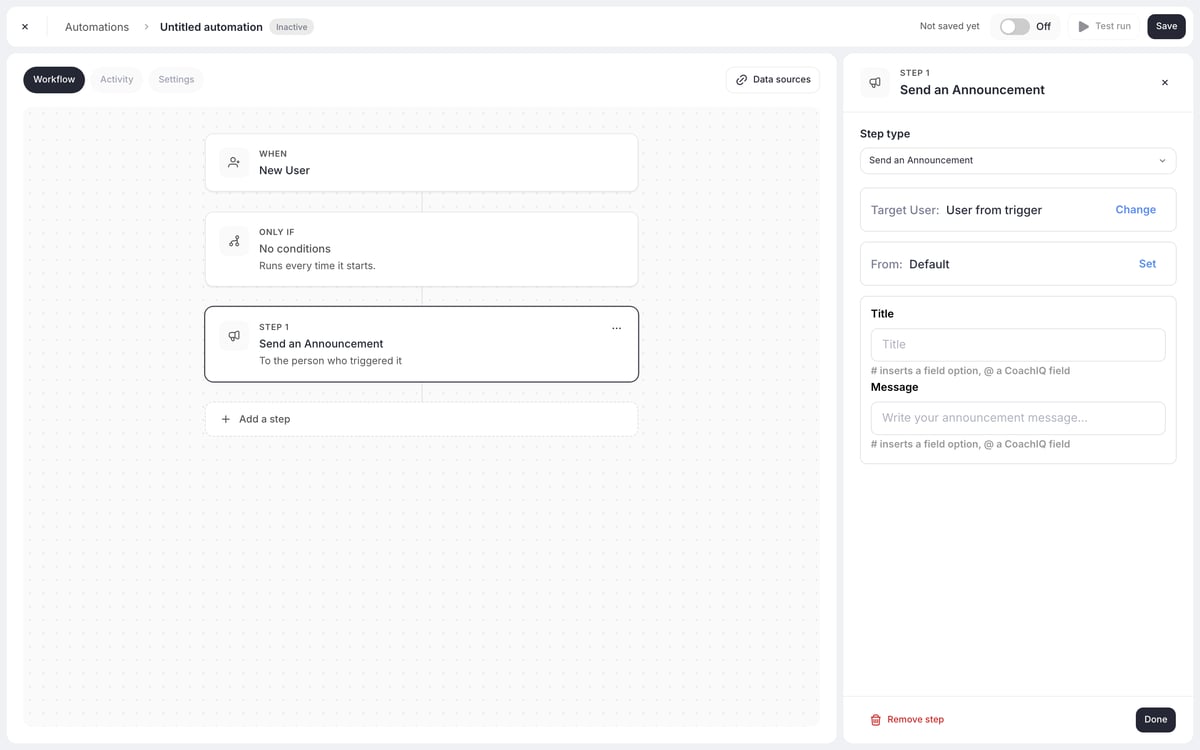
2
Name it
Open the Settings tab and type an Automation name, such as New Member Welcome. This is the name in the Automations list and in Activity. Go back to Workflow.
3
Choose the trigger
Click the When card, then Change. Under Payments & forms, choose Purchase Made (“Someone buys any product”) and click Done.The buyer becomes the user from trigger that the steps act on. On products that ask for an athlete at checkout, it’s the athlete instead.
4
Add a condition
You only want this for subscriptions, not camps or drop-ins. Click the Only if card, then Add Condition, and choose Is subscription in the field list. Click Done.
5
Add the email
Click Add a step and choose Send an Email under Messages. If a Step 1 card is already there, click it and change Step type to Send an Email instead. Fill in:Type
@ wherever you want a CoachIQ field such as the first name. It fills in for each person. Click Done.6
Add the tag
Click Add a step and choose Add a Tag to a User under Tags & profile. Keep User from trigger and pick the Active Member tag (create it in People first if you don’t have it). Click Done.
7
Save
Click Save. The automation is saved but still off, so nothing runs yet.
8
Test it
Follow the checklist in Test before you turn it on.
9
Turn it on
Switch Off to On in the top bar. CoachIQ shows When: Purchase Made and Then: your steps. Click Turn on.
That’s it. The next person who buys a subscription gets your welcome email and the Active Member tag.
Test before you turn it on
Email, text, booking, credit and purchase steps do real things the moment they run, so check your work first.- Use a test profile. Pick a profile with an email you can read, not a real member. For Purchase Made, its latest purchase must be a subscription, or the condition won’t pass.
- Click Test run in the top bar (it’s available once the automation is saved), pick the test profile and click Run Test Now. The test really sends.
- Open Activity. Expand the run to see whether the condition passed and what each step did (Delivered, Queued and so on).
- Check the inbox of the test profile to see how the email reads.
- Then turn it on.
Check it’s working
- Activity lists every run, who it was for and what each step did. See Activity.
- The tag shows on the client’s profile in People.
- A new account on its own doesn’t start this automation. It needs a purchase.
What you just learned
Every automation uses the same pattern:- When: the event that starts it (a purchase, a booking, a form submission, a schedule)
- Only if: who it applies to (only subscriptions, only first-time buyers)
- Steps: what CoachIQ does (send messages, add tags, manage credits)
- Data sources (optional): extra details, such as a credit balance, for conditions and messages to use
What’s next?
Automation templates
Thirteen ready-made automations to start from
Scheduled automations
Weekly check-ins, credit reminders and other timed automations
Builder reference
Every part of the builder, Test run and Activity
Triggers and actions reference
Every trigger, condition, step and field