

Where to find connections: Open any form in the builder → click Connections in the top bar
How connections work
When you add a Product, Scheduler, or Login/Signup to a form, each becomes a separate page in the submission flow:You control which connections to add. A simple lead form might have none. A camp registration might have all three.
Require a form when someone buys a product
To start registration from a product purchase, open Payments → Products, edit the product, and choose Advanced → Add a form. Select your form and save. The buyer completes registration, reviews their details, and then purchases. A returning parent or athlete with completed registration on file for that product skips the form on a repeat purchase. The product’s recipient setting still controls whether the purchase and credits go to the buyer or a selected managed athlete. See Attach a registration form to a product. Use the steps below when you want to start from the form instead.Adding a product (collect payment)
Use this when you want to collect a fee during form submission — registration fees, deposits, camp payments, or trial session charges.1
Open your form
Go to Tools → Forms and click on the form you want to edit.
2
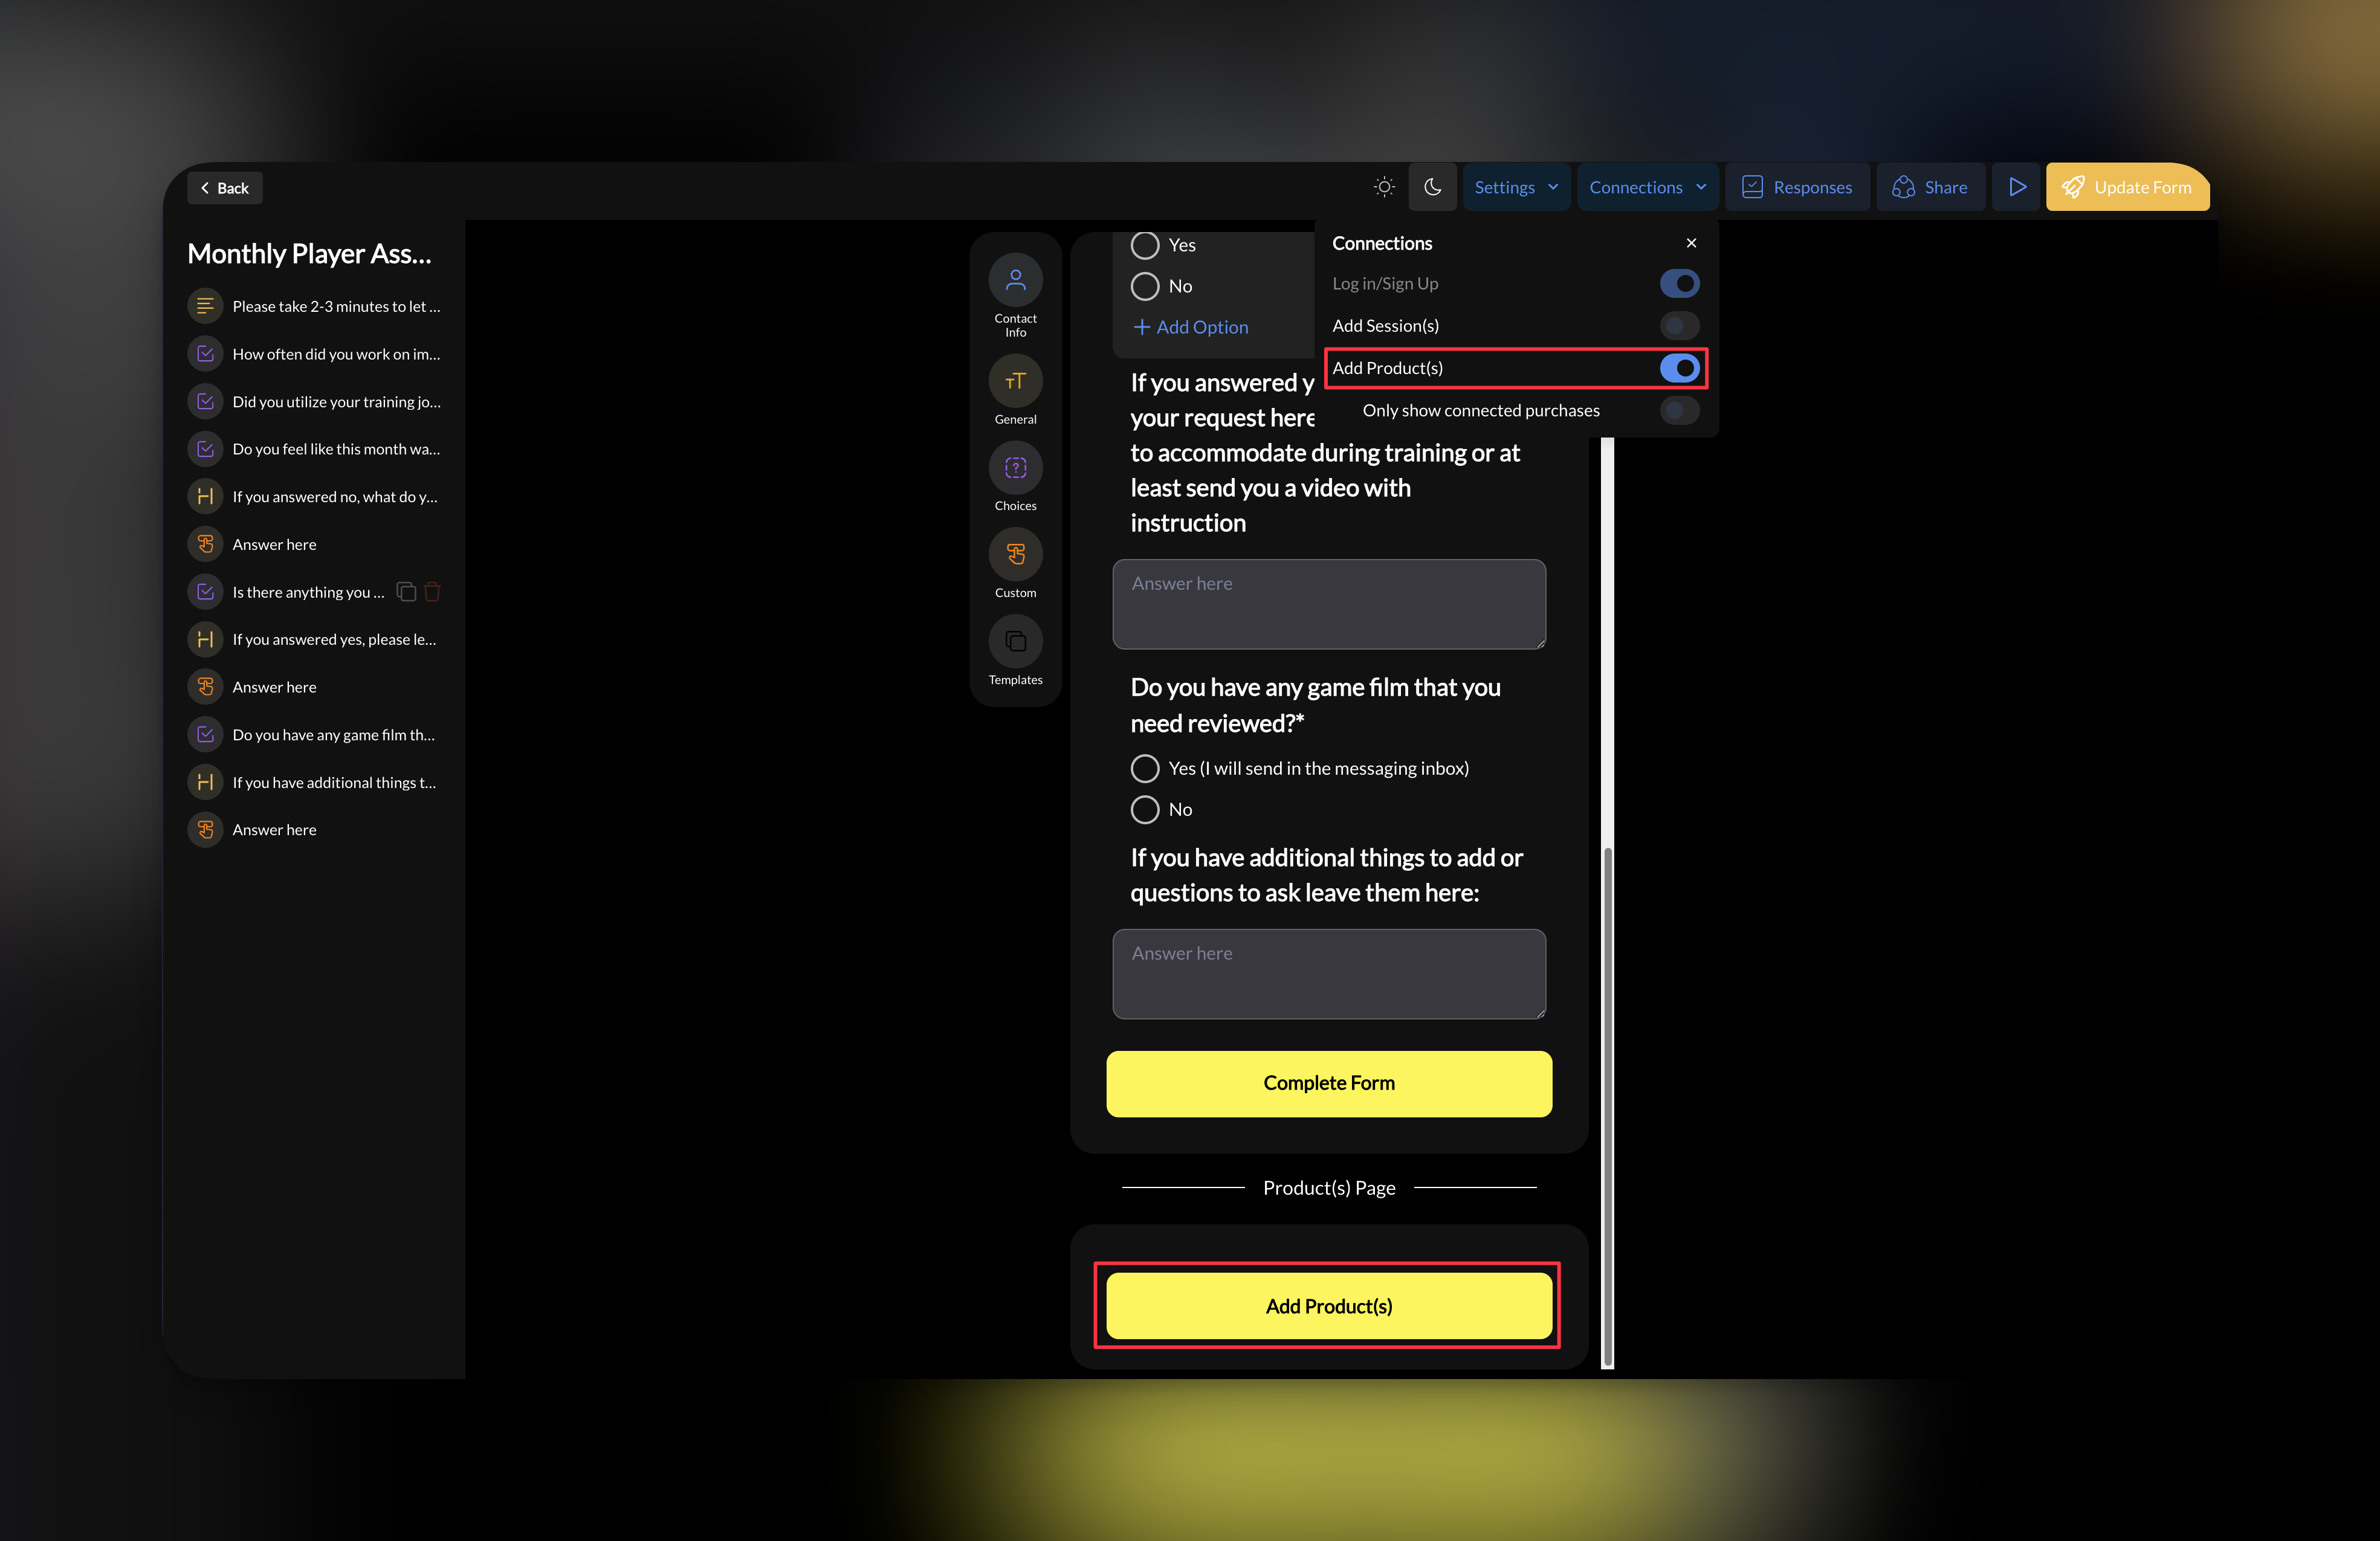
Click Connections
In the top bar, click Connections to open the connections menu.
3
Select a product
Choose the product you want to attach. This must be a product you’ve already created in Payments → Products.The product name, price, and description will display to the athlete during checkout.
4
Save your form
Click Update Form to save. The payment page is now part of your form flow.
What the athlete sees
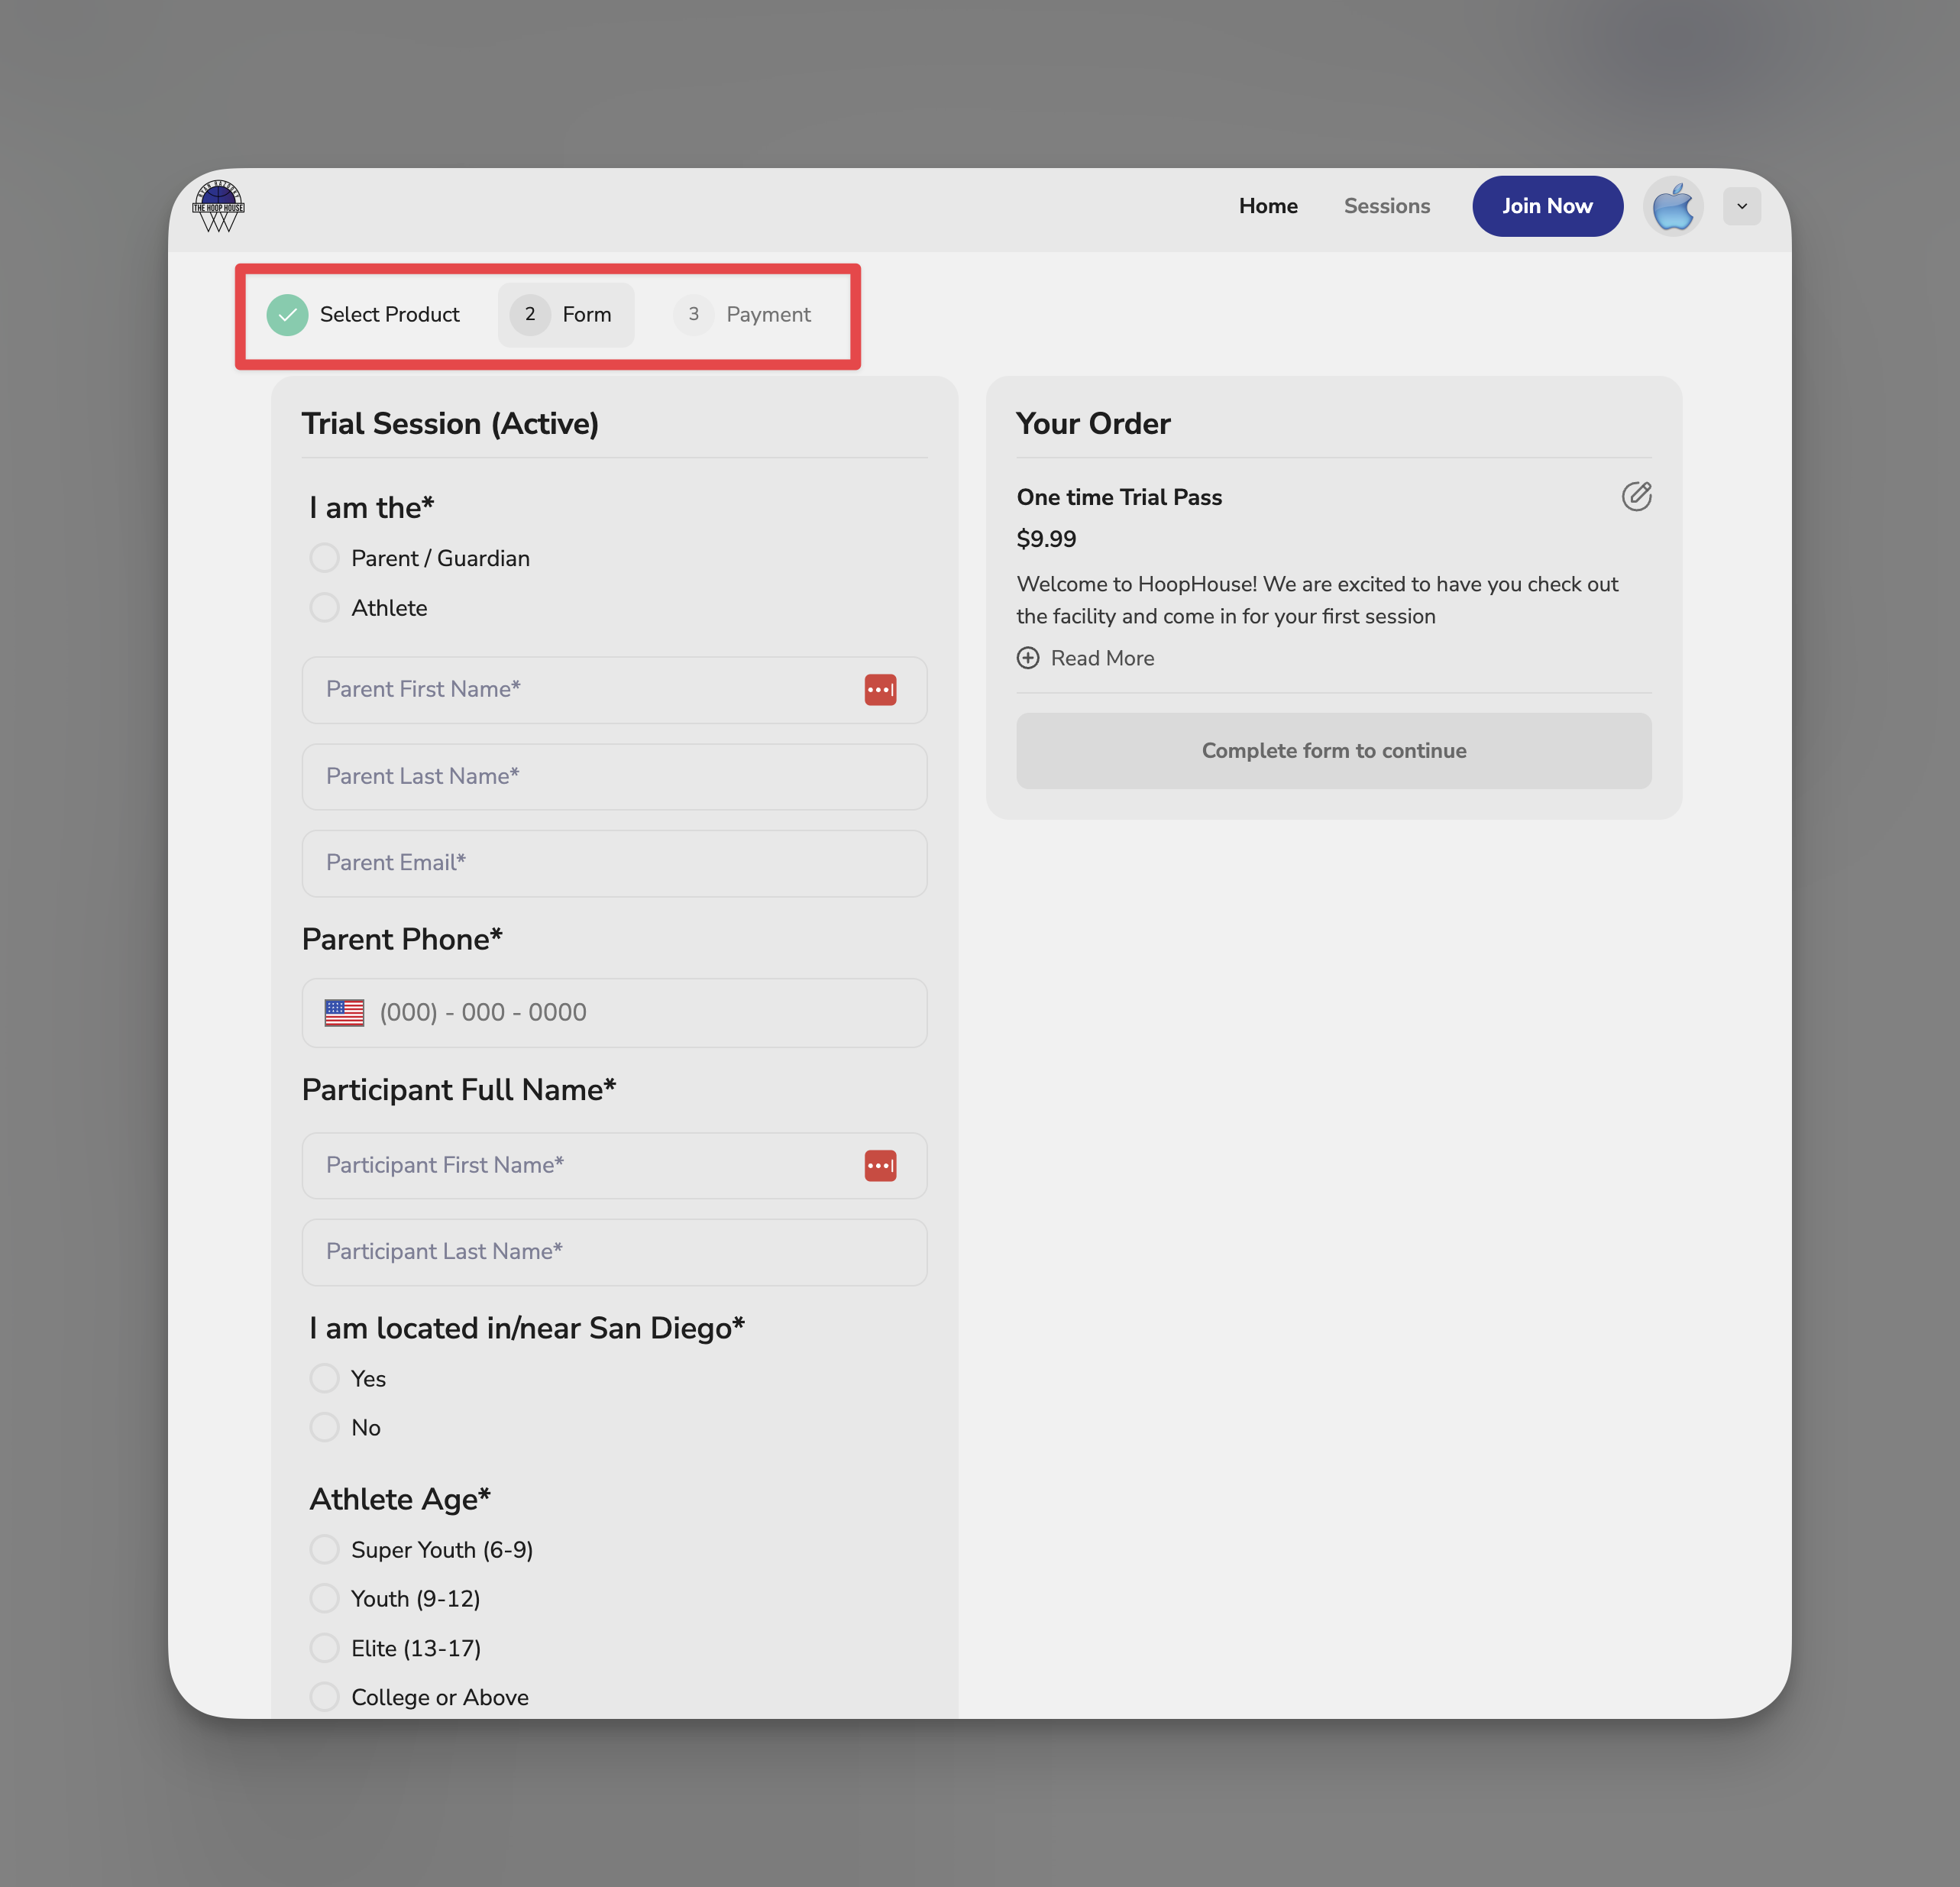
After completing your form fields:- They’re taken to a payment page
- They see the product name, description, and price
- They enter payment details
- After payment, they continue to the next step (or completion)
Adding a scheduler (book a session)
Use this when you want athletes to book a session as part of the form flow — common for evaluation bookings, trial sessions, or onboarding.1
Open your form
Go to Tools → Forms and click on the form you want to edit.
2
Click Connections
In the top bar, click Connections to open the connections menu.
3
Select a scheduler
Choose the scheduler you want to embed. This must be a scheduler you’ve already created in Schedule → Schedulers.
4
Save your form
Click Update Form to save. The booking calendar is now part of your form flow.
What the athlete sees
After completing previous steps:- They see an embedded calendar with your available times
- They select a date and time
- After booking, they continue to completion
Requiring login/signup
Use this when you want form submissions tied to athlete profiles in your People list.1
Open Connections
In your form builder, click Connections in the top bar.
2
Enable Login/Signup
Toggle on the login/signup requirement.
3
Save your form
Click Update Form to save.
What this enables
For waivers, always require login. You want the signed waiver attached to a specific athlete’s profile — not floating anonymously in your responses.
Common connection combinations
Lead capture form
Connections: None Just collect info. No payment, no booking, no account required. Keep the barrier low for first contact.Trial session registration
Connections: Login/Signup + Product (trial fee) + Scheduler Athlete creates account → pays trial fee → books their session. You get a qualified lead with payment commitment and a booking on your calendar.Camp registration
Connections: Login/Signup + Product (camp fee) Athlete creates account → pays camp fee. No scheduling needed since camp dates are fixed. Their registration is tied to their profile.New athlete onboarding
Connections: Login/Signup + Scheduler Athlete creates account → books first evaluation. No payment at this stage — you’ll charge after the eval or via a separate product.Waiver collection
Connections: Login/Signup only Athlete creates account → completes waiver. The signed waiver attaches to their profile. No payment or booking needed.Viewing connected transactions and bookings
Payments
When an athlete pays via a form:- Transaction appears in Payments → Transactions
- Shows the product, amount, athlete, and timestamp
- Links to the form submission
Bookings
When an athlete books via a form:- Session appears on your Calendar
- Shows in the athlete’s booking history
- Links to the form submission
Form responses
All submissions (with or without connections) appear in your form’s Responses tab. Use the response’s activity to confirm a completed purchase or booking, its date, and the session details. A form response alone does not prove payment or a reservation. See Check the connected purchase or booking.Tips for connected forms
Create products before building the form
Create products before building the form
You can only connect existing products. Build your registration fee or camp product first in Payments → Products, then add it to your form.
Create schedulers before building the form
Create schedulers before building the form
Same logic — you can only connect existing schedulers. Set up your availability and scheduler first.
Test the full flow yourself
Test the full flow yourself
Before sharing, submit your own form. Go through every page — fields, login, payment (use test mode if available), and booking. Experience what your athletes will experience.
Keep form fields minimal when adding connections
Keep form fields minimal when adding connections
Each connection adds a page. If your form already has 15 fields plus payment plus booking, that’s a lot of steps. Consider what’s truly essential.
Use login for any form you want tracked
Use login for any form you want tracked
Anonymous submissions work, but you lose the profile connection. For anything beyond casual lead capture, require login.
What you can’t do
- Make payment optional — If a product is connected, payment is required to submit
- Add multiple products — One product per form
- Add multiple schedulers — One scheduler per form
- Skip connection pages — Athletes must complete each connected step in order
Next steps
Share Your Forms
Get your link, embed on your website, and configure what happens after submission
Responses & Automations
View submissions, export data, and trigger automated actions
Related articles
Product Overview
Learn about the products you can connect to forms for payment
Product Builder
Create a product to attach to your registration or camp form
Creating Your First Scheduler
Set up a scheduler to embed in your form booking flow
People Overview
See how login/signup connects form data to athlete profiles