

Where to find this: open a form and click Responses in the top bar, or choose Responses from the form’s … menu in Tools → Forms
The Responses page
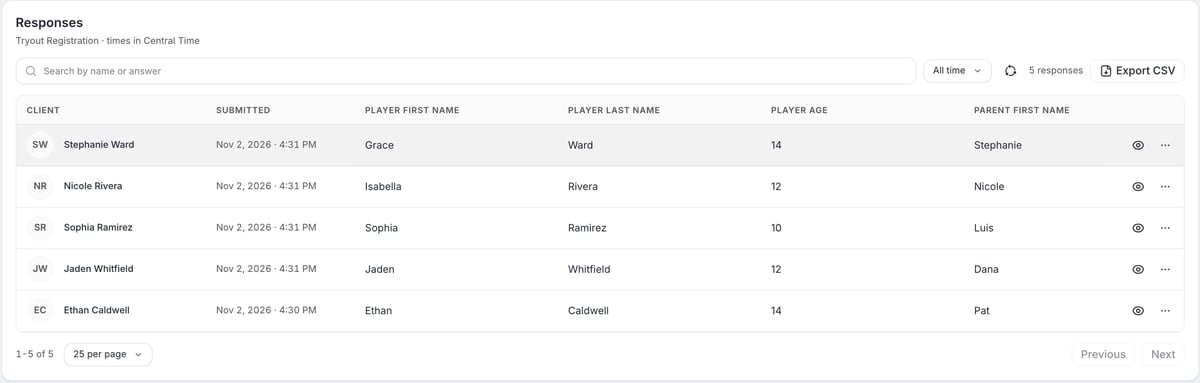
- Search by name or answer finds responses by the client’s name or anything they typed.
- The date range menu (All time) narrows the list. The count beside it shows how many responses match.
- The refresh button reloads the list. If an older response seems missing, choose All time and refresh before changing the form.
- Choose how many rows to show per page at the bottom (25 per page), and use Previous and Next to move between pages.
- A long question heading keeps its column narrow; hover over it to read the whole question.
Waiver ticks and every choice a person picked show in the table, the response and the export, and all three agree. A choice you left without a label shows as “Option 1”, “Option 2” (or “Waiver 1”).
Open one response
Click the eye icon on a row. The response opens in a side panel with:- who it’s for and, when a parent filled it in, For the child with Submitted by the parent
- Submitted with the date and time
- every answer as plain text
- a Signature block for a waiver: who agreed, when, and what they agreed to
Open a response from the calendar
When a session asks for a form, open the session on your Calendar. Each participant’s Actions menu has View form response, which opens their answers. If a session has more than one form, each entry names its form (for example View Intake response). For a repeating booking it reads View latest form response and opens their most recent answers. If they haven’t filled it in, it says No form response on file. Coaches limited to their own clients see this only for those clients.Check the connected purchase or booking
A response shows what someone typed. It doesn’t prove they paid or booked. Before you confirm a spot to a family:
Answers to a booking’s required form are saved only when the booking completes. See When the response is saved.
Export responses
Click Export CSV, then choose the responses shown (after your search and date range) or all responses. Open the file in Excel, Google Sheets or Numbers. The export includes the Registered for and Signed columns when they apply. An answer that starts with=, +, - or @ is saved in the file as text, so it can’t run as a formula when you open it.
Manage response history
- Removing a question or choice keeps its past answers readable. A question you add later is blank on earlier responses.
- On a form with Multiple responses off, a person who submits again keeps one row with their latest answers.
- Duplicating a form starts the copy with no responses. Archiving and restoring a form keeps its responses.
Delete a response
Choose Delete in the row’s … menu and confirm. Deleting one response doesn’t remove purchases, bookings, signed waivers or other responses. Export a copy first if you need it. Some responses can’t be deleted because they’re the record of something else: the response where a person first accepted a waiver, and responses linked to a purchase or booking. Delete explains why and the response stays. A later response where the person only re-ticked a waiver they’d already accepted can be deleted; their acceptance stays.Email for new submissions
When the Forms notification is on in Settings → Communication → Notifications, every submission sends you a Form Submitted email with the answers listed question by question, so you can read and reply from your own inbox. It links to the form’s Responses. File uploads come through as links. The form’s Settings tab shows whether this is on, with a Change button. See Communication settings.Responses on a client’s profile
When the person submitting has an account (they logged in, or the form doesn’t allow guests), the response is linked to their profile. Open the client in People → Clients, go to All Activity and choose the Forms filter to see every form they’ve submitted, and open one to read it. Answers you set to Save to profile field also fill in that field on their profile.Automations triggered by forms
A form can start an automation each time it’s submitted: send a message, add a tag, add credits and more. The form’s Settings tab lists the automations that use it.1
Create the automation
Go to Tools → Automations and click Create.
2
Choose the trigger
Click the When card, then Change, and choose Form Submitted.
3
Pick the form, and filter on an answer if you want
Click the Only if card, add a condition and pick the form. Once the form is picked, you can add a condition on one of its questions. Each question appears as an Answer field. Example: “How did you hear about us?” equal to “Instagram”. Checkbox, consent and waiver questions default to Contains.
4
Add the steps
Add a step such as Send an Email or Add a Tag to a User. In a message, type
# and pick a question to put that person’s answer in.5
Save, test, turn on
Click Save. New automations start off. Test it, then turn it on. See Build your first automation.
Recipes
What you can’t see yet
Forms show the number of responses and every answer, but not how many people started the form and left, or charts of the answers. Export to a spreadsheet for deeper analysis.Related articles
Build a form
Questions, design, settings and saving
Guests, payments and bookings
Who logs in, taking a payment and booking a session
Triggers and actions reference
Every trigger, condition and step, including form answers
Waivers
Track who has signed each waiver