Help Center
Office HoursCoachIQ Login
  • Start Here
    • Quickstart
  • Website
    • Website Overview
    • Pages & Templates
      • Header Navigation and Footer Editing
    • Page Sections
      • Backgrounds in Sections
      • Buttons in Sections
      • Duplicating Sections
      • Scheduling Section
      • Numbered Steps Section
      • Gallery Section
      • Logo Showcase Section
      • Forms Sections
      • Content & Media
      • Features Section
      • Pricing Section
      • Testimonies Section
      • Credibility Section
    • Connecting Your Domain
      • Purchasing a New Domain
      • Connecting a WIX domain
      • Connecting GoDaddy Domain
      • Squarespace Permission Sharing
      • Connecting Namecheap Domain
    • Analytics Tracking
    • Search Optimization
      • Google My Business
      • Apple Maps Listing
      • Keyword Strategy
      • Content Marketing
      • Link Building
    • Get a Professional Email
      • Squarespace
      • GoDaddy
  • Athlete Portal
    • Add Sessions
    • Add Products
    • Add Programs
    • Paywalling Specific Pages
    • Design your Portal
    • Personalized Athlete Portal URL
    • Edit Share Link
    • Athlete Notifications
  • Payment
    • Payment Overview
    • Creating a Product
    • Add Product to a Session
    • Add a Product to a Program
    • Add a Product to a Form
    • Coupons
    • Access Codes
    • Stripe Account
      • Create a Stripe Account
      • Stripe Payout Schedule
    • Connect your Stripe Account
    • Cancel Client Subscription
    • Failed Payment Handling
    • Add Payment Credit to a Customer's Account
    • Update Client Billing Card
    • Managing Subscriptions
    • Stripe Accounts for Multiple Locations
    • Currency Selection
    • Payment FAQ
  • Scheduling
    • Scheduling Overview
    • Create a Session
    • Manually Book Athletes
    • Recurring Bookings
    • Canceling Sessions
    • Credits System
    • Managing Athlete Credits
    • Add Auto-Reminders
    • Overlapping other Sessions
    • Adding & Managing Coaches
    • Black Out Dates
    • Schedule Avaliability
  • Inbox
    • Client Communication Overview
    • Announcements & Emails
    • In App Messaging
    • Texting Clients
      • Create Your Own Business Phone Number
      • Texting Limits & Cost
      • Setting up a Call Redirect Number
  • people
    • Client Management Overview
    • Manage Athlete Credits
    • Import Contacts
    • Adding an Admin
    • Updating User / Admin Info
    • Understanding Groups
    • Reset Password
    • Custom Fields
    • Add Waivers and Liability Forms
    • Managing Customers FAQ
  • Tools
    • Forms Overview
      • Leveraging Forms for Camps
      • Athlete Onboarding Wavier Form
      • Sharing Form Options
      • Add Payments to Forms
      • Require Login/Sign up to Forms
    • How to Create Automations in CoachIQ
      • Using Webhooks in CoachIQ
      • Integrate with Zapier
    • QR Codes in CoachIQ
  • Video
    • Media Hub Overview
      • Adding & Managing Tags
      • Sharing Media as Links
      • Uploading Media
      • Downloading Media
      • Compress Files
      • Deleting Multiple Files
      • Media Organization Examples
    • Virtual Programs Overview
      • Creating a Program
      • Sharing Programs
      • Sharing Programs Privately
      • Paywalling a Program
      • Editing Thumbnails
      • Viewing Users Stats
      • Coach Examples
    • Video Lessons Overview
      • Adding a Lesson to a Program
      • Lesson Best Practices
    • Video Analysis Overview
      • Record and Create a New Video
      • Running a Live Zoom
      • Take a Screenshot
      • Switching Clips
      • Split Screen
      • Other Coach Examples
  • Advanced
    • Migrating from Stripe Express to a Regular Stripe Account
    • Transfer from Wix Subscriptions
    • How to Launch Facebook Ads with CoachIQ
    • How to Warm Up Your Email with CoachIQ Leads
    • Personalized IOS App Benefits
    • Personalized IOS App Set Up
      • Update Apple Agreements
    • Billing Info
Powered by GitBook
On this page
  • Using the Content & Media Block in CoachIQ's Web Builder
  • Introduction
  • Use Cases for Private Sports Coaches
  • Steps to Add a Content & Media Block
  • Tips and Best Practices
  • Frequently Asked Questions
  1. Website
  2. Page Sections

Content & Media

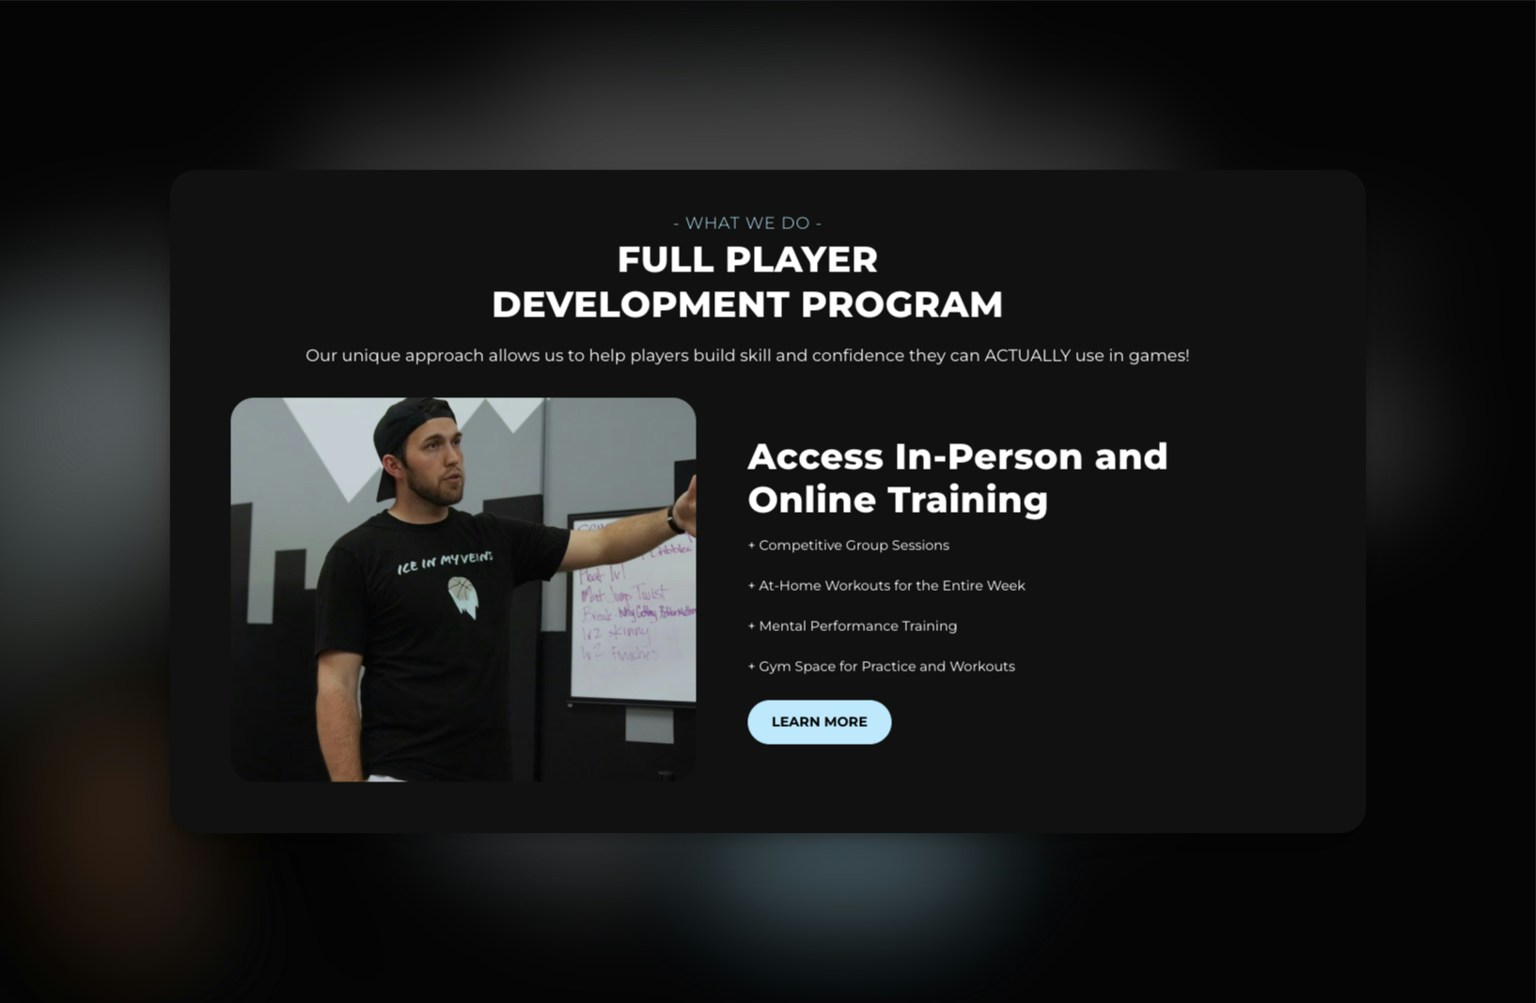
The Content & Media block in CoachIQ's web builder is a powerful feature designed to enhance your online presence. It allows you to showcase key information, images, and calls-to-action (CTAs).

PreviousForms SectionsNextFeatures Section

Last updated 6 months ago

Using the Content & Media Block in CoachIQ's Web Builder

Introduction

Whether you're a private sports coach looking to make a great first impression or promote your services, this feature can be utilized as a hero section, CTA section, or for various other purposes to drive conversions.

Use Cases for Private Sports Coaches

  1. Hero Section for Your Homepage

    • Purpose: Make a strong initial impact by highlighting your unique coaching program or training approach.

    • Example: Use an engaging photo of you coaching, along with a brief description of your expertise and a “Learn More” button linking to program details.

  2. Call-to-Action for Program Enrollment

    • Purpose: Encourage visitors to sign up for your programs or memberships.

    • Example: Display your main offerings, such as in-person and online training, with a clear CTA button like “Join Now” or “Get Started”.

  3. Feature Key Training Services

    • Purpose: Highlight the specific benefits of training with you, such as group sessions or access to gym facilities.

    • Example: Use a compelling image and list your top services with brief descriptions to attract attention.

  4. Promote Upcoming Events or Camps

    • Purpose: Announce dates and details for upcoming sports camps, clinics, or special events.

    • Example: Include a banner image, event details, and a “Sign Up” button linking to the registration page.

  5. Display Testimonials with Visual Impact

    • Purpose: Showcase testimonials or success stories from athletes or parents.

    • Example: Pair client feedback with a relevant image, adding a CTA like “See More Success Stories” to build credibility.

Steps to Add a Content & Media Block

  1. Access the Web Builder:

    • Log in to CoachIQ, navigate to your dashboard, and open the Web Builder.

  2. Select the Content & Media Block:

    • Click “Add Block” and choose “Content & Media” from the options.

  3. Upload Media:

    • Image/Video: Choose an image or video that complements your message, such as a coaching session or an athlete in action.

  4. Add Headline & Description:

    • Headline: Write a concise, attention-grabbing headline (e.g., “Full Player Development Program”).

    • Description: Provide a brief explanation of the benefits or purpose of the content.

  5. Insert a Call-to-Action Button:

    • Button Text: Customize the button text to align with your goal, such as “Learn More” or “Join Now”.

    • Link: Connect the button to the relevant page on your website.

  6. Customize Design:

    • Adjust colors, font, and alignment to match your brand style.

  7. Preview and Publish:

    • Review how the block appears on different devices, then click “Save” and “Publish” to make it live.

By effectively using the Content & Media block, you can engage visitors, highlight your unique offerings, and encourage action.

Tips and Best Practices

  • Consistency: Keep your branding consistent across all blocks to create a cohesive look.

  • Engaging Visuals: Use high-quality images and videos to capture attention.

  • Clear CTAs: Ensure your CTAs are visible and clearly lead to the next step for users.

Frequently Asked Questions

Q: Can I use multiple Content & Media blocks on a single page? A: Yes, you can use multiple blocks to highlight different aspects of your services or programs.

Q: How can I ensure my images load quickly? A: Optimize your images for web use by reducing their file size without compromising quality.