Help Center
Office HoursCoachIQ Login
  • Start Here
    • Quickstart
  • Website
    • Website Overview
    • Pages & Templates
      • Header Navigation and Footer Editing
    • Page Sections
      • Backgrounds in Sections
      • Buttons in Sections
      • Duplicating Sections
      • Scheduling Section
      • Numbered Steps Section
      • Gallery Section
      • Logo Showcase Section
      • Forms Sections
      • Content & Media
      • Features Section
      • Pricing Section
      • Testimonies Section
      • Credibility Section
    • Connecting Your Domain
      • Purchasing a New Domain
      • Connecting a WIX domain
      • Connecting GoDaddy Domain
      • Squarespace Permission Sharing
      • Connecting Namecheap Domain
    • Analytics Tracking
    • Search Optimization
      • Google My Business
      • Apple Maps Listing
      • Keyword Strategy
      • Content Marketing
      • Link Building
    • Get a Professional Email
      • Squarespace
      • GoDaddy
  • Athlete Portal
    • Add Sessions
    • Add Products
    • Add Programs
    • Paywalling Specific Pages
    • Design your Portal
    • Personalized Athlete Portal URL
    • Edit Share Link
    • Athlete Notifications
  • Payment
    • Payment Overview
    • Creating a Product
    • Add Product to a Session
    • Add a Product to a Program
    • Add a Product to a Form
    • Coupons
    • Access Codes
    • Stripe Account
      • Create a Stripe Account
      • Stripe Payout Schedule
    • Connect your Stripe Account
    • Cancel Client Subscription
    • Failed Payment Handling
    • Add Payment Credit to a Customer's Account
    • Update Client Billing Card
    • Managing Subscriptions
    • Stripe Accounts for Multiple Locations
    • Currency Selection
    • Payment FAQ
  • Scheduling
    • Scheduling Overview
    • Create a Session
    • Manually Book Athletes
    • Recurring Bookings
    • Canceling Sessions
    • Credits System
    • Managing Athlete Credits
    • Add Auto-Reminders
    • Overlapping other Sessions
    • Adding & Managing Coaches
    • Black Out Dates
    • Schedule Avaliability
  • Inbox
    • Client Communication Overview
    • Announcements & Emails
    • In App Messaging
    • Texting Clients
      • Create Your Own Business Phone Number
      • Texting Limits & Cost
      • Setting up a Call Redirect Number
  • people
    • Client Management Overview
    • Manage Athlete Credits
    • Import Contacts
    • Adding an Admin
    • Updating User / Admin Info
    • Understanding Groups
    • Reset Password
    • Custom Fields
    • Add Waivers and Liability Forms
    • Managing Customers FAQ
  • Tools
    • Forms Overview
      • Leveraging Forms for Camps
      • Athlete Onboarding Wavier Form
      • Sharing Form Options
      • Add Payments to Forms
      • Require Login/Sign up to Forms
    • How to Create Automations in CoachIQ
      • Using Webhooks in CoachIQ
      • Integrate with Zapier
    • QR Codes in CoachIQ
  • Video
    • Media Hub Overview
      • Adding & Managing Tags
      • Sharing Media as Links
      • Uploading Media
      • Downloading Media
      • Compress Files
      • Deleting Multiple Files
      • Media Organization Examples
    • Virtual Programs Overview
      • Creating a Program
      • Sharing Programs
      • Sharing Programs Privately
      • Paywalling a Program
      • Editing Thumbnails
      • Viewing Users Stats
      • Coach Examples
    • Video Lessons Overview
      • Adding a Lesson to a Program
      • Lesson Best Practices
    • Video Analysis Overview
      • Record and Create a New Video
      • Running a Live Zoom
      • Take a Screenshot
      • Switching Clips
      • Split Screen
      • Other Coach Examples
  • Advanced
    • Migrating from Stripe Express to a Regular Stripe Account
    • Transfer from Wix Subscriptions
    • How to Launch Facebook Ads with CoachIQ
    • How to Warm Up Your Email with CoachIQ Leads
    • Personalized IOS App Benefits
    • Personalized IOS App Set Up
      • Update Apple Agreements
    • Billing Info
Powered by GitBook
On this page
  • Pricing Section in the Web-builder
  • Introduction
  • Adding Products
  • Additional Notes
  • Tips and Best Practices
  • Frequently Asked Questions
  1. Website
  2. Page Sections

Pricing Section

The Pricing Options feature in CoachIQ allows you to effectively manage and showcase your products, whether custom or existing.

PreviousFeatures SectionNextTestimonies Section

Last updated 7 months ago

Pricing Section in the Web-builder

Introduction

This feature is designed to help you streamline the selling process, enhance customer experience, and maximize your revenue potential by providing flexible pricing structures.

Adding Products

CoachIQ offers two main methods to add products to your pricing section: Custom Products and Existing CoachIQ Products.
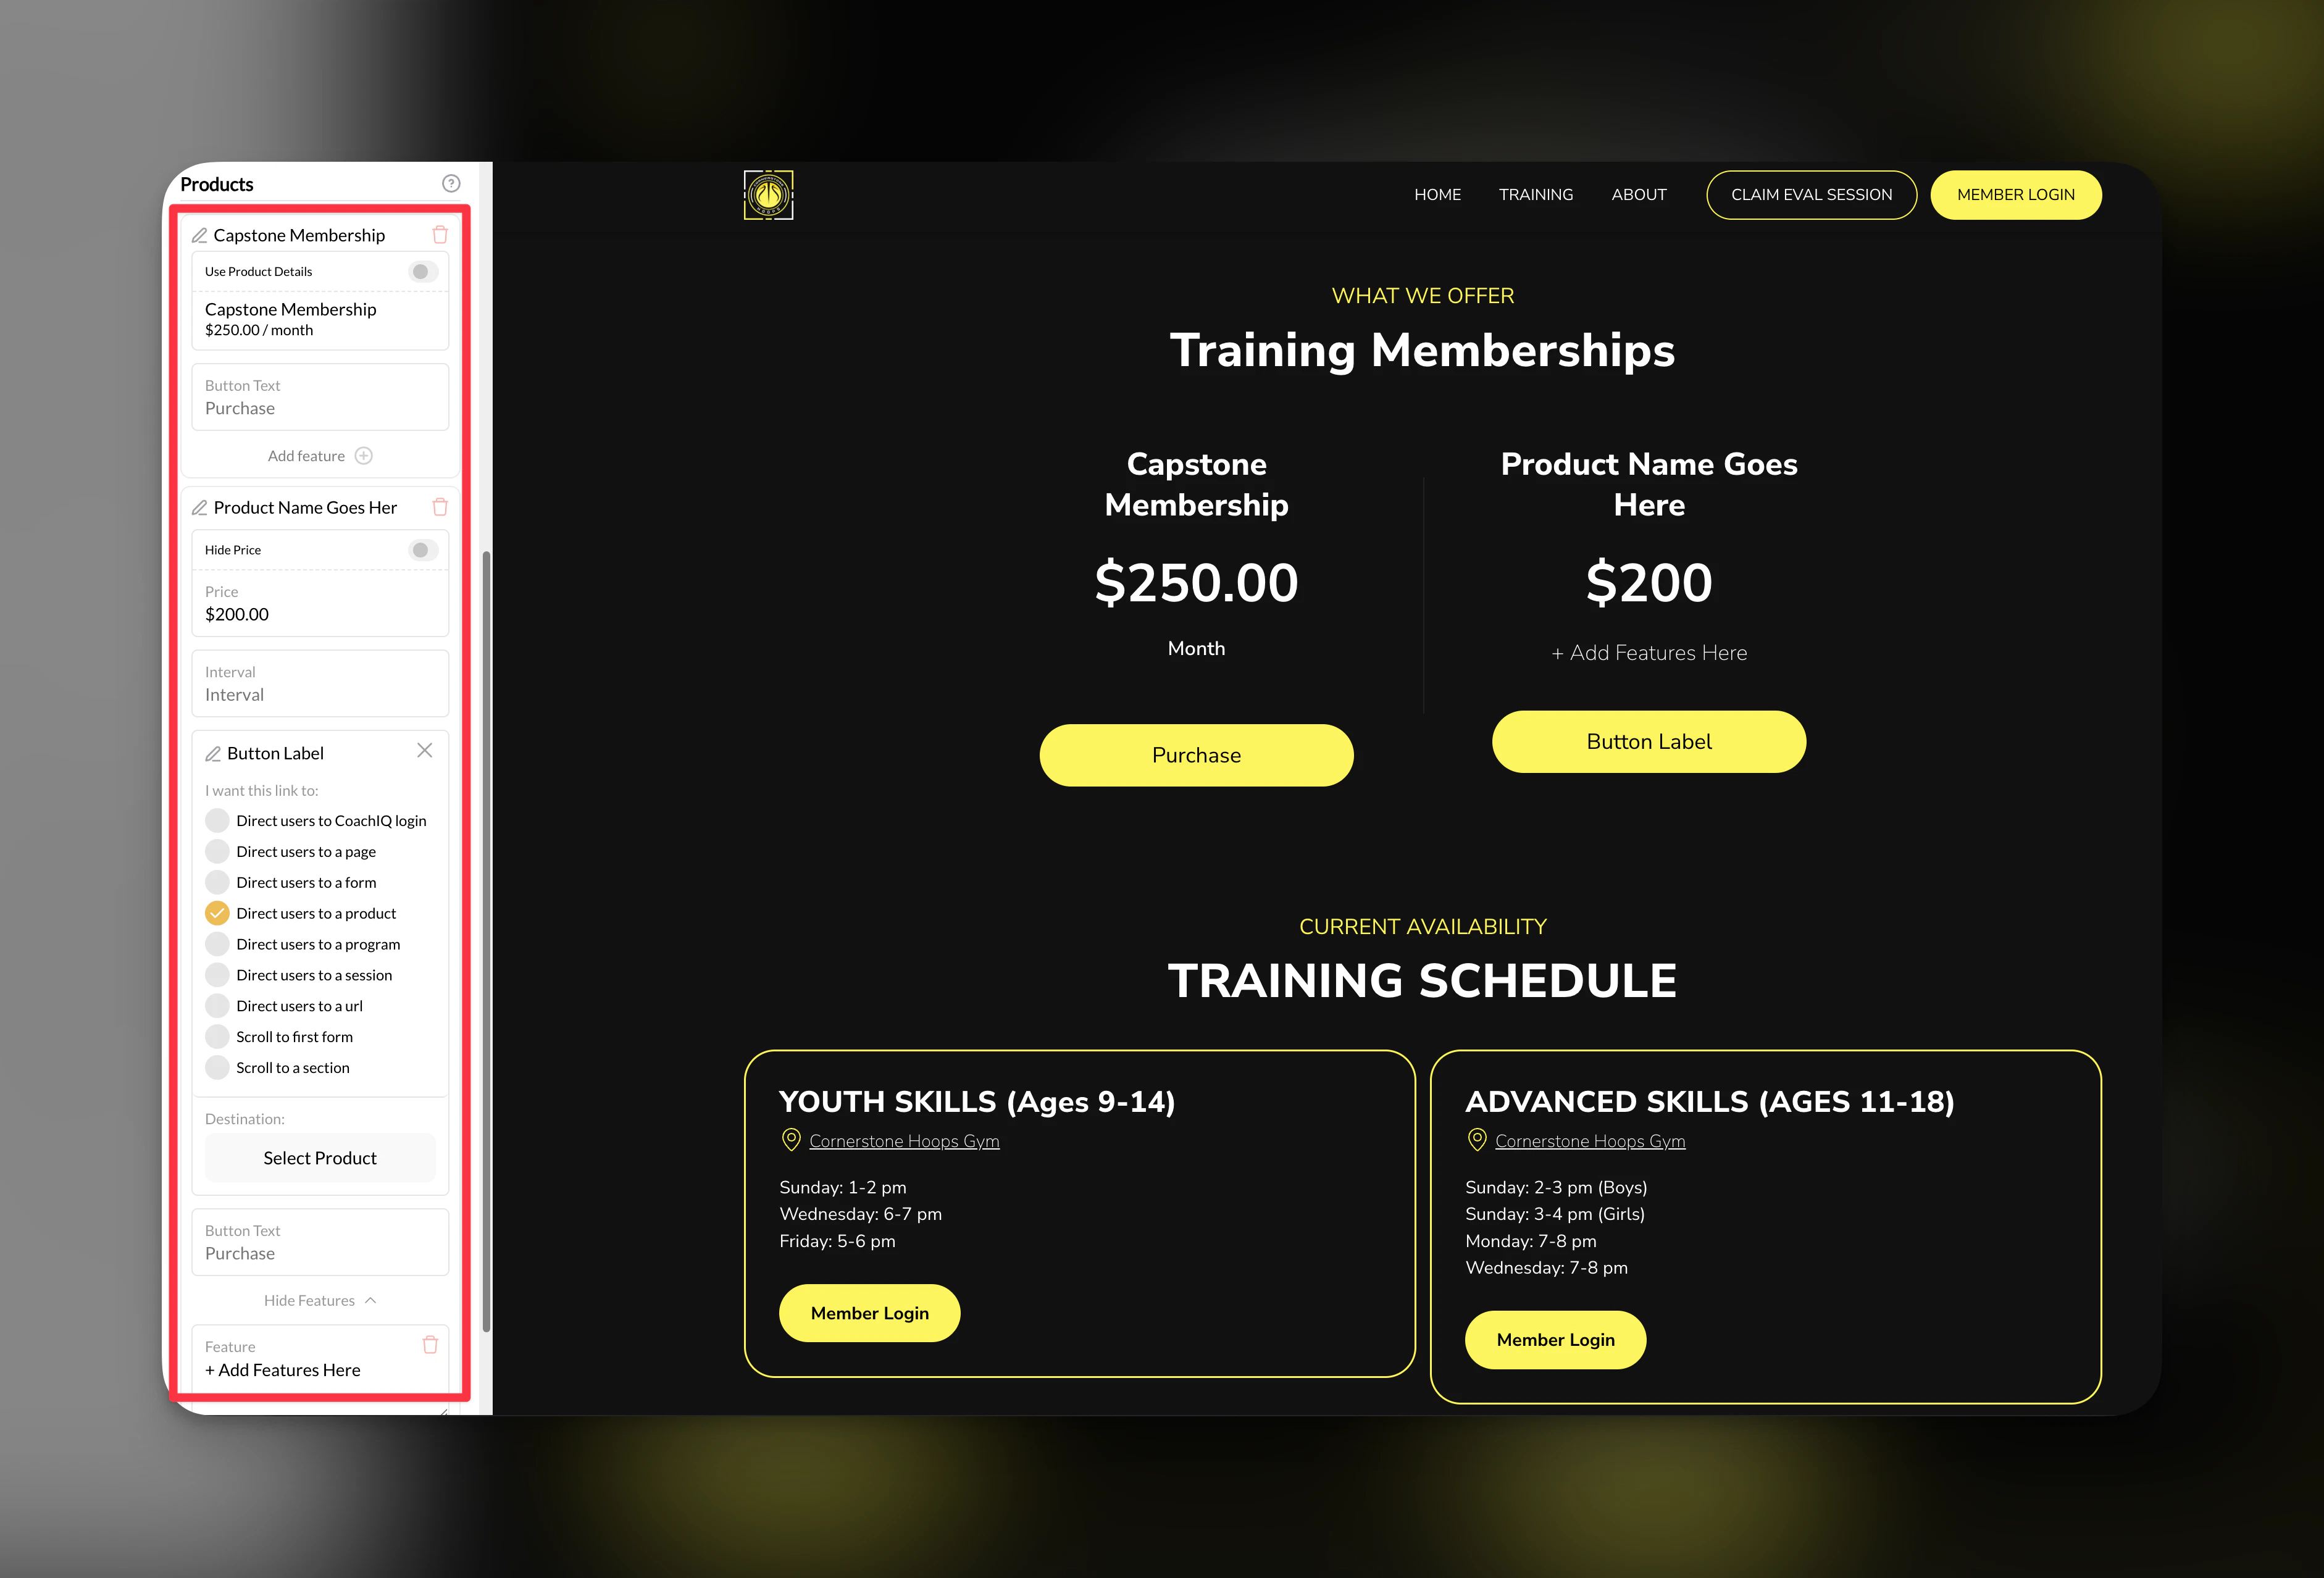
1. Custom Products

Custom Products are ideal if you sell services or items outside CoachIQ. Here’s how to add them:

  • Click the Plus Button: Initiate the process by clicking the plus button in your pricing section.

  • Select "Add Custom Product": This option is for products not sold through CoachIQ.

    • Example: In-person skills session

      • Label: Name your product, e.g., "In-person skills session".

      • Pricing Interval: Set how often pricing applies, such as per session.

      • Target URL: Enter the URL where the purchase button directs users.

      • Features: List features such as:

        • 60-minute session

        • Access to training materials

  • Flexibility: Add multiple features and as many products as needed.

2. Existing CoachIQ Products

If you’re already selling memberships or products through CoachIQ, follow these steps:

  • Click the Plus Button: Start by clicking the plus button.

  • Select "CoachIQ Product": Choose from your existing product list.

    • Automatic Features: Features are imported from your current settings.

    • Updates: Modify features as necessary to reflect current offerings.

Additional Notes

  • Structure Consistency: The pricing section retains consistent heading and subheading structures for clarity.

  • Customization: For custom products, you can specify details such as pricing intervals and target URLs.

  • Feature Import: When adding existing CoachIQ products, all associated features are automatically imported, but you have the flexibility to update them.

Tips and Best Practices

  • Regular Updates: Keep your product features and pricing intervals updated to reflect changes in your offerings.

  • Clear Descriptions: Use concise and descriptive labels for products to enhance user understanding.

  • Targeted URLs: Ensure that the target URL is accurate and leads customers to the correct purchase page.

Frequently Asked Questions

Q: Can I add multiple custom products at once? A: Yes, you can add as many custom products as you need, each with its unique features and pricing details.

Q: Are features for existing products automatically updated if I change them in CoachIQ? A: No, you’ll need to manually update the imported features if you make changes to the original product settings.